Grandma’s Old-Fashioned Cornbread: Golden, Moist, and Perfectly Sweet

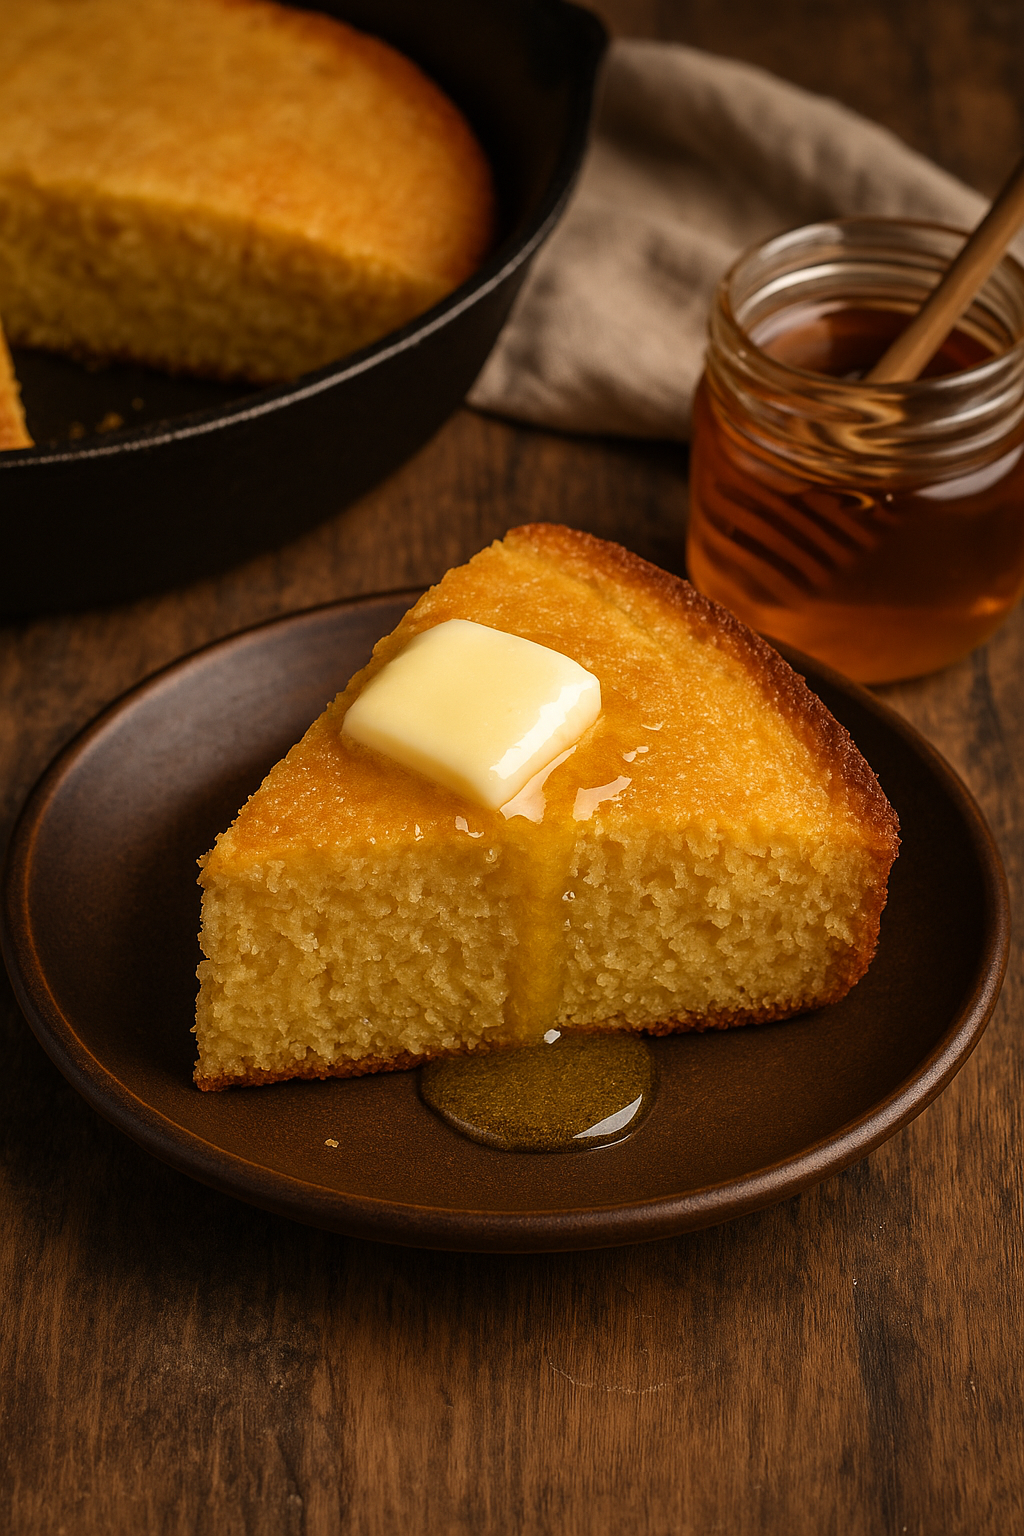
Served warm from a cast-iron skillet with a pat of butter melting on top, grandma’s cornbread was the definition of simple Southern comfort. Slightly sweet, tender in the center, and golden on the edges, it was a staple at family meals — especially with soups, stews, and chili.

In this article, you’ll learn how to make homemade cornbread the old-fashioned way, with easy steps and ingredients you already have at home.


Why You’ll Love This Cornbread

  • Made from scratch in under 30 minutes
  • Moist and tender inside, with crispy golden edges
  • Lightly sweet — perfect with both savory and sweet meals
  • Versatile: bake it in a skillet, muffin tin, or baking dish
  • Delicious served warm with honey, butter, or jam

Ingredients for Classic Cornbread

This recipe serves 8 people.

  • 1 cup cornmeal (yellow or white)
  • 1 cup all-purpose flour
  • ¼ cup granulated sugar (adjust to taste)
  • 1 tablespoon baking powder
  • ½ teaspoon salt
  • 1 cup buttermilk (or milk + lemon juice substitute)
  • 2 large eggs
  • ½ cup unsalted butter, melted (plus extra for greasing pan)

Optional Add-ins: corn kernels, shredded cheese, diced jalapeños, or chopped herbs


Step-by-Step Instructions

1. Preheat Your Oven

Preheat to 200°C (400°F).

Grease a cast iron skillet, square baking dish, or muffin pan with butter.

If using a skillet, place it in the oven to preheat — this helps create a crispy crust.


2. Mix the Dry Ingredients

In a large bowl, whisk together the cornmeal, flour, sugar, baking powder, and salt.


3. Mix the Wet Ingredients

In another bowl, combine the buttermilk, eggs, and melted butter. Stir until fully blended.


4. Combine and Pour

Pour the wet ingredients into the dry ingredients and mix until just combined.

Don’t overmix — a few lumps are fine!

Carefully pour the batter into the hot greased skillet or pan.


5. Bake

Bake for 20–25 minutes, or until the top is golden and a toothpick inserted in the center comes out clean.

Let cool for 5–10 minutes before slicing and serving.


Serving Suggestions

  • With chili, soup, or stew
  • Slathered in butter and drizzled with honey
  • Alongside fried chicken or barbecue
  • Crumbled into collard greens or beans
  • As a base for stuffing or cornbread dressing

How to Store and Reheat

Store:

  • Cover and store at room temp for up to 2 days
  • Refrigerate for up to 5 days

Reheat:

  • Microwave individual slices or reheat in oven at 175°C (350°F)

Freeze:

  • Wrap slices individually in foil or plastic and freeze for up to 2 months

Variations You Can Try

  • Southern-Style: Leave out sugar for a savory cornbread
  • Sweet Cornbread: Double the sugar or add honey
  • Cheesy Jalapeño: Mix in shredded cheddar and chopped peppers
  • Cornbread Muffins: Bake in muffin tins for about 15 minutes
  • Gluten-Free: Use gluten-free all-purpose flour blend

Grandma’s Tips for Perfect Cornbread

  • Preheat the skillet — this gives the cornbread a golden, crispy edge
  • Use real buttermilk for authentic flavor and fluffiness
  • Melt the butter and let it cool slightly before mixing
  • Don’t overbake — it should be moist in the center, not dry
  • Serve it warm — that’s when the flavor shines

Final Thoughts: A Southern Tradition in Every Slice

Whether served with stew, smothered in honey, or enjoyed straight from the skillet, grandma’s cornbread is the kind of simple, soul-satisfying food that brings people together.

Grandma’s Classic Meatloaf: Juicy, Savory, and Perfectly Baked Every Time

When it came to hearty family dinners, grandma’s meatloaf was always front and center. Juicy, flavorful, and topped with a sweet tangy glaze, it was the kind of dish that brought everyone to the table — and usually back for seconds.

This guide walks you through making traditional meatloaf from scratch, using simple ingredients and grandma’s old-fashioned method for a moist, savory loaf every time.


Why Meatloaf Is a Comfort Food Classic

  • Uses affordable, everyday ingredients
  • Easy to prep and bake in one pan
  • Feeds a whole family with plenty of leftovers
  • Customizable with herbs, vegetables, or sauces
  • Freezes and reheats beautifully

Ingredients for Grandma’s Meatloaf

This recipe makes a 9-inch loaf that serves 6–8 people.

For the Meatloaf:

  • 2 lbs (900g) ground beef (80/20 for best flavor)
  • 1 small onion, finely chopped
  • 2 cloves garlic, minced
  • ¾ cup breadcrumbs
  • ⅓ cup milk
  • 2 large eggs
  • 2 tablespoons Worcestershire sauce
  • 2 tablespoons ketchup
  • 1 teaspoon salt
  • ½ teaspoon black pepper
  • ½ teaspoon dried thyme or parsley (optional)

For the Glaze:

  • ½ cup ketchup
  • 2 tablespoons brown sugar
  • 1 tablespoon Dijon mustard or regular mustard
  • Optional: a splash of vinegar for tang

Step-by-Step Instructions

1. Preheat the Oven

Set your oven to 175°C (350°F). Line a baking sheet with parchment or lightly grease a loaf pan.


2. Prepare the Meat Mixture

In a large bowl, combine the breadcrumbs and milk. Let sit for 2–3 minutes to soak.

Add in the ground beef, chopped onion, garlic, eggs, Worcestershire sauce, ketchup, salt, pepper, and herbs.

Mix gently with your hands or a spoon until just combined. Don’t overmix — it makes the loaf tough.


3. Shape and Bake

Form the meat mixture into a loaf shape on a lined baking sheet or press gently into a loaf pan.

Bake uncovered for 40 minutes.


4. Add the Glaze

While the loaf is baking, mix the glaze ingredients in a small bowl.

After 40 minutes of baking, spread the glaze evenly on top of the meatloaf.

Return to the oven and bake for another 15–20 minutes, or until the internal temperature reaches 70°C (160°F).


5. Rest and Slice

Let the meatloaf rest for 10 minutes before slicing. This keeps it juicy and easier to serve.


Serving Suggestions

  • With mashed potatoes and green beans
  • Alongside roasted vegetables or coleslaw
  • Sliced on sandwiches with mayo and pickles
  • With a side of mac and cheese or buttered corn

Grandma’s tip: Meatloaf sandwiches the next day are even better!


Storage and Reheating

Refrigerate:

  • Store in an airtight container for up to 4 days

Reheat:

  • Microwave individual slices or reheat whole in oven at 160°C (325°F)

Freeze:

  • Wrap whole loaf or individual slices in foil and freeze up to 3 months
  • Thaw overnight in the fridge before reheating

Variations to Try

  • Cheesy Meatloaf: Add shredded cheddar or mozzarella to the mix
  • Turkey or Chicken Meatloaf: Use leaner meat and adjust moisture with extra milk or oil
  • Spicy Kick: Add hot sauce or chopped jalapeños
  • Vegetable Boost: Grate in carrots, zucchini, or mushrooms
  • BBQ Glaze: Swap ketchup glaze for your favorite BBQ sauce

Grandma’s Secrets for the Perfect Meatloaf

  • Let the breadcrumbs soak in milk — it helps keep the loaf moist
  • Don’t overwork the meat — mix just until combined
  • Bake on a baking sheet for crispier edges, or in a loaf pan for a softer texture
  • Always rest before slicing to retain juices
  • Double the glaze if you like it extra saucy

Final Thoughts: A Slice of Tradition

Grandma’s meatloaf was more than dinner — it was the heart of Sunday night meals, the comfort after long days, and a family favorite that always delivered. With this tried-and-true recipe, you can bring that same warmth and flavor to your own table — one savory slice at a time.

Grandma’s Homemade Pickles: Crisp, Tangy, and Easy to Make at Home

Long before pickles came in fancy jars from the grocery store, grandma was making her own — crunchy, vinegary, and bursting with garlic and dill. They were kept in glass jars tucked away in cool pantries, always ready to be served with sandwiches, grilled meats, or just as a salty snack.

This article teaches you how to make classic homemade pickles, grandma-style — no special equipment, no preservatives, just simple ingredients and a lot of flavor.


Why Make Your Own Pickles?

  • Incredibly easy — no canning or special tools required
  • Ready in just 24–48 hours (quick pickles!)
  • You control the flavor, crunch, and spice
  • Made with real ingredients
  • Delicious with burgers, sandwiches, charcuterie boards, and more

Ingredients for Classic Dill Pickles

This recipe makes about 2 quart-sized jars of pickles.

You’ll Need:

  • 6–8 small cucumbers (Kirby or Persian cucumbers work best)
  • 2 cups white vinegar
  • 2 cups water
  • 2 tablespoons kosher salt
  • 1 tablespoon sugar
  • 4 garlic cloves, peeled
  • 1 tablespoon black peppercorns
  • 1 tablespoon mustard seeds (optional)
  • 4–6 sprigs fresh dill
  • Optional: pinch of red pepper flakes for a spicy kick

Step-by-Step Instructions

1. Prepare the Jars

Clean and dry your jars thoroughly.

Cut cucumbers into spears, chips, or leave whole — depending on your preference and jar size.

Place fresh dill, garlic cloves, peppercorns, and mustard seeds at the bottom of each jar.

Tightly pack the cucumbers into the jars.


2. Make the Brine

In a saucepan, combine vinegar, water, salt, and sugar.

Bring to a simmer and stir until the salt and sugar are dissolved.

Remove from heat and let it cool slightly.


3. Pour the Brine

Carefully pour the warm (not hot) brine into the jars, covering the cucumbers completely.

Tap the jars gently on the counter to release air bubbles.

Seal with lids and let them cool to room temperature.


4. Refrigerate and Wait

Place jars in the refrigerator for at least 24–48 hours before eating. The longer they sit, the more flavorful they become.

They’ll stay good in the fridge for up to 1–2 months!


Serving Ideas for Grandma’s Pickles

  • With burgers, hot dogs, and sandwiches
  • On a cheese or charcuterie board
  • Chopped into potato or pasta salads
  • As a topping for tuna salad or deviled eggs
  • Just eaten cold, straight from the jar

Grandma’s tip: Save the leftover brine for pickling onions, eggs, or more cucumbers!


Flavor Variations to Try

  • Sweet Pickles: Add more sugar to the brine and reduce garlic
  • Spicy Pickles: Add sliced jalapeños or red chili flakes
  • Bread and Butter Style: Use a mix of white and apple cider vinegar, add more sugar, and include onion slices
  • Garlic Bomb: Double the garlic for a bold punch
  • Asian-Inspired: Add ginger slices and a dash of soy sauce

Storage and Shelf Life

  • Keep pickles refrigerated at all times
  • Best enjoyed within 4 weeks, though they’ll last up to 2 months if sealed properly
  • Always use clean utensils to remove pickles from the jar — no fingers!

Final Thoughts: Crunchy, Tangy, and Full of Tradition

Grandma’s pickles weren’t just snacks — they were made with care, preserved with purpose, and shared with pride. Whether packed into lunchboxes or placed in little dishes on the dinner table, they added flavor and fun to every bite.

Grandma’s Chicken and Dumplings: A Creamy Bowl of Pure Comfort

There’s no dish that says “comfort” quite like a steaming bowl of chicken and dumplings. With tender chicken, soft vegetables, a creamy broth, and fluffy dumplings floating on top, this was one of grandma’s most-loved recipes — especially on cold days or when someone needed a little extra love.

In this guide, we’ll teach you how to make homemade chicken and dumplings from scratch, just like grandma did: rich, hearty, and packed with soul.


Why This Dish Is So Special

  • A one-pot meal perfect for family dinners
  • Features tender shredded chicken and fluffy dumplings
  • The broth is creamy, flavorful, and soul-soothing
  • Made with basic ingredients and lots of love
  • A true comfort food classic for all seasons

Ingredients for Grandma’s Chicken and Dumplings

This recipe serves 6–8 people.

For the Stew:

  • 2 tablespoons butter or oil
  • 1 onion, chopped
  • 2 garlic cloves, minced
  • 3 carrots, sliced
  • 2 celery stalks, chopped
  • 4 cups chicken broth
  • 2 cups cooked shredded chicken (rotisserie or homemade)
  • 1 cup milk or half-and-half
  • 2 tablespoons all-purpose flour
  • 1 teaspoon dried thyme or poultry seasoning
  • Salt and black pepper to taste
  • Optional: 1 bay leaf or chopped parsley

For the Dumplings:

  • 1 cup all-purpose flour
  • 2 teaspoons baking powder
  • ½ teaspoon salt
  • 2 tablespoons butter, melted
  • ½ cup whole milk (plus more if needed)

Step-by-Step Instructions

1. Cook the Base

In a large pot or Dutch oven, melt the butter over medium heat.

Add the onion, garlic, carrots, and celery. Cook for about 5–6 minutes, until soft.

Sprinkle in the flour and stir for 1–2 minutes to coat the vegetables.

Slowly whisk in the chicken broth and bring to a gentle simmer.


2. Add Chicken and Seasonings

Stir in the shredded chicken, milk, thyme, salt, pepper, and bay leaf (if using).

Let the stew simmer uncovered for 10–15 minutes until it thickens slightly.


3. Make the Dumplings

In a bowl, whisk together the flour, baking powder, and salt.

Add the melted butter and milk, stirring just until combined — don’t overmix.

The dough should be thick but spoonable.


4. Add the Dumplings

Drop spoonfuls of dumpling dough (about a tablespoon each) on top of the simmering stew.

Cover with a lid and let cook on low heat for 15 minutes — do not lift the lid during this time.

The dumplings will puff up and steam until fluffy.


5. Serve Hot

Remove the bay leaf, if used. Taste and adjust seasoning.

Serve warm in deep bowls, topped with fresh parsley or a pat of butter if desired.


Tips for Success

  • Use rotisserie chicken for ease, or boil your own with aromatics
  • Don’t uncover the pot while dumplings cook — steam is key!
  • Add peas or corn for extra texture and color
  • If stew gets too thick, add a splash of milk or broth to loosen
  • For richer flavor, stir in a bit of cream at the end

Variations You’ll Love

  • Creamy Herb Dumplings: Add chopped chives or parsley to the dumpling mix
  • Cheesy Dumplings: Mix in shredded cheddar or parmesan
  • Spicy Twist: Add crushed red pepper or hot sauce to the stew base
  • Veggie Boost: Stir in spinach or kale at the end
  • Gluten-Free Option: Use a gluten-free flour blend for both stew and dumplings

Storage and Reheating

Store:

  • Refrigerate leftovers in an airtight container for up to 4 days

Reheat:

  • Gently on the stovetop with a splash of broth or milk
  • Microwave in short bursts, covered with a damp paper towel

Freeze:

  • Best to freeze the stew base without dumplings, then add fresh dumplings when reheating

Final Thoughts: A Bowl Full of Love

Grandma’s chicken and dumplings weren’t just warm and hearty — they were healing, the kind of food that made you feel cared for with every bite. From the fluffy dumplings to the creamy, savory stew, this dish brings comfort straight to the heart.

Now it’s your turn to bring that kind of care and comfort to your kitchen — one spoonful at a time.

Grandma’s Buttermilk Pancakes: Fluffy, Golden, and Made from Scratch

Waking up to the smell of pancakes sizzling on grandma’s griddle was a tradition that made any morning special. Her buttermilk pancakes were soft, fluffy, and perfectly golden — served hot with melted butter and real maple syrup.

In this guide, you’ll learn how to make the ultimate homemade pancakes, just like grandma did: no boxed mix, just real ingredients and a few simple steps for perfect results every time.


Why These Pancakes Are So Loved

  • Incredibly fluffy and light thanks to buttermilk
  • Made from scratch with everyday ingredients
  • Ready in just 20 minutes
  • Perfect for weekend breakfasts, brunches, or even breakfast-for-dinner
  • Easily customizable with berries, chocolate chips, or spices

Ingredients for Grandma’s Buttermilk Pancakes

This recipe makes about 10–12 medium pancakes.

  • 2 cups all-purpose flour
  • 2 tablespoons sugar
  • 1 teaspoon baking soda
  • 2 teaspoons baking powder
  • ½ teaspoon salt
  • 2 cups buttermilk (or substitute below)
  • 2 large eggs
  • ¼ cup unsalted butter, melted
  • 1 teaspoon vanilla extract (optional)
  • Butter or oil for cooking

Buttermilk Substitute:

  • 2 cups milk + 2 tablespoons lemon juice or vinegar
  • Let sit for 5–10 minutes until slightly curdled

Step-by-Step Instructions

1. Mix the Dry Ingredients

In a large bowl, whisk together the flour, sugar, baking powder, baking soda, and salt.


2. Mix the Wet Ingredients

In another bowl, beat the eggs. Add the buttermilk, melted butter, and vanilla. Mix until well combined.


3. Combine Wet and Dry

Pour the wet ingredients into the dry ingredients.

Stir gently until just combined — a few lumps are okay! Don’t overmix or the pancakes will be tough.


4. Preheat the Griddle or Pan

Heat a skillet or griddle over medium heat. Add a bit of butter or oil to coat the surface.


5. Cook the Pancakes

Pour about ¼ cup of batter per pancake onto the hot surface.

Cook for 2–3 minutes, or until bubbles form on the surface and the edges look set. Flip and cook for another 1–2 minutes until golden brown.

Keep warm in a low oven while you finish the batch.


Serving Suggestions

  • With real maple syrup and butter
  • Topped with fresh berries and whipped cream
  • With banana slices and chopped nuts
  • Spread with jam, peanut butter, or honey
  • Rolled with fruit and yogurt for a breakfast wrap

Grandma’s Favorite: A little butter, a splash of syrup, and a smile.


Tips for Perfect Pancakes

  • Don’t overmix the batter — lumps are fine!
  • Let the batter rest for 5 minutes before cooking
  • Use medium heat to avoid burning
  • Wipe the skillet between batches to prevent sticking
  • For crispy edges, use a bit of extra butter on the griddle

Variations You’ll Love

  • Blueberry Pancakes: Add fresh or frozen blueberries to the batter
  • Chocolate Chip Pancakes: Mix in mini chocolate chips
  • Pumpkin Spice Pancakes: Add ½ cup pumpkin puree and spices
  • Lemon Ricotta Pancakes: Swap some buttermilk for ricotta and add lemon zest
  • Whole Wheat Pancakes: Replace half the flour with whole wheat flour

How to Store and Reheat

Store:

  • Let pancakes cool completely, then refrigerate in an airtight container for up to 4 days

Freeze:

  • Stack with parchment between and freeze for up to 2 months

Reheat:

  • Microwave: Heat in 15–20 second bursts
  • Toaster: Great for getting the edges crispy again
  • Oven: Bake at 175°C (350°F) for 5–10 minutes

Final Thoughts: A Breakfast That Feels Like Home

Grandma’s buttermilk pancakes weren’t just about starting the day with a full belly — they were about starting it with joy, comfort, and the kind of flavor you never forget.

Now you can bring that magic into your own kitchen — with every golden, buttery, fluffy bite.

Grandma’s Apple Crisp: Warm, Spiced, and Topped with Buttery Crumble

Few things say “home” like a warm dish of apple crisp coming out of the oven. With tender spiced apples, a crispy oat topping, and that unmistakable aroma of cinnamon and butter, grandma’s apple crisp was a dessert you never had to wait for a special occasion to enjoy — just a few ripe apples and a little love.

In this guide, you’ll learn how to make the perfect apple crisp, just like grandma did — rustic, simple, and absolutely satisfying.


Why Apple Crisp Is a Timeless Favorite

  • Easier and faster than apple pie — no crust needed
  • Made with simple pantry ingredients
  • Perfect for using seasonal apples
  • Best served warm with vanilla ice cream or whipped cream
  • A true comfort dessert that feeds the soul

Ingredients for Grandma’s Apple Crisp

This recipe serves 6–8 people.

For the Filling:

  • 6 medium apples (Granny Smith, Honeycrisp, or a mix), peeled and sliced
  • 2 tablespoons granulated sugar
  • 2 tablespoons brown sugar
  • 1 tablespoon all-purpose flour
  • 1 teaspoon ground cinnamon
  • ¼ teaspoon ground nutmeg
  • 1 teaspoon lemon juice

For the Topping:

  • ¾ cup rolled oats
  • ¾ cup all-purpose flour
  • ½ cup brown sugar
  • ½ cup unsalted butter, cold and cubed
  • ¼ teaspoon salt
  • Optional: ½ teaspoon cinnamon or chopped nuts for added texture

Step-by-Step Instructions

1. Preheat the Oven

Set your oven to 175°C (350°F) and lightly butter a 9×9-inch baking dish or similar.


2. Prepare the Apple Filling

In a large mixing bowl, toss the sliced apples with sugar, brown sugar, flour, cinnamon, nutmeg, and lemon juice.

Pour the apple mixture into the prepared baking dish and spread evenly.


3. Make the Crisp Topping

In another bowl, mix oats, flour, brown sugar, salt, and cinnamon.

Cut in the cold butter using a pastry cutter or your fingertips until the mixture resembles coarse crumbs.

Sprinkle the topping evenly over the apples.


4. Bake

Bake for 40–45 minutes, or until the topping is golden brown and the apples are tender and bubbling.

Let cool for at least 10–15 minutes before serving — this allows the filling to set slightly.


Serving Suggestions

  • Warm with a scoop of vanilla ice cream
  • Drizzled with caramel sauce
  • Served cold for breakfast with a dollop of Greek yogurt
  • With whipped cream and a sprinkle of cinnamon

Grandma’s Favorite: A warm bowl of apple crisp with milk poured over the top — old-fashioned and delicious!


Storage and Reheating Tips

Store:

  • Cover and refrigerate for up to 4 days

Reheat:

  • Oven: Warm at 160°C (325°F) for 10–15 minutes
  • Microwave: Heat individual portions in short intervals

Freeze:

  • Freeze after baking (cooled) for up to 3 months
  • Thaw in the fridge overnight and reheat before serving

Delicious Variations

  • Apple-Pear Crisp: Replace half the apples with ripe pears
  • Maple Apple Crisp: Add 2 tablespoons of maple syrup to the filling
  • Berry Apple Crisp: Mix in fresh or frozen berries with the apples
  • Coconut-Oat Topping: Add shredded coconut to the topping for extra texture
  • Gluten-Free Version: Use gluten-free flour and oats

Grandma’s Tips for the Perfect Apple Crisp

  • Use tart apples like Granny Smith for balance
  • Slice apples evenly so they cook at the same rate
  • Don’t skip the lemon juice — it brightens the flavor
  • Use real butter for the richest, crunchiest topping
  • Let it rest before serving — this helps the juices settle

Final Thoughts: A Rustic Treat with Heart

Grandma’s apple crisp wasn’t fancy — and that’s exactly what made it so special. No need for perfection, just ripe fruit, cozy spices, and a golden, buttery topping that brought everyone back for seconds.

Now it’s your turn to carry on that tradition with a dessert that’s as comforting as it is delicious.

Grandma’s Classic Banana Bread: Moist, Sweet, and Made with Ripe Bananas

There’s something timeless and healing about a big pot of hot, homemade vegetable soup. No matter the season or occasion, grandma’s classic vegetable soup was always there to comfort — whether you were sick, sad, cold, or just hungry. Full of color, flavor, and simple ingredients, it was her way of saying, “Everything will be alright.”

In this article, you’ll learn how to recreate that old-fashioned vegetable soup that simmered gently on grandma’s stove — loaded with fresh vegetables, tender potatoes, and just the right seasoning.

Why This Soup Is So Special

Unlike fancy modern recipes or pre-packaged mixes, grandma’s vegetable soup was:

  • Flexible — she used whatever was in the fridge or garden
  • Nourishing — packed with real ingredients, vitamins, and fiber
  • Fragrant and slow-cooked — building layers of flavor over time
  • Easy to make in big batches for family dinners or freezing later

Best of all, it made the whole house smell like home.

Ingredients You’ll Need

This recipe serves 6–8 hearty portions.

Base Vegetables:

  • 2 tablespoons olive oil or butter
  • 1 medium onion, chopped
  • 2 garlic cloves, minced
  • 2 celery stalks, diced
  • 3 large carrots, peeled and sliced
  • 2 medium potatoes, cubed
  • 1 zucchini, diced
  • 1 cup green beans, chopped
  • 1 cup corn kernels (fresh or frozen)
  • 1 cup green peas (fresh or frozen)
  • 1 can diced tomatoes (400g / 14oz)

Broth and Seasonings:

  • 6 cups vegetable broth or water
  • 1 bay leaf
  • 1 teaspoon dried thyme
  • Salt and pepper to taste
  • Optional: 1 teaspoon smoked paprika or a pinch of chili flakes for warmth

Add-ins and Variations:

  • 1 cup shredded cabbage or kale
  • 1 can of beans (kidney, white, or chickpeas), drained
  • Small pasta (like elbow or ditalini), cooked separately
  • Fresh parsley or basil for garnish
  • Parmesan rind during cooking for extra flavor (optional)

Step-by-Step Instructions

1. Sauté the Base

Heat the oil or butter in a large pot over medium heat. Add the onions and cook until translucent. Stir in the garlic, celery, and carrots. Sauté for about 5–7 minutes until slightly softened.

2. Add the Broth and Hearty Veggies

Add the potatoes, tomatoes (with juice), bay leaf, thyme, and broth. Bring everything to a gentle boil.

Reduce heat and simmer for 20–25 minutes, or until the potatoes and carrots are nearly tender.

Grandma’s Tip: Keep the lid partially on for a richer broth.

3. Add the Remaining Vegetables

Add the green beans, zucchini, corn, and peas. Simmer for another 10–15 minutes, until all the vegetables are soft but not mushy.

If adding beans, leafy greens, or cooked pasta, stir them in now and cook for just a few minutes more.

4. Taste and Adjust

Season with salt and pepper to taste. Add any optional flavor boosts like paprika or chili flakes. Remove bay leaf before serving.

5. Let It Rest

Remove the soup from heat and let it sit for 5–10 minutes before serving. This allows the flavors to meld and deepen — grandma always insisted on this step.

What Makes This Recipe So Flexible?

One of the best things about grandma’s vegetable soup is how adaptable it is:

  • Out of peas? Add broccoli florets.
  • No potatoes? Try sweet potatoes, turnips, or pasta.
  • No broth? Use water and season generously.
  • No fresh veggies? Frozen works too.

This was a “use what you have” recipe — and it always worked.

How to Serve

Grandma’s vegetable soup was often the main course — simple, hearty, and served with:

  • Crusty bread or toast with butter
  • Homemade cornbread or cheese biscuits
  • White rice or noodles on the side
  • A sprinkle of grated Parmesan or cheddar on top

It’s also great as a starter for larger meals or packed in a thermos for school and work lunches.

How to Store and Reheat

Storage:

  • Let the soup cool completely.
  • Store in an airtight container in the fridge for up to 5 days.
  • Or freeze for up to 3 months — perfect for busy weeks!

Reheating:

  • Reheat gently on the stovetop over medium-low heat.
  • Add a splash of water or broth if it thickens too much in the fridge.
  • Stir often and taste before serving.

Grandma’s Tips for the Best Soup Every Time

  • Layer the flavors by adding vegetables in stages.
  • Don’t skip the garlic and onion — they are the aromatic base.
  • Use fresh herbs at the end for brightness.
  • Taste as you go — add salt gradually and adjust at the end.
  • Let it simmer slowly — never rush a good pot of soup.

The Power of a Pot of Soup

This isn’t just soup. It’s:

  • What you ate after playing outside in the cold
  • What grandma made when someone was sick
  • What filled the house with warmth on Sunday evenings
  • What taught you that simple food can be the most satisfying

A pot of vegetable soup is a pot of care, tradition, and nourishment.

Final Thoughts: A Bowl Full of Memories

Recreating grandma’s vegetable soup isn’t about perfection — it’s about comfort. It’s about taking what you have, adding love, and letting it simmer into something beautiful.

This recipe brings warmth to your kitchen and your heart, one bowl at a time.