Grandma’s Classic Meatloaf: Juicy, Savory, and Perfectly Baked Every Time

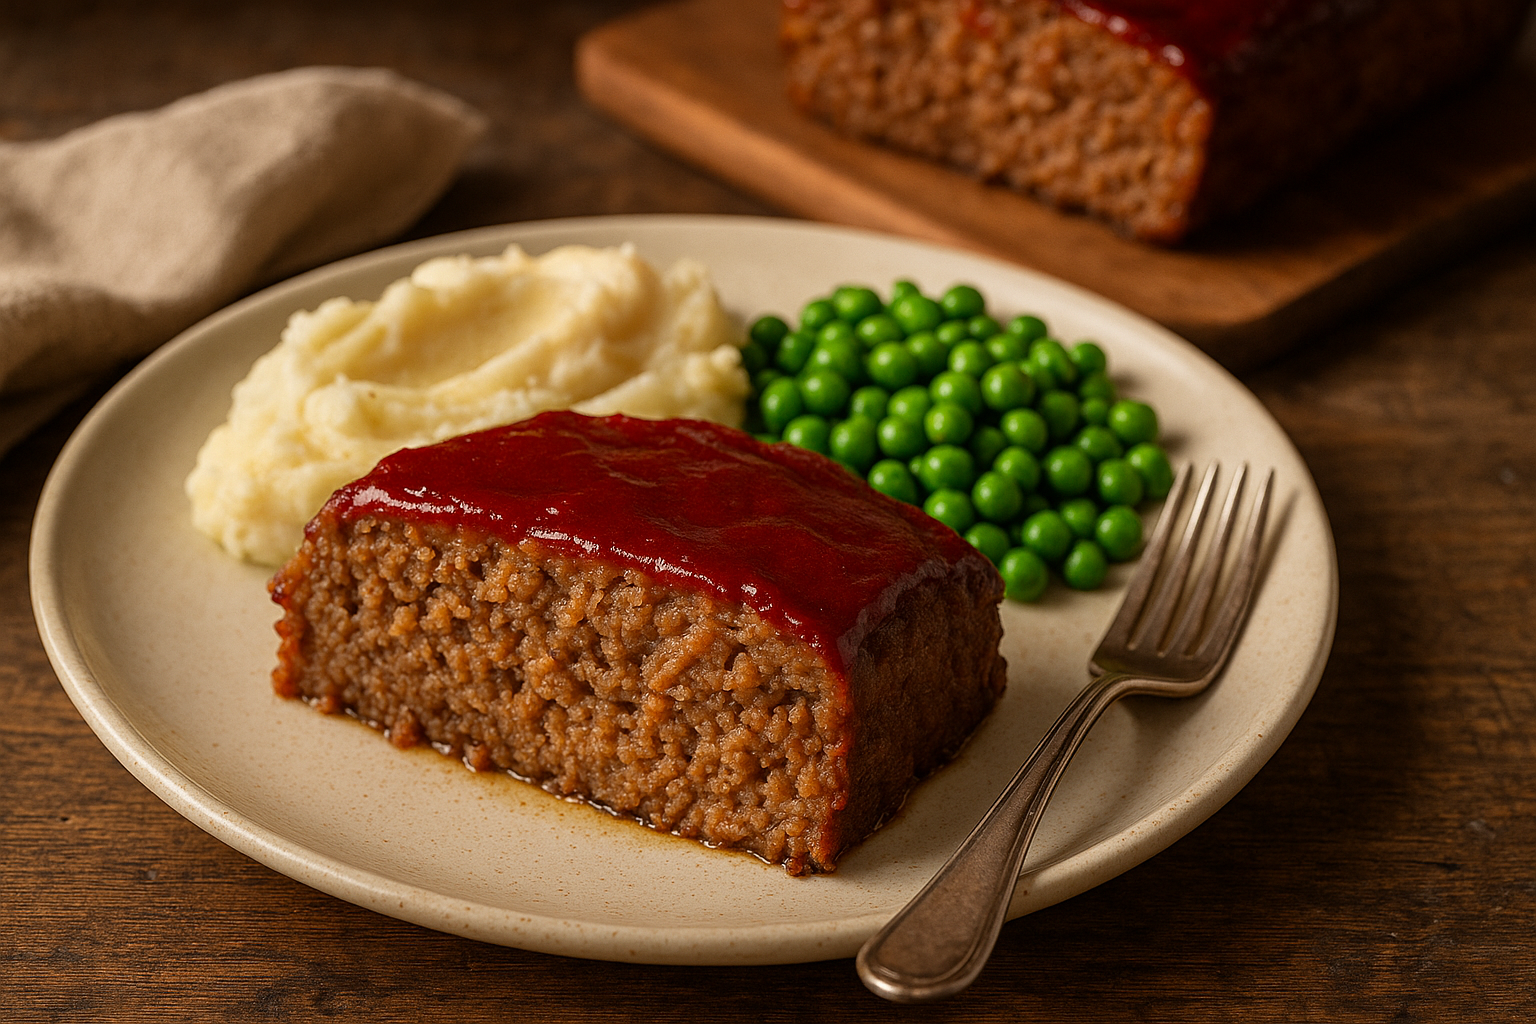
When it came to hearty family dinners, grandma’s meatloaf was always front and center. Juicy, flavorful, and topped with a sweet tangy glaze, it was the kind of dish that brought everyone to the table — and usually back for seconds.

This guide walks you through making traditional meatloaf from scratch, using simple ingredients and grandma’s old-fashioned method for a moist, savory loaf every time.


Why Meatloaf Is a Comfort Food Classic

  • Uses affordable, everyday ingredients
  • Easy to prep and bake in one pan
  • Feeds a whole family with plenty of leftovers
  • Customizable with herbs, vegetables, or sauces
  • Freezes and reheats beautifully

Ingredients for Grandma’s Meatloaf

This recipe makes a 9-inch loaf that serves 6–8 people.

For the Meatloaf:

  • 2 lbs (900g) ground beef (80/20 for best flavor)
  • 1 small onion, finely chopped
  • 2 cloves garlic, minced
  • ¾ cup breadcrumbs
  • ⅓ cup milk
  • 2 large eggs
  • 2 tablespoons Worcestershire sauce
  • 2 tablespoons ketchup
  • 1 teaspoon salt
  • ½ teaspoon black pepper
  • ½ teaspoon dried thyme or parsley (optional)

For the Glaze:

  • ½ cup ketchup
  • 2 tablespoons brown sugar
  • 1 tablespoon Dijon mustard or regular mustard
  • Optional: a splash of vinegar for tang

Step-by-Step Instructions

1. Preheat the Oven

Set your oven to 175°C (350°F). Line a baking sheet with parchment or lightly grease a loaf pan.


2. Prepare the Meat Mixture

In a large bowl, combine the breadcrumbs and milk. Let sit for 2–3 minutes to soak.

Add in the ground beef, chopped onion, garlic, eggs, Worcestershire sauce, ketchup, salt, pepper, and herbs.

Mix gently with your hands or a spoon until just combined. Don’t overmix — it makes the loaf tough.


3. Shape and Bake

Form the meat mixture into a loaf shape on a lined baking sheet or press gently into a loaf pan.

Bake uncovered for 40 minutes.


4. Add the Glaze

While the loaf is baking, mix the glaze ingredients in a small bowl.

After 40 minutes of baking, spread the glaze evenly on top of the meatloaf.

Return to the oven and bake for another 15–20 minutes, or until the internal temperature reaches 70°C (160°F).


5. Rest and Slice

Let the meatloaf rest for 10 minutes before slicing. This keeps it juicy and easier to serve.


Serving Suggestions

  • With mashed potatoes and green beans
  • Alongside roasted vegetables or coleslaw
  • Sliced on sandwiches with mayo and pickles
  • With a side of mac and cheese or buttered corn

Grandma’s tip: Meatloaf sandwiches the next day are even better!


Storage and Reheating

Refrigerate:

  • Store in an airtight container for up to 4 days

Reheat:

  • Microwave individual slices or reheat whole in oven at 160°C (325°F)

Freeze:

  • Wrap whole loaf or individual slices in foil and freeze up to 3 months
  • Thaw overnight in the fridge before reheating

Variations to Try

  • Cheesy Meatloaf: Add shredded cheddar or mozzarella to the mix
  • Turkey or Chicken Meatloaf: Use leaner meat and adjust moisture with extra milk or oil
  • Spicy Kick: Add hot sauce or chopped jalapeños
  • Vegetable Boost: Grate in carrots, zucchini, or mushrooms
  • BBQ Glaze: Swap ketchup glaze for your favorite BBQ sauce

Grandma’s Secrets for the Perfect Meatloaf

  • Let the breadcrumbs soak in milk — it helps keep the loaf moist
  • Don’t overwork the meat — mix just until combined
  • Bake on a baking sheet for crispier edges, or in a loaf pan for a softer texture
  • Always rest before slicing to retain juices
  • Double the glaze if you like it extra saucy

Final Thoughts: A Slice of Tradition

Grandma’s meatloaf was more than dinner — it was the heart of Sunday night meals, the comfort after long days, and a family favorite that always delivered. With this tried-and-true recipe, you can bring that same warmth and flavor to your own table — one savory slice at a time.

Grandma’s Apple Crisp: Warm, Spiced, and Topped with Buttery Crumble

Few things say “home” like a warm dish of apple crisp coming out of the oven. With tender spiced apples, a crispy oat topping, and that unmistakable aroma of cinnamon and butter, grandma’s apple crisp was a dessert you never had to wait for a special occasion to enjoy — just a few ripe apples and a little love.

In this guide, you’ll learn how to make the perfect apple crisp, just like grandma did — rustic, simple, and absolutely satisfying.


Why Apple Crisp Is a Timeless Favorite

  • Easier and faster than apple pie — no crust needed
  • Made with simple pantry ingredients
  • Perfect for using seasonal apples
  • Best served warm with vanilla ice cream or whipped cream
  • A true comfort dessert that feeds the soul

Ingredients for Grandma’s Apple Crisp

This recipe serves 6–8 people.

For the Filling:

  • 6 medium apples (Granny Smith, Honeycrisp, or a mix), peeled and sliced
  • 2 tablespoons granulated sugar
  • 2 tablespoons brown sugar
  • 1 tablespoon all-purpose flour
  • 1 teaspoon ground cinnamon
  • ¼ teaspoon ground nutmeg
  • 1 teaspoon lemon juice

For the Topping:

  • ¾ cup rolled oats
  • ¾ cup all-purpose flour
  • ½ cup brown sugar
  • ½ cup unsalted butter, cold and cubed
  • ¼ teaspoon salt
  • Optional: ½ teaspoon cinnamon or chopped nuts for added texture

Step-by-Step Instructions

1. Preheat the Oven

Set your oven to 175°C (350°F) and lightly butter a 9×9-inch baking dish or similar.


2. Prepare the Apple Filling

In a large mixing bowl, toss the sliced apples with sugar, brown sugar, flour, cinnamon, nutmeg, and lemon juice.

Pour the apple mixture into the prepared baking dish and spread evenly.


3. Make the Crisp Topping

In another bowl, mix oats, flour, brown sugar, salt, and cinnamon.

Cut in the cold butter using a pastry cutter or your fingertips until the mixture resembles coarse crumbs.

Sprinkle the topping evenly over the apples.


4. Bake

Bake for 40–45 minutes, or until the topping is golden brown and the apples are tender and bubbling.

Let cool for at least 10–15 minutes before serving — this allows the filling to set slightly.


Serving Suggestions

  • Warm with a scoop of vanilla ice cream
  • Drizzled with caramel sauce
  • Served cold for breakfast with a dollop of Greek yogurt
  • With whipped cream and a sprinkle of cinnamon

Grandma’s Favorite: A warm bowl of apple crisp with milk poured over the top — old-fashioned and delicious!


Storage and Reheating Tips

Store:

  • Cover and refrigerate for up to 4 days

Reheat:

  • Oven: Warm at 160°C (325°F) for 10–15 minutes
  • Microwave: Heat individual portions in short intervals

Freeze:

  • Freeze after baking (cooled) for up to 3 months
  • Thaw in the fridge overnight and reheat before serving

Delicious Variations

  • Apple-Pear Crisp: Replace half the apples with ripe pears
  • Maple Apple Crisp: Add 2 tablespoons of maple syrup to the filling
  • Berry Apple Crisp: Mix in fresh or frozen berries with the apples
  • Coconut-Oat Topping: Add shredded coconut to the topping for extra texture
  • Gluten-Free Version: Use gluten-free flour and oats

Grandma’s Tips for the Perfect Apple Crisp

  • Use tart apples like Granny Smith for balance
  • Slice apples evenly so they cook at the same rate
  • Don’t skip the lemon juice — it brightens the flavor
  • Use real butter for the richest, crunchiest topping
  • Let it rest before serving — this helps the juices settle

Final Thoughts: A Rustic Treat with Heart

Grandma’s apple crisp wasn’t fancy — and that’s exactly what made it so special. No need for perfection, just ripe fruit, cozy spices, and a golden, buttery topping that brought everyone back for seconds.

Now it’s your turn to carry on that tradition with a dessert that’s as comforting as it is delicious.