How to Make Grandma’s Apple Cinnamon Cake: A Moist, Fragrant Slice of Home

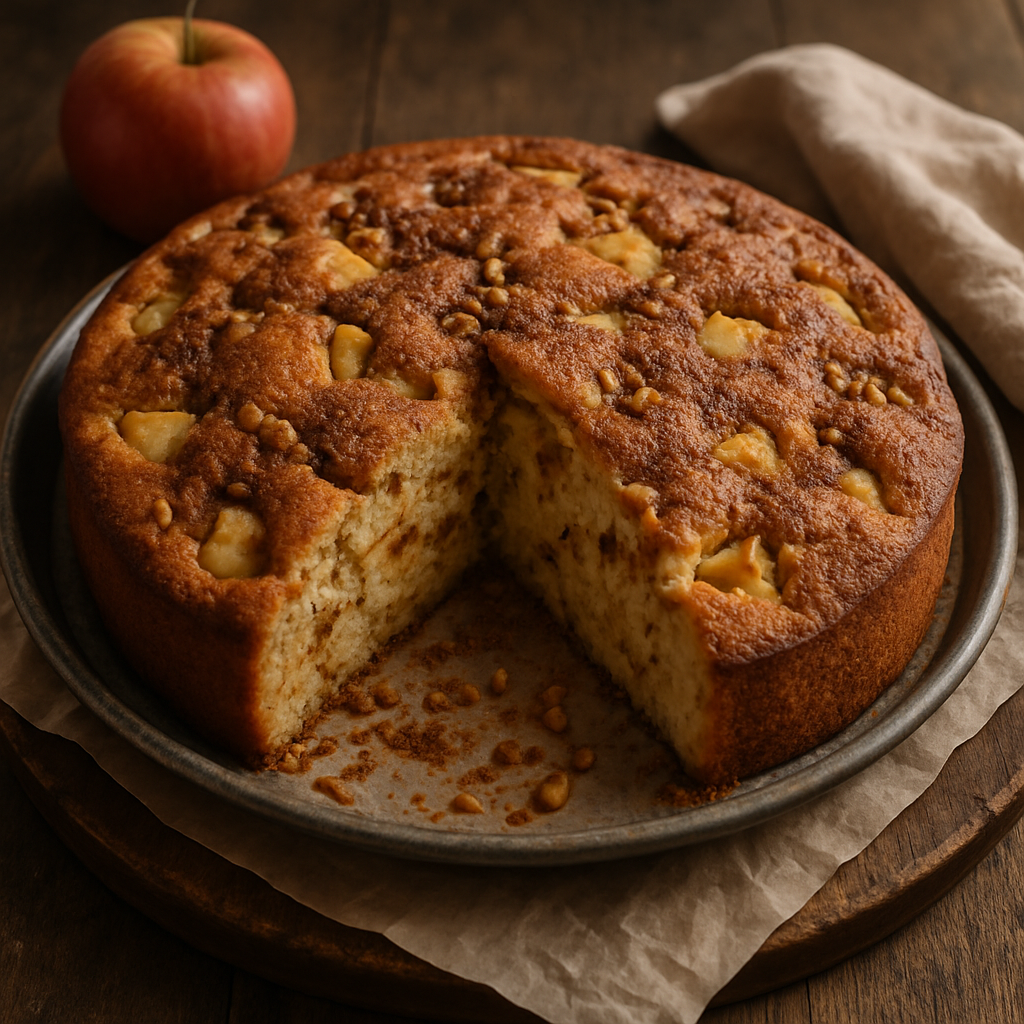
When the scent of cinnamon and baked apples fills the kitchen, you know something special is in the oven. Few things capture the essence of homemade comfort like grandma’s apple cinnamon cake — soft, buttery, and bursting with warm spice and juicy apple chunks. It’s the kind of cake you remember forever.

Whether it was served on a quiet afternoon or placed proudly at the center of the table during family gatherings, this cake always brought people together. In this guide, we’ll walk you through how to recreate grandma’s beloved recipe — a timeless classic that’s perfect year-round.

Why Apple Cinnamon Cake Is a Timeless Favorite

Apple cinnamon cake isn’t just another dessert — it’s a hug in every slice. It’s:

  • Moist and rich without being too sweet
  • Perfectly spiced and aromatic
  • Easy to make with basic ingredients
  • Ideal for any time of day — breakfast, snack, or dessert

Grandma’s version was especially magical. She didn’t need icing or fancy decorations. Just ripe apples, a pinch of cinnamon, and a whole lot of love.

Ingredients You’ll Need

This recipe makes one 9-inch round or square cake — about 8 generous slices.

For the Batter:

  • 2 cups all-purpose flour
  • 1 tablespoon baking powder
  • ½ teaspoon baking soda
  • ½ teaspoon salt
  • 1 teaspoon ground cinnamon
  • ¼ teaspoon ground nutmeg (optional)
  • ½ cup (1 stick) unsalted butter, softened
  • 1 cup granulated sugar
  • 2 large eggs
  • 1 teaspoon vanilla extract
  • 1 cup sour cream or plain yogurt (for extra moisture)

For the Apples:

  • 2 medium apples, peeled and chopped (use Granny Smith or Fuji for best results)
  • 1 tablespoon lemon juice
  • 1 tablespoon sugar
  • ½ teaspoon ground cinnamon

For the Topping (Optional but Delicious):

  • 2 tablespoons brown sugar
  • 1 teaspoon cinnamon
  • 2 tablespoons chopped walnuts or pecans (optional)

Step-by-Step Instructions

1. Prepare the Apples

Peel and chop the apples into small cubes. Toss with lemon juice, sugar, and cinnamon. Set aside so the apples can soften and absorb the flavor.

Grandma’s Tip: Letting the apples sit for 10–15 minutes brings out their juices and makes the cake even more moist.

2. Preheat the Oven and Prepare the Pan

Preheat your oven to 175°C (350°F). Grease and flour a 9-inch cake pan or line it with parchment paper for easy release.

3. Mix the Dry Ingredients

In a medium bowl, sift together the flour, baking powder, baking soda, salt, cinnamon, and nutmeg. Set aside.

4. Cream the Butter and Sugar

In a large bowl, beat the softened butter and sugar together until light and fluffy — about 2–3 minutes. Add the eggs one at a time, beating well after each.

Stir in the vanilla extract.

5. Add the Sour Cream and Dry Mix

Add the dry ingredients to the butter mixture in three parts, alternating with the sour cream or yogurt. Start and end with the dry ingredients.

Don’t overmix — stir until just combined for a soft, tender crumb.

6. Fold in the Apples

Drain any excess liquid from the apple mixture, then gently fold the apple cubes into the batter with a spatula.

7. Add Topping and Bake

Pour the batter into your prepared pan and smooth the top.

In a small bowl, mix the brown sugar, cinnamon, and nuts (if using). Sprinkle over the batter evenly.

Bake for 40–50 minutes, or until a toothpick inserted into the center comes out clean.

8. Cool and Serve

Let the cake cool in the pan for 15 minutes, then remove and transfer to a wire rack. Serve warm or at room temperature — with or without a dusting of powdered sugar.

How to Serve Apple Cinnamon Cake

This cake is incredibly versatile. Here are some of grandma’s favorite ways to serve it:

  • Warm with a scoop of vanilla ice cream
  • With coffee or tea for a cozy afternoon treat
  • As breakfast with a bit of butter or cream cheese
  • With caramel sauce drizzled on top

Storage Tips

  • Room temperature: Keep covered for up to 3 days.
  • Refrigerator: Up to 5 days, especially in warmer climates.
  • Freezer: Freeze slices wrapped individually for up to 2 months. Thaw at room temperature or gently warm in the oven.

Variations You Can Try

Want to make this cake your own? Try these twists:

  • Add raisins or cranberries with the apples
  • Use brown butter for a richer, nuttier taste
  • Add chopped nuts to the batter for texture
  • Use whole wheat flour for a more rustic finish
  • Replace apples with pears for a seasonal variation

The Magic of Homemade Baking

Baking grandma’s apple cinnamon cake isn’t just about dessert — it’s about reviving tradition. It’s about the smell that brings everyone into the kitchen. The warm slices handed out on little plates. The feeling that something made with care will always taste better.

In a world full of trends, this is one recipe that never goes out of style.

Final Thoughts: A Slice of Love

Whether you’re baking for a holiday, a family gathering, or a simple afternoon at home, grandma’s apple cinnamon cake is the kind of dessert that comforts, nourishes, and delights. Every bite brings you a little closer to her kitchen, her laughter, and her legacy.

Now let’s bring this delicious memory to life with a warm, realistic image of this beautiful apple cinnamon cake!

How to Make Grandma’s Soft Cheese Buns: Fluffy, Buttery, and Irresistible

There’s nothing like the smell of fresh bread wafting through the kitchen — especially when it’s filled with melty, savory cheese. One of grandma’s most beloved recipes was her soft cheese buns: golden on the outside, tender on the inside, and bursting with warm cheesy goodness.

These buns weren’t just snacks — they were little bites of comfort, made to share, to impress guests, or simply to enjoy with coffee on a quiet afternoon. In this detailed guide, you’ll learn how to bake these traditional cheese buns just like grandma did — simple, fluffy, and incredibly satisfying.

What Are Cheese Buns?

Cheese buns (also known in some cultures as cheese rolls or cheese bread) are soft rolls made with a yeasted dough, filled or topped with cheese, and baked until golden brown. Grandma’s version had cheese in the center and on top, creating the perfect balance of gooey inside and crispy edges.

They’re great for breakfast, as a snack, with soup, or served on a brunch table. Plus, they smell absolutely amazing while baking!

Ingredients You’ll Need

This recipe makes about 12 buns.

For the Dough:

  • 3 ½ cups all-purpose flour
  • 1 packet active dry yeast (2 ¼ teaspoons)
  • 1 cup warm milk (not hot)
  • ¼ cup sugar
  • 1 teaspoon salt
  • 2 large eggs
  • ¼ cup butter, melted

For the Filling and Topping:

  • 1 ½ cups shredded cheese (mozzarella, cheddar, or a mix)
  • 2 tablespoons grated Parmesan (optional, for extra flavor)
  • 1 egg yolk + 1 tablespoon milk (for brushing)
  • Extra butter for greasing or brushing tops

Step-by-Step Instructions

1. Activate the Yeast

In a small bowl, combine the warm milk and sugar. Sprinkle in the yeast, stir gently, and let sit for 5–10 minutes until frothy.

Grandma’s Tip: If the yeast doesn’t bubble, it’s not active — start again with a fresh packet.

2. Make the Dough

In a large mixing bowl, beat the eggs and add the melted butter. Pour in the yeast mixture and mix to combine.

Add the flour and salt gradually, stirring with a wooden spoon or using a stand mixer with a dough hook. Knead for 8–10 minutes, until the dough is soft, smooth, and elastic.

Add a bit more flour if the dough is too sticky, but don’t overdo it — a slightly tacky dough yields softer buns.

3. Let the Dough Rise

Form the dough into a ball, place it in a greased bowl, and cover with a clean towel or plastic wrap. Let it rise in a warm place for 1 to 1½ hours, or until doubled in size.

4. Shape the Buns

Punch down the dough and divide it into 12 equal pieces. Flatten each piece into a small circle. Add a tablespoon of shredded cheese in the center and pinch the dough closed like a pouch.

Shape into balls and place seam-side down on a greased baking tray or parchment paper-lined sheet.

5. Second Rise

Cover the shaped buns loosely and let them rise again for 30–40 minutes, until puffy.

6. Add Toppings and Bake

Preheat the oven to 180°C (350°F).

Brush the tops of the buns with the egg yolk + milk mixture. Sprinkle the remaining cheese (and Parmesan, if using) over the tops.

Bake for 20–25 minutes, or until golden brown and the cheese is bubbling.

7. Cool Slightly and Serve

Let the buns cool for 5–10 minutes before serving. Enjoy them warm for the best cheesy experience!

Why Grandma’s Cheese Buns Were Always Perfect

Her secret wasn’t just in the ingredients — it was in the way she made them:

  • She never rushed the dough. Letting it rise fully made them light and fluffy.
  • She always used real butter and fresh cheese.
  • She often added a sprinkle of love — the kind that made every bite special.

Variations You Can Try

Want to make this recipe your own? Try these ideas:

  • Spicy cheese buns: Add a pinch of chili flakes or jalapeños to the filling.
  • Herb cheese buns: Mix rosemary, thyme, or parsley into the dough or topping.
  • Garlic cheese buns: Add roasted garlic to the filling or brush garlic butter on top after baking.
  • Mini cheese rolls: Make smaller versions for party snacks or lunchboxes.

How to Store and Reheat

  • Room temp: Store in an airtight container for up to 2 days.
  • Fridge: Up to 5 days, though they’re best fresh.
  • Freeze: Freeze baked buns (cooled) for up to 1 month. Thaw and reheat in the oven for best texture.

Reheating:

  • Microwave for 20–30 seconds for a quick warm-up.
  • For crispy tops, reheat in a toaster oven or regular oven at 160°C (325°F) for 5–8 minutes.

Serving Suggestions

Grandma served her cheese buns in many ways:

  • With coffee or tea in the morning
  • Alongside soups or stews
  • As a savory snack with jam or tomato relish
  • On the dinner table as a cheesy bread option

They’re versatile, easy to serve, and always appreciated.

Final Thoughts: Little Pillows of Joy

Baking these buns is more than just making bread — it’s recreating a memory, a moment, and a taste of comfort that’s impossible to forget.

Whether you’re baking for your family, impressing guests, or simply treating yourself, these fluffy, cheesy buns will transport you right back to grandma’s kitchen — where everything was made with care, and every bite was a reminder that food can be love.

The Secret to Grandma’s Sweet Corn Pudding: A Creamy, Oven-Baked Classic

There are some recipes that don’t just feed us — they nurture memories. Grandma’s sweet corn pudding is one of those dishes. It’s a warm, custard-like side that’s subtly sweet, slightly savory, and deeply comforting. Whether served at Sunday dinner, holiday gatherings, or just because, this dish is a nostalgic favorite that deserves a place in every kitchen.

In this detailed guide, you’ll learn how to make perfect sweet corn pudding using grandma’s traditional style — baked until golden, creamy on the inside, and rich with corn flavor.

What Is Corn Pudding?

Corn pudding is a Southern-style casserole dish that combines corn kernels, eggs, milk or cream, butter, and sometimes sugar, baked until set into a soft, spoonable custard. Think of it as the middle ground between cornbread and creamed corn — with a luxurious, tender texture.

Grandma’s version was always slightly sweet, served as a side dish rather than a dessert, often paired with roasted meats, fried chicken, or vegetables.

Why This Dish Was Always on Grandma’s Table

There are a few reasons why corn pudding stood the test of time in grandma’s kitchen:

  • Easy to make in one bowl
  • Uses basic, affordable ingredients
  • Comforting and satisfying
  • Feeds a crowd with very little effort
  • Can be sweet or savory depending on the family’s tradition

Ingredients You’ll Need

This recipe serves about 6–8 people.

  • 1 can (15 oz) whole kernel corn, drained
  • 1 can (15 oz) creamed corn
  • 2 large eggs
  • 1 cup whole milk or half-and-half
  • ½ cup (1 stick) unsalted butter, melted
  • 2 tablespoons sugar (optional — for a sweet version)
  • ¼ cup all-purpose flour
  • 1 teaspoon baking powder
  • ½ teaspoon salt
  • Ground black pepper to taste

Optional Add-ins:

  • 1 cup shredded cheddar cheese
  • ¼ cup chopped green onions or chives
  • A dash of cayenne or paprika for a mild kick

How to Make Sweet Corn Pudding: Step-by-Step

1. Preheat the Oven

Set your oven to 175°C (350°F). Grease a 2-quart baking dish or an 8×8-inch casserole pan with butter or nonstick spray.

2. Mix the Wet Ingredients

In a large mixing bowl, whisk together the eggs, milk, melted butter, and sugar (if using). Stir until well blended.

3. Add the Corn

Stir in the drained whole corn and creamed corn. Mix gently to combine — the mixture will be loose, but that’s exactly how it should be.

4. Add the Dry Ingredients

In a separate bowl (or directly into the wet if you’re doing it grandma-style), combine the flour, baking powder, salt, and pepper. Add this dry mix into the corn mixture and stir until just combined. Do not overmix.

5. Pour and Bake

Pour the batter into the greased baking dish and smooth out the top.

Bake uncovered for 45–55 minutes, or until the top is golden and the center is set but still slightly jiggly.

Test with a knife: Insert a knife into the center — if it comes out mostly clean, it’s done.

6. Let It Rest

Allow the pudding to rest for 10–15 minutes before serving. This helps it set up and makes scooping easier.

Tips for a Perfect Grandma-Style Corn Pudding

  • Don’t overbake: It should be set but still soft — not dry or crumbly.
  • Use high-quality butter and milk for richer flavor.
  • Let it sit before serving to get that perfect creamy-but-sliceable texture.
  • Double the recipe for larger gatherings — it scales beautifully.
  • Make it ahead: Reheats well in the oven at low heat (covered with foil).

Sweet or Savory? Grandma Knew Both

Depending on the region or family tradition, corn pudding can swing sweet or savory:

  • For sweet: Add sugar, a pinch of cinnamon or nutmeg, and a drizzle of honey on top.
  • For savory: Add shredded cheese, herbs, sautéed onions, or even crumbled bacon.

Either way, it’s delicious.

Serving Suggestions

Corn pudding works beautifully as a side dish for:

  • Roast chicken or turkey
  • BBQ ribs or pulled pork
  • Grilled sausages or baked ham
  • Vegetarian meals like black bean stew or sautéed greens

You can also serve it on a holiday buffet with other cozy sides like mac and cheese, mashed potatoes, and green beans.

Leftovers? No Problem

If you’re lucky enough to have leftovers, here’s what to do:

  • Storage: Store in an airtight container in the fridge for up to 4 days.
  • Reheat: Cover with foil and reheat in the oven at 160°C (325°F) for 10–15 minutes, or microwave individual portions for 1–2 minutes.

Bonus: It also tastes amazing cold straight from the fridge. Grandma approved.

Can You Freeze Corn Pudding?

Yes — although fresh is best. If freezing:

  1. Let it cool completely.
  2. Wrap tightly in plastic wrap and foil.
  3. Freeze for up to 2 months.
  4. Thaw overnight in the fridge before reheating in the oven.

Why It’s More Than Just a Side Dish

What makes grandma’s corn pudding truly special isn’t just the creamy texture or golden top. It’s the sense of togetherness that came with it. The big spoonfuls passed around the table. The silence that followed the first bite. The laughter and stories that came after.

It wasn’t fancy. But it was real, comforting, and made with love.

Final Thoughts: A Southern Classic Worth Remembering

Whether you’re cooking for a family dinner, a potluck, or just treating yourself to something nostalgic, grandma’s sweet corn pudding is a recipe worth keeping in your collection. It’s warm, familiar, and deeply satisfying — the kind of food that reminds you of where you come from.

Now let’s bring this golden, creamy dish to life with an ultra-realistic image that captures all its rustic charm!

Grandma’s Country-Style Chicken Stew: The Secret to a Hearty Family Dinner

Some recipes aren’t just meals — they’re family traditions, often passed down through generations. Among them, few are as warm, filling, and nostalgic as grandma’s country-style chicken stew.

Thick, flavorful, and full of love, this dish was a Sunday favorite, especially during cold evenings when the whole family gathered at the table.

In this complete guide, you’ll learn how to prepare this rustic chicken stew just like grandma made it — with rich broth, tender meat, hearty vegetables, and the kind of flavor that comes from slow, thoughtful cooking.

What Makes Grandma’s Chicken Stew So Special?

It wasn’t about fancy techniques or exotic spices. Grandma’s stew was special because:

  • She used simple ingredients from the garden or pantry.
  • She let it simmer for hours, building deep flavor.
  • She always made enough to feed everyone (and send leftovers home).
  • She cooked with feeling, not just instructions.

And somehow, no matter how many times you tried to replicate it, hers always tasted better.

Ingredients for a Traditional Country Chicken Stew

This recipe is designed to serve 6–8 people — or to provide delicious leftovers.

Base Ingredients:

  • 1 whole chicken, cut into pieces (or 1.5 kg of bone-in chicken thighs and drumsticks)
  • 2 tablespoons olive oil or butter
  • 1 large onion, chopped
  • 3 garlic cloves, minced
  • 3 large carrots, sliced
  • 3 potatoes, peeled and diced
  • 2 celery stalks, chopped
  • 2 bay leaves
  • 1 teaspoon dried thyme or fresh thyme sprigs
  • Salt and black pepper to taste
  • 1 tablespoon tomato paste (optional for color and depth)
  • 6 cups chicken broth (homemade if possible)
  • 1 tablespoon all-purpose flour or cornstarch (for thickening)
  • ½ cup green peas or corn (optional, added near the end)

Optional:

  • A splash of white wine (for deglazing)
  • Fresh parsley for garnish

Step-by-Step Instructions

1. Brown the Chicken

In a large, heavy pot or Dutch oven, heat the olive oil over medium heat. Add the chicken pieces skin-side down and sear until golden brown on both sides (about 5–7 minutes per side). Work in batches if needed.

Remove and set aside.

2. Sauté the Aromatics

In the same pot, add the chopped onion and cook until softened. Add the garlic and tomato paste and stir for about 1–2 minutes to build flavor.

Grandma’s Tip: Scrape the brown bits from the bottom — they add rich flavor to the stew.

3. Add the Vegetables

Stir in the carrots, potatoes, and celery. Season with salt, pepper, thyme, and bay leaves. Cook for about 5 minutes, stirring occasionally.

4. Simmer Everything Together

Return the chicken to the pot. Pour in the chicken broth (and wine, if using). Bring to a boil, then reduce to a gentle simmer. Cover and cook for about 45–60 minutes, or until the chicken is tender and fully cooked.

Stir occasionally and adjust seasoning if needed.

5. Thicken the Stew (Optional)

For a thicker stew, mix 1 tablespoon of flour or cornstarch with a few tablespoons of the hot broth. Stir into the pot and simmer uncovered for an additional 10 minutes until it thickens slightly.

6. Add Finishing Touches

Stir in the peas or corn and simmer for another 5 minutes. Remove bay leaves and thyme sprigs. Taste and adjust seasoning again if needed.

Sprinkle with chopped fresh parsley before serving.

Why Bone-In Chicken Works Best

Grandma always preferred using a whole chicken or bone-in cuts for a reason:

  • More flavor: Bones enrich the broth naturally.
  • Tender meat: Slow simmering keeps it juicy and tender.
  • Tradition: It’s how she was taught, and it just works better.

If you prefer boneless meat, go ahead — but know that the real depth comes from the bones.

Serving Suggestions

This chicken stew is hearty enough to stand alone, but grandma always made it feel like a complete meal. Try serving it with:

  • Steamed white rice or wild rice
  • Buttered noodles
  • Homemade cornbread or biscuits
  • Crusty rustic bread for soaking up the broth
  • A side salad with vinegar dressing for balance

How to Store and Reheat

Storage:

  • Refrigerate in an airtight container for up to 4 days.
  • Freeze for up to 3 months. Store in single portions for easy reheating.

Reheating:

  • Reheat gently on the stove over medium-low heat.
  • Add a splash of water or broth to loosen if it thickened too much in the fridge.

Tips for the Best Old-Fashioned Chicken Stew

  • Don’t rush the simmering — slow cooking is what gives the stew its deep, layered taste.
  • Season gradually. Salt early, taste often.
  • Use homemade stock if possible — or simmer the chicken bones in water with herbs for a few hours.
  • Let it rest before serving — the flavors intensify after cooling slightly.

Variations You Can Try

Make this stew your own by trying:

  • Adding barley or small pasta for a more filling version
  • Using turnips, parsnips, or sweet potatoes for a rustic twist
  • Finishing with a dash of cream or butter for richness
  • Adding hot sauce or chili flakes if your grandma liked a little heat

The Power of a Family Recipe

This stew isn’t just food. It’s:

  • The smell that filled the house on Sunday.
  • The sound of the ladle hitting the pot.
  • The taste of home after a long day.
  • A reminder of grandma’s warm kitchen, where life slowed down and everyone was welcome.

These are the recipes that stick with us. They become part of who we are.

Final Thoughts: A Bowl Full of Love

In today’s fast-paced world, taking the time to make something like grandma’s chicken stew is an act of care. It fills your kitchen with warmth, your heart with memories, and your stomach with satisfaction.

Whether you’re cooking for your family, yourself, or just to reconnect with the past, this stew will never let you down. Just like grandma.

How to Make Grandma’s Creamy Rice Pudding: A Comfort Dessert That Never Fails

When it comes to desserts that feel like a warm hug, grandma’s rice pudding stands in a class of its own.

Whether served warm or chilled, plain or topped with cinnamon, it’s a dish that delivers pure nostalgia with every bite.

This timeless comfort dessert is simple, budget-friendly, and always satisfying.

In this guide, we’ll explore how to make creamy, delicious rice pudding just like grandma used to, as well as different variations, expert tips, and serving ideas to make it your own.

Why Rice Pudding Is a Timeless Dessert

Rice pudding — known by many names around the world (arroz doce, riz au lait, kheer) — has been around for centuries. What makes grandma’s version special is not just the ingredients, but the slow cooking, the patience, and the heart behind it.

It’s a dessert that brings back memories of childhood: sitting by the kitchen table, listening to stories, while the warm scent of milk, sugar, and cinnamon filled the air.

Basic Ingredients for Traditional Creamy Rice Pudding

What’s beautiful about rice pudding is its simplicity. You don’t need anything fancy — just pantry staples and a bit of time.

Here’s what you’ll need:

  • 1 cup short-grain white rice (arborio or sushi rice preferred)
  • 4 cups whole milk (can substitute part with cream for extra richness)
  • 1 ½ cups water
  • 1/2 cup sugar (adjust to taste)
  • 1 cinnamon stick (or 1 tsp ground cinnamon)
  • 1 teaspoon vanilla extract (optional, but recommended)
  • A pinch of salt
  • Ground cinnamon for topping (optional)

Optional Add-ins:

  • Lemon or orange zest for fragrance
  • Raisins or dried fruits (soaked in warm water or rum)
  • Condensed milk for added sweetness and creaminess

Step-by-Step Instructions: Grandma’s Method

Let’s go through the traditional process to get that signature creaminess and depth of flavor that only grandma’s rice pudding has.

1. Rinse and Pre-cook the Rice

Start by rinsing the rice in cold water until the water runs clear. This removes excess starch and prevents the pudding from becoming gluey.

In a medium saucepan, bring the water and a pinch of salt to a boil. Add the rice, reduce the heat to low, and cook uncovered for about 10–12 minutes, or until most of the water is absorbed.

Note: This pre-cooking step ensures the rice is tender before adding milk.

2. Add Milk and Flavor

Pour in the milk and add the cinnamon stick (or ground cinnamon). Stir gently and bring the mixture to a gentle simmer over medium-low heat.

Let the rice simmer in milk for 25–35 minutes, stirring occasionally to prevent sticking. The mixture will thicken slowly as the rice absorbs the milk.

Grandma’s Tip: Stir with a wooden spoon in figure-eights to keep the rice from clumping or burning.

3. Add Sugar and Vanilla

Once the pudding reaches a soft, creamy consistency, stir in the sugar and vanilla extract. Continue to cook for another 5–10 minutes, stirring more frequently.

Taste and adjust sweetness as desired. Remove from heat when it’s still slightly runny — it will thicken further as it cools.

4. Rest and Serve

Let the rice pudding rest for at least 10 minutes before serving. Remove the cinnamon stick if used. Serve warm for a cozy dessert or refrigerate for a few hours for a chilled treat.

Sprinkle ground cinnamon on top before serving — just like grandma did.

What Makes Grandma’s Rice Pudding So Creamy?

The magic lies in:

  • Slow cooking: Low and slow is the secret. Rushing the process can make it dry or undercooked.
  • Whole milk or cream: Don’t skimp on the fat. It gives that luscious texture and classic richness.
  • Stirring: Regular stirring prevents the pudding from sticking to the bottom and keeps the texture smooth.

Popular Variations from Around the World

Rice pudding is loved in many cultures, and each adds its own twist:

Portuguese/Spanish Style (Arroz Doce):

  • Often includes lemon zest and egg yolks, added at the end for extra richness.
  • Decorated with cinnamon in lattice or swirl patterns.

Indian Kheer:

  • Made with cardamom, nuts, and sometimes saffron.
  • Often includes raisins and ghee.

Scandinavian Style:

  • Made with short-grain rice and cream, often served cold with berry sauce.

American Style:

  • Sometimes baked with eggs for a custard-style pudding.

Serving Suggestions

There’s no wrong way to enjoy rice pudding, but here are some ideas to elevate it:

  • Serve warm with extra cinnamon or nutmeg
  • Add a spoon of berry compote or jam for tartness
  • Top with whipped cream and roasted nuts for crunch
  • Drizzle caramel or honey for added sweetness
  • Serve cold with sliced bananas or mangoes for a tropical twist

Storing and Reheating

  • Store rice pudding in an airtight container in the fridge for up to 4 days.
  • It will thicken when chilled, so add a splash of milk when reheating to loosen it up.
  • Warm over low heat on the stove or microwave in short intervals, stirring in between.

Can You Freeze Rice Pudding?

Yes — although the texture may change slightly, it’s safe to freeze rice pudding. Let it cool completely, store in freezer-safe containers, and thaw in the fridge before reheating.

Tips to Avoid Common Mistakes

1. My rice pudding is too thick!
Add a little warm milk and stir well. Always remove from heat while it’s still a bit runny.

2. It burned at the bottom!
Use a heavy-bottomed pot and stir frequently on low heat. Don’t walk away for too long.

3. It tastes bland.
Boost flavor with vanilla, cinnamon, lemon zest, or even a touch of salt to balance the sweetness.

4. It’s not sweet enough.
No problem — you can always stir in a little extra sugar, honey, or condensed milk after cooking.

Make It a Family Tradition

One of the most beautiful things about rice pudding is that it’s more than just a recipe — it’s a family tradition. Invite your kids, partner, or grandkids to help stir the pot or sprinkle cinnamon. Share stories about grandma and the magic of her kitchen.

These are the moments that turn recipes into memories.

Final Thoughts: A Hug in a Bowl

In a world filled with trendy desserts and elaborate pastries, grandma’s rice pudding remains timeless. It’s proof that a few humble ingredients, a bit of patience, and a lot of love can create something extraordinary.

Next time you need a taste of comfort — or just want to slow down and reconnect with something real — make a pot of this creamy, cozy, unforgettable dessert.

Grandma’s Classic Rainy Day Treat: Crispy Sugar-Dusted Fried Dough Balls

There’s something magical about rainy afternoons and the smell of something sweet frying in the kitchen.

For many of us, that comforting scent came from grandma’s famous fried dough balls, affectionately known in many cultures as “rainy day snacks.”

Whether you called them sugar donuts, fritters, or bolinhos de chuva, these sugar-dusted delights were golden, crispy, and made with love.

In this article, you’ll learn how to make this nostalgic treat from scratch, with tips passed down from grandmas around the world.

Why Fried Dough Balls Are the Ultimate Comfort Food

Simple to make and quick to cook, fried dough balls were the go-to recipe for grandmas on rainy afternoons when something warm and sweet was just what everyone needed. They required no special equipment, just pantry staples and a frying pan.

They’re more than just dessert — they’re a memory in every bite.

Ingredients You’ll Need

These fried treats come together in minutes with basic ingredients:

  • 2 cups all-purpose flour
  • 2 eggs
  • ½ cup sugar
  • ¾ cup milk
  • 1 tablespoon baking powder
  • 1 pinch of salt
  • 1 teaspoon vanilla extract (optional)
  • Oil for frying (vegetable or sunflower)
  • Sugar and cinnamon for coating

How to Make Grandma’s Fried Dough Balls

1. Mix the Batter

In a mixing bowl, whisk together the eggs and sugar until light and slightly foamy. Add the milk and vanilla extract, then stir to combine.

In another bowl, mix the flour, baking powder, and salt. Slowly add the dry ingredients to the wet mixture, stirring gently until a thick, sticky batter forms.

Tip: The batter should be thick enough to scoop with a spoon but soft enough to drop easily into oil.

2. Heat the Oil

In a deep frying pan or medium-sized pot, heat about 2–3 inches of oil over medium heat. The ideal frying temperature is 170–180°C (340–355°F). You can test it by dropping a small bit of batter into the oil — it should sizzle and rise to the surface quickly.

3. Fry the Dough Balls

Use two spoons or an ice cream scoop to drop small portions of the batter into the hot oil. Fry in batches of 5–6 at a time to avoid overcrowding.

Cook for about 3–4 minutes, turning occasionally with a slotted spoon, until they are golden brown and puffed.

4. Drain and Dust

Remove the dough balls from the oil and place them on a plate lined with paper towels to drain the excess oil.

While still warm, roll them in a mixture of sugar and cinnamon for that classic sweet coating.

Variations on Grandma’s Fried Dough Balls

Want to get creative? Try these delicious twists:

  • Add a pinch of nutmeg or lemon zest to the batter
  • Fill with soft fruit pieces like banana or apple
  • Use powdered sugar instead of granulated sugar
  • Drizzle with honey or chocolate sauce before serving

Perfect Moments for These Treats

These are best enjoyed:

  • On rainy or cold afternoons
  • As a treat with hot cocoa or spiced tea
  • Served with fresh fruit or a dollop of jam
  • During family movie night or game day

Why These Treats Endure

They’re fast, they’re sweet, and they bring people together. Whether you’re a grandchild learning to make them for the first time or an adult passing on the tradition, fried dough balls are a celebration of simplicity and warmth.

Every family has its own spin on the recipe — some lighter, some crispier, some stuffed — but the love behind them is always the same.

A Delicious Way to Relive Childhood

Cooking these dough balls is like flipping through an edible photo album. Each batch comes with memories, laughter, and a little bit of sugar on your fingertips.

So the next time it rains, instead of reaching for a snack, head to the kitchen. Whip up a batch of these deliciously simple fried dough balls and bring grandma’s love to life.

How to Make Grandma’s Fluffy Homemade Bread: A Step-by-Step Guide

Few aromas are as comforting as freshly baked bread wafting through the kitchen. For many of us, the memory of grandma’s homemade bread — soft, warm, and golden — brings back moments of pure joy. Whether it was for breakfast, a family meal, or an after-school snack, her bread was always the centerpiece of comfort.

This article will guide you through making traditional fluffy homemade bread just like grandma used to bake — simple, wholesome, and incredibly satisfying.

Why Grandma’s Bread Is So Special

Grandma’s bread wasn’t about trends or fancy ingredients. It was about love, patience, and tradition. She didn’t need high-tech mixers or complicated techniques. Her secret was care — kneading by hand, allowing the dough to rise naturally, and baking until the crust turned perfectly golden.

More than food, it was an experience passed from generation to generation.

Ingredients for the Perfect Homemade Bread

You only need a few ingredients to make this classic bread:

  • 4 cups all-purpose flour (plus extra for kneading)
  • 2 teaspoons salt
  • 2 tablespoons sugar
  • 2 ¼ teaspoons active dry yeast (1 packet)
  • 1 ½ cups warm water (not hot)
  • 2 tablespoons vegetable oil or melted butter

Optional:

  • 1 egg (for egg wash)
  • 1 tablespoon milk (for brushing the top)
  • Sesame or poppy seeds (for topping)

Step-by-Step Instructions

1. Activate the Yeast

In a large bowl, mix the warm water and sugar. Stir in the yeast and let it sit for 5–10 minutes, until it becomes frothy. If it doesn’t foam, your yeast may be expired — start again with a new packet.

2. Mix the Dough

Add salt, oil or butter, and 2 cups of flour to the yeast mixture. Mix with a wooden spoon or spatula until combined. Gradually add the remaining flour, ½ cup at a time, until a soft dough forms.

3. Knead by Hand

Transfer the dough to a floured surface and knead for 8–10 minutes. The dough should be smooth and elastic but not sticky. If it’s too sticky, add a bit more flour as needed.

4. Let It Rise

Place the dough in a greased bowl, cover it with a damp cloth or plastic wrap, and let it rise in a warm spot for 1 to 1.5 hours, or until it has doubled in size.

Grandma’s Tip: Place the bowl inside the oven (turned off) with the light on to create the perfect warm environment for rising.

5. Shape the Loaf

Punch down the dough gently and transfer it to a floured surface. Shape it into a loaf or divide into rolls. Place the shaped dough in a greased loaf pan or on a baking sheet.

6. Second Rise

Cover the loaf again and let it rise for 30–40 minutes, until puffy.

7. Bake the Bread

Preheat your oven to 190°C (375°F). If using, brush the top with an egg wash (1 beaten egg with 1 tablespoon milk) for a golden crust. Sprinkle with seeds if desired.

Bake for 30–35 minutes, or until the top is golden brown and the bread sounds hollow when tapped on the bottom.

8. Cool Before Slicing

Allow the bread to cool on a wire rack for at least 20 minutes before slicing. This helps the structure set and prevents it from becoming gummy inside.

How to Store Homemade Bread

To keep your bread fresh:

  • Store in a bread box or wrap in a clean kitchen towel.
  • Avoid plastic bags unless freezing — plastic traps moisture and makes the crust soggy.
  • Homemade bread lasts about 3 days at room temperature. You can freeze slices for up to 3 months.

Serving Suggestions

Grandma’s bread is incredibly versatile. Here are a few ways to enjoy it:

  • Toasted with butter and jam
  • As sandwich bread for lunch
  • French toast for breakfast
  • With soups and stews for a hearty dinner
  • Simply warm with olive oil and herbs

The Power of Homemade Traditions

In a world full of processed foods, returning to the kitchen to bake bread from scratch connects us to the past. It’s a slow, grounding ritual — mixing, kneading, waiting — just like grandma did.

It’s not just about filling your stomach, but about feeding your soul.

Make It a Family Moment

Baking bread can be a fun activity to share with kids, friends, or family. Involving others in kneading or shaping the loaf makes the process even more meaningful. Plus, there’s nothing like the pride of slicing into something you made together from scratch.

Grandma’s Bread, Fresh in Your Kitchen

With just a few ingredients and a bit of patience, you can recreate the nostalgic joy of grandma’s homemade bread in your own kitchen. Whether you serve it with jam in the morning or warm with dinner, every bite brings back the feeling of being home.