Grandma’s Homemade Mac and Cheese: Creamy, Cheesy, and Baked to Perfection

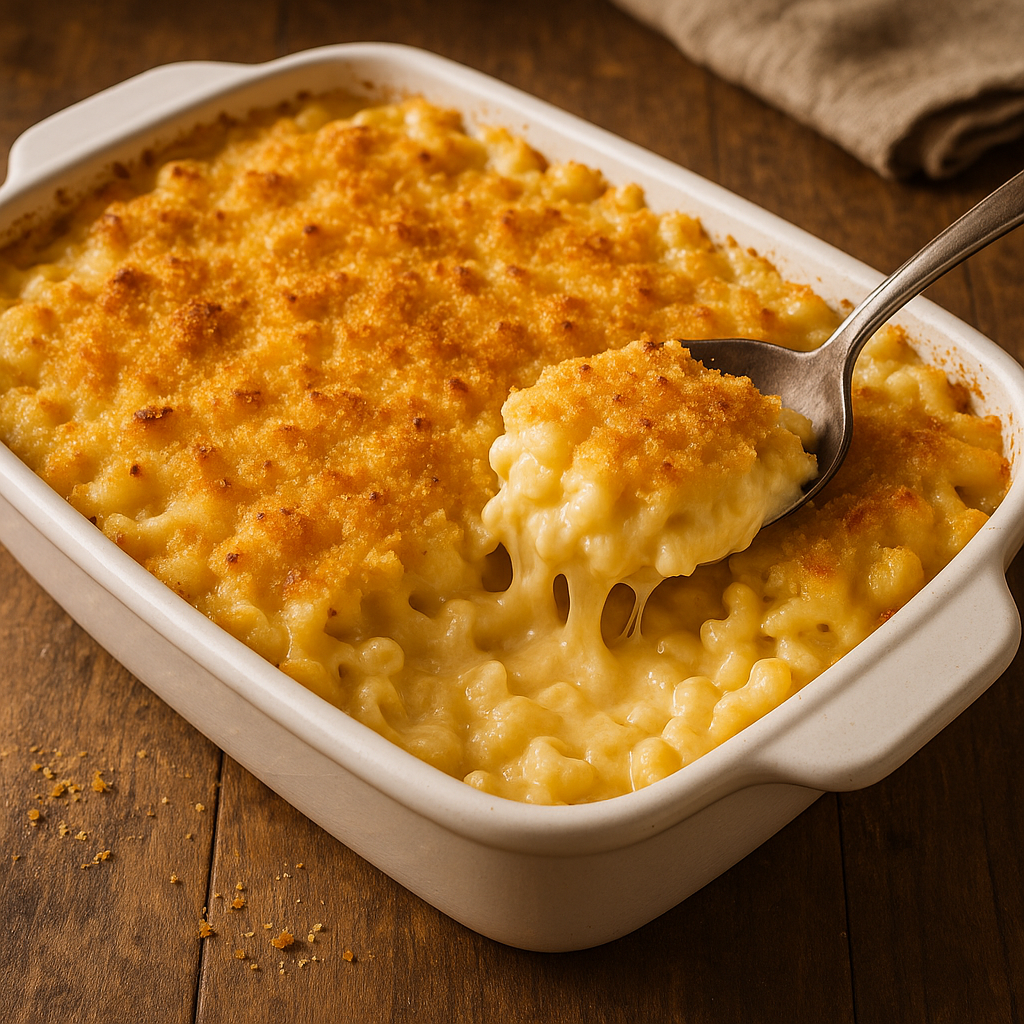
No boxed mix ever came close to grandma’s baked mac and cheese. Rich, golden, and packed with gooey cheese, it was always the most requested side dish at family dinners — and often the first to disappear from the table.

This article will show you how to make classic baked macaroni and cheese, the old-fashioned way: comforting, creamy, and full of real, melted cheese.

Why This Mac and Cheese Is a Family Favorite

  • Made with real cheese and a creamy béchamel sauce
  • Topped with a buttery golden crust
  • Easily customizable with mix-ins or spices
  • Perfect for holidays, potlucks, or weeknight dinners
  • Comfort food at its absolute best

Ingredients for Grandma’s Mac and Cheese

Serves 6–8 people.

For the Pasta:

  • 1 lb (450g) elbow macaroni or small shells
  • Salt for pasta water

For the Cheese Sauce:

  • 4 tablespoons butter
  • 4 tablespoons all-purpose flour
  • 3 cups milk (whole milk preferred)
  • 2 cups shredded sharp cheddar cheese
  • 1 cup shredded mozzarella (or another melty cheese)
  • ½ teaspoon salt
  • ¼ teaspoon black pepper
  • Optional: pinch of paprika or dry mustard

For the Topping:

  • ½ cup breadcrumbs (panko or regular)
  • 1 tablespoon melted butter
  • Optional: more shredded cheese on top

Step-by-Step Instructions

1. Cook the Pasta

Boil the macaroni in salted water until just al dente (about 1 minute less than package directions).

Drain and set aside.

2. Make the Roux

In a large saucepan, melt the butter over medium heat.

Add the flour and stir constantly for about 2 minutes until lightly golden.

3. Add the Milk

Slowly whisk in the milk to avoid lumps.

Cook, stirring constantly, until the sauce thickens — about 5–7 minutes.

4. Add the Cheese

Remove from heat and stir in the shredded cheddar and mozzarella.

Season with salt, pepper, and optional paprika or mustard powder.

Taste and adjust seasoning as needed.

5. Combine Pasta and Sauce

Mix the drained pasta into the cheese sauce until fully coated.

Transfer to a greased 9×13-inch baking dish.

6. Add the Topping

Mix breadcrumbs with melted butter and sprinkle over the top.

You can also add a little more shredded cheese for extra crispiness.

7. Bake

Bake at 180°C (350°F) for 25–30 minutes, or until bubbly and golden on top.

Let rest for 5–10 minutes before serving.

Serving Ideas

  • Serve as a main dish with salad or roasted vegetables
  • As a side for fried chicken, barbecue, or meatloaf
  • Add bacon bits, caramelized onions, or jalapeños for extra flavor
  • Use as a base for mac and cheese bowls with toppings like pulled pork or veggies

Storage and Reheating

Store:

  • Refrigerate in an airtight container for up to 4 days

Reheat:

  • Oven: Cover with foil and bake at 160°C (325°F) until hot
  • Microwave: Heat individual portions with a splash of milk

Freeze:

  • Freeze after baking. Wrap tightly and freeze for up to 2 months
  • Thaw overnight in the fridge and reheat thoroughly

Tasty Variations

  • Three-Cheese Mac: Add Gruyère, Monterey Jack, or Parmesan
  • Spicy Mac: Add cayenne, hot sauce, or pepper jack
  • Veggie Mac: Stir in cooked spinach, peas, or roasted cauliflower
  • Southern-Style: Add beaten egg to the sauce before baking for a firmer texture
  • Gluten-Free: Use GF pasta and flour

Grandma’s Tips for the Creamiest Mac and Cheese

  • Use freshly shredded cheese — it melts better than pre-shredded
  • Don’t overcook the pasta before baking
  • For extra creaminess, use a splash of cream or add more cheese to the sauce
  • Let the mac and cheese rest after baking so it sets up perfectly
  • Always taste the sauce before baking — adjust seasoning early!

Final Thoughts: The Ultimate Comfort Classic

Whether served on a holiday table or a rainy Tuesday night, grandma’s mac and cheese was always a dish that brought smiles and second helpings. With its gooey interior and golden, cheesy crust, it’s a recipe that deserves a permanent place in your kitchen — and in your heart.

Grandma’s Rice Pudding: Creamy, Sweet, and Full of Nostalgia

Rice pudding was one of grandma’s most comforting desserts — warm, creamy, and sprinkled with cinnamon. Whether served after Sunday lunch or as a sweet snack in the afternoon, it always brought a sense of calm and joy with every spoonful.

In this article, you’ll learn how to make classic rice pudding from scratch, just like grandma did — simple, cozy, and made with love.


Why You’ll Love This Rice Pudding

  • Uses pantry staples you already have
  • Can be served warm or chilled
  • Naturally gluten-free and easy to adapt
  • Great for leftover rice or fresh batch cooking
  • A timeless dessert that never goes out of style

Ingredients for Grandma’s Rice Pudding

This recipe makes 4–6 servings.

  • 1 cup cooked white rice (short or medium grain is best)
  • 2 cups whole milk
  • ½ cup heavy cream (or more milk for a lighter version)
  • ⅓ cup sugar
  • 1 large egg
  • ½ teaspoon vanilla extract
  • ¼ teaspoon ground cinnamon
  • Pinch of salt
  • Optional: ¼ cup raisins or golden raisins
  • Extra cinnamon for topping

Step-by-Step Instructions

1. Combine Rice, Milk, and Cream

In a medium saucepan, combine the cooked rice, milk, cream, sugar, and salt.

Cook over medium heat, stirring frequently, for about 15–18 minutes, until the mixture thickens slightly and the rice is very soft.


2. Temper the Egg

In a small bowl, beat the egg.

Scoop out a few spoonfuls of the hot mixture and slowly whisk it into the egg to temper it.

Then pour the egg mixture back into the saucepan and cook for 2–3 minutes, stirring constantly. The pudding will thicken more.


3. Finish with Flavor

Stir in the vanilla extract and cinnamon. Add raisins if using.

Cook for another 1–2 minutes, then remove from heat.


4. Serve Warm or Cold

Let the pudding sit for a few minutes before serving. It will continue to thicken as it cools.

Serve warm, at room temperature, or chilled.

Dust with cinnamon or nutmeg before serving, if desired.


Serving Suggestions

  • Sprinkle with cinnamon sugar or nutmeg
  • Add a spoonful of whipped cream or fruit preserves
  • Stir in chocolate chips or chopped nuts
  • Layer with fresh fruit like berries or banana slices
  • Drizzle with caramel sauce or honey

Grandma’s tip: A bowl of warm rice pudding is perfect on rainy days.


Storage and Reheating

Store:

  • Refrigerate in an airtight container for up to 4 days

Reheat:

  • Add a splash of milk and warm gently in a saucepan or microwave

Freeze:

  • Not recommended — the texture may become grainy

Variations to Try

  • Coconut Rice Pudding: Use part coconut milk for a tropical twist
  • Spiced Version: Add cardamom, cloves, or star anise
  • Vegan: Use almond or oat milk, and skip the egg
  • Lemon or Orange Zest: For a citrusy brightness
  • Chocolate Rice Pudding: Stir in melted chocolate or cocoa powder

Grandma’s Secrets for Perfect Rice Pudding

  • Use short-grain rice for the creamiest texture
  • Stir often to prevent sticking or scorching
  • Don’t rush — low, gentle heat gives the best results
  • Let it cool slightly before serving to enhance flavor
  • For extra richness, finish with a small pat of butter

Final Thoughts: A Hug in a Bowl

Grandma’s rice pudding was more than a dessert — it was a moment of peace, a pause in the day, and a taste of tradition. Creamy, sweet, and endlessly comforting, it’s a recipe worth keeping alive in every kitchen.

Now it’s your turn to make this timeless favorite — and maybe pass it down, too.

Grandma’s Classic Meatloaf: Juicy, Savory, and Perfectly Baked Every Time

When it came to hearty family dinners, grandma’s meatloaf was always front and center. Juicy, flavorful, and topped with a sweet tangy glaze, it was the kind of dish that brought everyone to the table — and usually back for seconds.

This guide walks you through making traditional meatloaf from scratch, using simple ingredients and grandma’s old-fashioned method for a moist, savory loaf every time.


Why Meatloaf Is a Comfort Food Classic

  • Uses affordable, everyday ingredients
  • Easy to prep and bake in one pan
  • Feeds a whole family with plenty of leftovers
  • Customizable with herbs, vegetables, or sauces
  • Freezes and reheats beautifully

Ingredients for Grandma’s Meatloaf

This recipe makes a 9-inch loaf that serves 6–8 people.

For the Meatloaf:

  • 2 lbs (900g) ground beef (80/20 for best flavor)
  • 1 small onion, finely chopped
  • 2 cloves garlic, minced
  • ¾ cup breadcrumbs
  • ⅓ cup milk
  • 2 large eggs
  • 2 tablespoons Worcestershire sauce
  • 2 tablespoons ketchup
  • 1 teaspoon salt
  • ½ teaspoon black pepper
  • ½ teaspoon dried thyme or parsley (optional)

For the Glaze:

  • ½ cup ketchup
  • 2 tablespoons brown sugar
  • 1 tablespoon Dijon mustard or regular mustard
  • Optional: a splash of vinegar for tang

Step-by-Step Instructions

1. Preheat the Oven

Set your oven to 175°C (350°F). Line a baking sheet with parchment or lightly grease a loaf pan.


2. Prepare the Meat Mixture

In a large bowl, combine the breadcrumbs and milk. Let sit for 2–3 minutes to soak.

Add in the ground beef, chopped onion, garlic, eggs, Worcestershire sauce, ketchup, salt, pepper, and herbs.

Mix gently with your hands or a spoon until just combined. Don’t overmix — it makes the loaf tough.


3. Shape and Bake

Form the meat mixture into a loaf shape on a lined baking sheet or press gently into a loaf pan.

Bake uncovered for 40 minutes.


4. Add the Glaze

While the loaf is baking, mix the glaze ingredients in a small bowl.

After 40 minutes of baking, spread the glaze evenly on top of the meatloaf.

Return to the oven and bake for another 15–20 minutes, or until the internal temperature reaches 70°C (160°F).


5. Rest and Slice

Let the meatloaf rest for 10 minutes before slicing. This keeps it juicy and easier to serve.


Serving Suggestions

  • With mashed potatoes and green beans
  • Alongside roasted vegetables or coleslaw
  • Sliced on sandwiches with mayo and pickles
  • With a side of mac and cheese or buttered corn

Grandma’s tip: Meatloaf sandwiches the next day are even better!


Storage and Reheating

Refrigerate:

  • Store in an airtight container for up to 4 days

Reheat:

  • Microwave individual slices or reheat whole in oven at 160°C (325°F)

Freeze:

  • Wrap whole loaf or individual slices in foil and freeze up to 3 months
  • Thaw overnight in the fridge before reheating

Variations to Try

  • Cheesy Meatloaf: Add shredded cheddar or mozzarella to the mix
  • Turkey or Chicken Meatloaf: Use leaner meat and adjust moisture with extra milk or oil
  • Spicy Kick: Add hot sauce or chopped jalapeños
  • Vegetable Boost: Grate in carrots, zucchini, or mushrooms
  • BBQ Glaze: Swap ketchup glaze for your favorite BBQ sauce

Grandma’s Secrets for the Perfect Meatloaf

  • Let the breadcrumbs soak in milk — it helps keep the loaf moist
  • Don’t overwork the meat — mix just until combined
  • Bake on a baking sheet for crispier edges, or in a loaf pan for a softer texture
  • Always rest before slicing to retain juices
  • Double the glaze if you like it extra saucy

Final Thoughts: A Slice of Tradition

Grandma’s meatloaf was more than dinner — it was the heart of Sunday night meals, the comfort after long days, and a family favorite that always delivered. With this tried-and-true recipe, you can bring that same warmth and flavor to your own table — one savory slice at a time.

Grandma’s Chicken and Dumplings: A Creamy Bowl of Pure Comfort

There’s no dish that says “comfort” quite like a steaming bowl of chicken and dumplings. With tender chicken, soft vegetables, a creamy broth, and fluffy dumplings floating on top, this was one of grandma’s most-loved recipes — especially on cold days or when someone needed a little extra love.

In this guide, we’ll teach you how to make homemade chicken and dumplings from scratch, just like grandma did: rich, hearty, and packed with soul.


Why This Dish Is So Special

  • A one-pot meal perfect for family dinners
  • Features tender shredded chicken and fluffy dumplings
  • The broth is creamy, flavorful, and soul-soothing
  • Made with basic ingredients and lots of love
  • A true comfort food classic for all seasons

Ingredients for Grandma’s Chicken and Dumplings

This recipe serves 6–8 people.

For the Stew:

  • 2 tablespoons butter or oil
  • 1 onion, chopped
  • 2 garlic cloves, minced
  • 3 carrots, sliced
  • 2 celery stalks, chopped
  • 4 cups chicken broth
  • 2 cups cooked shredded chicken (rotisserie or homemade)
  • 1 cup milk or half-and-half
  • 2 tablespoons all-purpose flour
  • 1 teaspoon dried thyme or poultry seasoning
  • Salt and black pepper to taste
  • Optional: 1 bay leaf or chopped parsley

For the Dumplings:

  • 1 cup all-purpose flour
  • 2 teaspoons baking powder
  • ½ teaspoon salt
  • 2 tablespoons butter, melted
  • ½ cup whole milk (plus more if needed)

Step-by-Step Instructions

1. Cook the Base

In a large pot or Dutch oven, melt the butter over medium heat.

Add the onion, garlic, carrots, and celery. Cook for about 5–6 minutes, until soft.

Sprinkle in the flour and stir for 1–2 minutes to coat the vegetables.

Slowly whisk in the chicken broth and bring to a gentle simmer.


2. Add Chicken and Seasonings

Stir in the shredded chicken, milk, thyme, salt, pepper, and bay leaf (if using).

Let the stew simmer uncovered for 10–15 minutes until it thickens slightly.


3. Make the Dumplings

In a bowl, whisk together the flour, baking powder, and salt.

Add the melted butter and milk, stirring just until combined — don’t overmix.

The dough should be thick but spoonable.


4. Add the Dumplings

Drop spoonfuls of dumpling dough (about a tablespoon each) on top of the simmering stew.

Cover with a lid and let cook on low heat for 15 minutes — do not lift the lid during this time.

The dumplings will puff up and steam until fluffy.


5. Serve Hot

Remove the bay leaf, if used. Taste and adjust seasoning.

Serve warm in deep bowls, topped with fresh parsley or a pat of butter if desired.


Tips for Success

  • Use rotisserie chicken for ease, or boil your own with aromatics
  • Don’t uncover the pot while dumplings cook — steam is key!
  • Add peas or corn for extra texture and color
  • If stew gets too thick, add a splash of milk or broth to loosen
  • For richer flavor, stir in a bit of cream at the end

Variations You’ll Love

  • Creamy Herb Dumplings: Add chopped chives or parsley to the dumpling mix
  • Cheesy Dumplings: Mix in shredded cheddar or parmesan
  • Spicy Twist: Add crushed red pepper or hot sauce to the stew base
  • Veggie Boost: Stir in spinach or kale at the end
  • Gluten-Free Option: Use a gluten-free flour blend for both stew and dumplings

Storage and Reheating

Store:

  • Refrigerate leftovers in an airtight container for up to 4 days

Reheat:

  • Gently on the stovetop with a splash of broth or milk
  • Microwave in short bursts, covered with a damp paper towel

Freeze:

  • Best to freeze the stew base without dumplings, then add fresh dumplings when reheating

Final Thoughts: A Bowl Full of Love

Grandma’s chicken and dumplings weren’t just warm and hearty — they were healing, the kind of food that made you feel cared for with every bite. From the fluffy dumplings to the creamy, savory stew, this dish brings comfort straight to the heart.

Now it’s your turn to bring that kind of care and comfort to your kitchen — one spoonful at a time.

Grandma’s Buttermilk Pancakes: Fluffy, Golden, and Made from Scratch

Waking up to the smell of pancakes sizzling on grandma’s griddle was a tradition that made any morning special. Her buttermilk pancakes were soft, fluffy, and perfectly golden — served hot with melted butter and real maple syrup.

In this guide, you’ll learn how to make the ultimate homemade pancakes, just like grandma did: no boxed mix, just real ingredients and a few simple steps for perfect results every time.


Why These Pancakes Are So Loved

  • Incredibly fluffy and light thanks to buttermilk
  • Made from scratch with everyday ingredients
  • Ready in just 20 minutes
  • Perfect for weekend breakfasts, brunches, or even breakfast-for-dinner
  • Easily customizable with berries, chocolate chips, or spices

Ingredients for Grandma’s Buttermilk Pancakes

This recipe makes about 10–12 medium pancakes.

  • 2 cups all-purpose flour
  • 2 tablespoons sugar
  • 1 teaspoon baking soda
  • 2 teaspoons baking powder
  • ½ teaspoon salt
  • 2 cups buttermilk (or substitute below)
  • 2 large eggs
  • ¼ cup unsalted butter, melted
  • 1 teaspoon vanilla extract (optional)
  • Butter or oil for cooking

Buttermilk Substitute:

  • 2 cups milk + 2 tablespoons lemon juice or vinegar
  • Let sit for 5–10 minutes until slightly curdled

Step-by-Step Instructions

1. Mix the Dry Ingredients

In a large bowl, whisk together the flour, sugar, baking powder, baking soda, and salt.


2. Mix the Wet Ingredients

In another bowl, beat the eggs. Add the buttermilk, melted butter, and vanilla. Mix until well combined.


3. Combine Wet and Dry

Pour the wet ingredients into the dry ingredients.

Stir gently until just combined — a few lumps are okay! Don’t overmix or the pancakes will be tough.


4. Preheat the Griddle or Pan

Heat a skillet or griddle over medium heat. Add a bit of butter or oil to coat the surface.


5. Cook the Pancakes

Pour about ¼ cup of batter per pancake onto the hot surface.

Cook for 2–3 minutes, or until bubbles form on the surface and the edges look set. Flip and cook for another 1–2 minutes until golden brown.

Keep warm in a low oven while you finish the batch.


Serving Suggestions

  • With real maple syrup and butter
  • Topped with fresh berries and whipped cream
  • With banana slices and chopped nuts
  • Spread with jam, peanut butter, or honey
  • Rolled with fruit and yogurt for a breakfast wrap

Grandma’s Favorite: A little butter, a splash of syrup, and a smile.


Tips for Perfect Pancakes

  • Don’t overmix the batter — lumps are fine!
  • Let the batter rest for 5 minutes before cooking
  • Use medium heat to avoid burning
  • Wipe the skillet between batches to prevent sticking
  • For crispy edges, use a bit of extra butter on the griddle

Variations You’ll Love

  • Blueberry Pancakes: Add fresh or frozen blueberries to the batter
  • Chocolate Chip Pancakes: Mix in mini chocolate chips
  • Pumpkin Spice Pancakes: Add ½ cup pumpkin puree and spices
  • Lemon Ricotta Pancakes: Swap some buttermilk for ricotta and add lemon zest
  • Whole Wheat Pancakes: Replace half the flour with whole wheat flour

How to Store and Reheat

Store:

  • Let pancakes cool completely, then refrigerate in an airtight container for up to 4 days

Freeze:

  • Stack with parchment between and freeze for up to 2 months

Reheat:

  • Microwave: Heat in 15–20 second bursts
  • Toaster: Great for getting the edges crispy again
  • Oven: Bake at 175°C (350°F) for 5–10 minutes

Final Thoughts: A Breakfast That Feels Like Home

Grandma’s buttermilk pancakes weren’t just about starting the day with a full belly — they were about starting it with joy, comfort, and the kind of flavor you never forget.

Now you can bring that magic into your own kitchen — with every golden, buttery, fluffy bite.

Grandma’s Apple Crisp: Warm, Spiced, and Topped with Buttery Crumble

Few things say “home” like a warm dish of apple crisp coming out of the oven. With tender spiced apples, a crispy oat topping, and that unmistakable aroma of cinnamon and butter, grandma’s apple crisp was a dessert you never had to wait for a special occasion to enjoy — just a few ripe apples and a little love.

In this guide, you’ll learn how to make the perfect apple crisp, just like grandma did — rustic, simple, and absolutely satisfying.


Why Apple Crisp Is a Timeless Favorite

  • Easier and faster than apple pie — no crust needed
  • Made with simple pantry ingredients
  • Perfect for using seasonal apples
  • Best served warm with vanilla ice cream or whipped cream
  • A true comfort dessert that feeds the soul

Ingredients for Grandma’s Apple Crisp

This recipe serves 6–8 people.

For the Filling:

  • 6 medium apples (Granny Smith, Honeycrisp, or a mix), peeled and sliced
  • 2 tablespoons granulated sugar
  • 2 tablespoons brown sugar
  • 1 tablespoon all-purpose flour
  • 1 teaspoon ground cinnamon
  • ¼ teaspoon ground nutmeg
  • 1 teaspoon lemon juice

For the Topping:

  • ¾ cup rolled oats
  • ¾ cup all-purpose flour
  • ½ cup brown sugar
  • ½ cup unsalted butter, cold and cubed
  • ¼ teaspoon salt
  • Optional: ½ teaspoon cinnamon or chopped nuts for added texture

Step-by-Step Instructions

1. Preheat the Oven

Set your oven to 175°C (350°F) and lightly butter a 9×9-inch baking dish or similar.


2. Prepare the Apple Filling

In a large mixing bowl, toss the sliced apples with sugar, brown sugar, flour, cinnamon, nutmeg, and lemon juice.

Pour the apple mixture into the prepared baking dish and spread evenly.


3. Make the Crisp Topping

In another bowl, mix oats, flour, brown sugar, salt, and cinnamon.

Cut in the cold butter using a pastry cutter or your fingertips until the mixture resembles coarse crumbs.

Sprinkle the topping evenly over the apples.


4. Bake

Bake for 40–45 minutes, or until the topping is golden brown and the apples are tender and bubbling.

Let cool for at least 10–15 minutes before serving — this allows the filling to set slightly.


Serving Suggestions

  • Warm with a scoop of vanilla ice cream
  • Drizzled with caramel sauce
  • Served cold for breakfast with a dollop of Greek yogurt
  • With whipped cream and a sprinkle of cinnamon

Grandma’s Favorite: A warm bowl of apple crisp with milk poured over the top — old-fashioned and delicious!


Storage and Reheating Tips

Store:

  • Cover and refrigerate for up to 4 days

Reheat:

  • Oven: Warm at 160°C (325°F) for 10–15 minutes
  • Microwave: Heat individual portions in short intervals

Freeze:

  • Freeze after baking (cooled) for up to 3 months
  • Thaw in the fridge overnight and reheat before serving

Delicious Variations

  • Apple-Pear Crisp: Replace half the apples with ripe pears
  • Maple Apple Crisp: Add 2 tablespoons of maple syrup to the filling
  • Berry Apple Crisp: Mix in fresh or frozen berries with the apples
  • Coconut-Oat Topping: Add shredded coconut to the topping for extra texture
  • Gluten-Free Version: Use gluten-free flour and oats

Grandma’s Tips for the Perfect Apple Crisp

  • Use tart apples like Granny Smith for balance
  • Slice apples evenly so they cook at the same rate
  • Don’t skip the lemon juice — it brightens the flavor
  • Use real butter for the richest, crunchiest topping
  • Let it rest before serving — this helps the juices settle

Final Thoughts: A Rustic Treat with Heart

Grandma’s apple crisp wasn’t fancy — and that’s exactly what made it so special. No need for perfection, just ripe fruit, cozy spices, and a golden, buttery topping that brought everyone back for seconds.

Now it’s your turn to carry on that tradition with a dessert that’s as comforting as it is delicious.

Grandma’s Chicken Pot Pie: A Creamy, Golden-Baked Classic Filled with Love

When it came to comfort food, nothing could beat grandma’s homemade chicken pot pie. With its flaky golden crust, creamy chicken filling, and colorful mix of vegetables, it was more than just dinner — it was a warm, baked hug served fresh from the oven.

This article will guide you through how to make a traditional chicken pot pie from scratch — hearty, homemade, and bursting with flavor, just like grandma’s.

Why This Chicken Pot Pie Is a True Classic

  • Golden, flaky top crust that seals in all the goodness
  • Creamy, savory filling made with real ingredients
  • Tender chunks of chicken and vegetables in every bite
  • Perfect for family dinners, leftovers, or meal prep
  • Brings back warm memories of grandma’s kitchen

Ingredients for Grandma’s Chicken Pot Pie

This recipe fills one 9-inch deep pie dish (or a medium casserole).

For the Crust (Top Only or Double if Desired):

  • 1 ¼ cups all-purpose flour
  • ½ teaspoon salt
  • ½ cup cold unsalted butter, cubed
  • 3–5 tablespoons ice water

Or use store-bought pie crust or puff pastry for a shortcut.

For the Filling:

  • 2 tablespoons unsalted butter
  • 1 small onion, chopped
  • 2 cloves garlic, minced
  • 2 carrots, diced
  • 2 celery stalks, diced
  • ⅓ cup all-purpose flour
  • 2 cups chicken broth
  • ¾ cup whole milk or half-and-half
  • 2–3 cups cooked chicken, shredded or diced
  • ½ cup frozen peas
  • ½ teaspoon dried thyme
  • Salt and pepper to taste

For Finishing:

  • 1 egg, beaten (for egg wash)

Step-by-Step Instructions

1. Prepare the Crust (If Making from Scratch)

Mix flour and salt in a bowl. Cut in cold butter until crumbly.

Add ice water one tablespoon at a time until the dough holds together. Form into a disc, wrap in plastic, and refrigerate for at least 30 minutes.

2. Make the Filling

In a large skillet or saucepan, melt butter over medium heat.

Add onion, garlic, carrots, and celery. Cook until vegetables are soft, about 6–8 minutes.

Stir in flour and cook for 1–2 minutes, stirring constantly, to form a roux.

Gradually whisk in chicken broth and milk. Cook until thickened (5–7 minutes).

Stir in the cooked chicken, peas, thyme, salt, and pepper. Let simmer 2–3 minutes. Remove from heat and let cool slightly.

3. Assemble the Pie

Preheat oven to 200°C (400°F).

Pour the filling into a 9-inch pie dish or baking dish.

Roll out your pie dough to fit over the top. Lay it gently over the filling and trim any excess. Crimp the edges and cut small slits to vent.

Brush with beaten egg for a shiny, golden crust.

4. Bake

Bake for 30–35 minutes, or until the crust is golden and the filling is bubbling.

Let rest for 10–15 minutes before serving — this allows the filling to set.

Serving Suggestions

  • Serve with a simple green salad or roasted vegetables
  • Pair with a glass of iced tea or lemonade
  • Enjoy as is — it’s a complete meal on its own

Tips for the Best Chicken Pot Pie

  • Use leftover roasted chicken or rotisserie chicken to save time
  • Add extra herbs like rosemary or parsley for flavor
  • Let the filling cool slightly before topping with crust — prevents soggy dough
  • Don’t skip the egg wash — it gives that classic golden look
  • For extra comfort, add a splash of cream to the filling

Make-Ahead and Storage

Make Ahead:

  • Prep filling and crust separately up to 1 day ahead
  • Assemble and bake when ready to serve
  • Or assemble and refrigerate (unbaked) for up to 24 hours

Store:

  • Refrigerate leftovers for up to 4 days

Reheat:

  • Bake at 175°C (350°F) until hot and bubbly
  • Microwave individual portions if needed, but crust may lose some crispness

Freeze:

  • Freeze whole assembled, unbaked pot pie. Wrap tightly.
  • Bake from frozen at 190°C (375°F) for 45–55 minutes

Final Thoughts: Dinner, the Way Grandma Did It

Grandma’s chicken pot pie was more than a meal — it was a reminder of everything good: cozy evenings, full plates, and second helpings shared around the table. From the rich, creamy filling to the golden crust, every forkful was filled with love and tradition.

Now it’s your turn to bring that magic into your own kitchen with this timeless, delicious recipe.

Grandma’s Homemade Cornbread: Moist, Buttery, and Baked to Perfection

In grandma’s kitchen, cornbread was more than a side dish — it was a staple. Served with stews, chili, greens, or just a smear of butter and a drizzle of honey, it was always baked in a hot cast-iron skillet and came out golden, moist, and full of flavor.

This recipe brings back that homemade magic. We’ll show you how to make traditional Southern-style cornbread, just like grandma did — with crispy edges, tender crumb, and simple ingredients from the pantry.

Why Grandma’s Cornbread Is So Loved

There’s something special about homemade cornbread — especially when it’s done the old-fashioned way:

  • No added sugar (or just a touch — grandma-style!)
  • Moist on the inside, golden and crisp on the outside
  • Baked in a cast-iron skillet for perfect texture
  • Versatile enough for both sweet and savory dishes
  • Always made with real cornmeal, butter, and love

Let’s get started!

Ingredients for Grandma’s Cornbread

This recipe serves 6–8 people and bakes in a 9-inch skillet or square pan.

  • 1 cup cornmeal (medium or fine ground)
  • 1 cup all-purpose flour
  • 1 tablespoon baking powder
  • ½ teaspoon baking soda
  • ½ teaspoon salt
  • 1 cup buttermilk (or substitute below)
  • 2 large eggs
  • ½ cup unsalted butter, melted
  • Optional: 1–2 tablespoons sugar (for slightly sweet cornbread)
  • Optional: ½ cup corn kernels, shredded cheese, or chopped jalapeños

Buttermilk Substitute:

  • 1 cup milk + 1 tablespoon vinegar or lemon juice
  • Let sit 5–10 minutes before using

Step-by-Step Instructions

1. Preheat the Oven (and the Skillet)

Preheat oven to 220°C (425°F).

If using a cast-iron skillet, place it in the oven while it preheats. A hot skillet = crispy edges!

2. Mix Dry Ingredients

In a large bowl, whisk together the cornmeal, flour, baking powder, baking soda, salt, and sugar if using.

3. Mix Wet Ingredients

In another bowl, beat the eggs. Add the buttermilk and melted butter. Stir until well combined.

4. Combine Wet and Dry

Add the wet mixture to the dry ingredients. Stir just until combined. Do not overmix — a few lumps are fine.

If adding extras (corn, cheese, herbs), fold them in now.

Grandma’s Tip: A slightly thick batter makes a heartier cornbread.

5. Pour into the Hot Pan

Carefully remove the hot skillet from the oven and grease it with a small amount of butter or oil.

Pour the batter into the skillet — it should sizzle slightly. Spread evenly.

6. Bake

Bake for 20–25 minutes, or until the top is golden brown and a toothpick comes out clean from the center.

Let it cool in the pan for a few minutes before slicing and serving.

How to Serve Cornbread (Grandma-Style)

Cornbread is incredibly versatile. Serve it:

  • With chili or bean stew
  • Alongside fried chicken or BBQ ribs
  • Crumbled into collard greens or soups
  • Toasted with butter and jam
  • As a savory stuffing for poultry
  • With honey or molasses drizzled on top

Variations and Add-Ins

Want to customize your cornbread? Try these ideas:

  • Cheddar Jalapeño Cornbread: Add ½ cup shredded cheese + 1 chopped jalapeño
  • Sweet Cornbread: Increase sugar to ¼ cup
  • Bacon Cornbread: Fold in cooked, crumbled bacon
  • Herbed Cornbread: Add chopped chives, thyme, or rosemary
  • Corn Pudding Cornbread: Mix in creamed corn for extra moisture

How to Store and Reheat

Store:

  • Wrap leftovers in foil or airtight container
  • Keep at room temperature for up to 2 days, or refrigerate for up to 5 days

Freeze:

  • Wrap tightly in plastic and foil, then freeze for up to 2 months
  • Thaw at room temperature or in the oven

Reheat:

  • Oven: Wrap in foil and warm at 160°C (325°F) for 10–15 minutes
  • Microwave: Wrap in a damp paper towel and heat in short bursts

Grandma’s Secrets for the Best Cornbread

  • Preheat your skillet — this gives you that signature crispy crust
  • Use real buttermilk for tang and tenderness
  • Don’t overmix — treat the batter gently
  • Serve warm, straight from the skillet
  • Make extra — it disappears fast!

Final Thoughts: Cornbread with a Legacy

Grandma’s cornbread wasn’t just a side dish — it was part of the story. A warm slice passed around the table, a complement to hearty meals, or a snack all on its own, it brought comfort and connection to every occasion.

Now, with this recipe, you can bake that same golden comfort in your own kitchen — and carry on a timeless tradition.

Grandma’s Homemade Vanilla Pudding: A Silky, Creamy Dessert Straight from the Heart

Before instant pudding mix was a kitchen staple, grandma was already whipping up batches of smooth, homemade vanilla pudding using just a handful of real ingredients. With its silky texture and rich, comforting flavor, it was one of those desserts that felt like a warm hug in a bowl.

In this guide, you’ll learn how to make vanilla pudding from scratch, using the same simple techniques and ingredients grandma used — no packets, no preservatives, just creamy goodness.

Why Homemade Pudding Is Worth It

Store-bought puddings might be fast, but nothing compares to the flavor and texture of the real thing. Here’s why:

  • Uses real milk, eggs, and vanilla
  • Richer, creamier texture than instant mixes
  • Perfect base for other flavors (chocolate, banana, coconut)
  • Great for layering into trifles or topping with fruit
  • Brings back that nostalgic, old-fashioned dessert vibe

Let’s start with the ingredients.

Ingredients for Homemade Vanilla Pudding

This recipe makes about 4–6 servings.

  • 2 ½ cups whole milk
  • ½ cup granulated sugar
  • ¼ cup cornstarch
  • ¼ teaspoon salt
  • 3 large egg yolks
  • 2 tablespoons unsalted butter
  • 1 ½ teaspoons pure vanilla extract

Optional: Add a splash of cream for a richer finish or a pinch of nutmeg for warmth.

Step-by-Step Instructions

1. Mix the Dry Ingredients

In a medium saucepan (off the heat), whisk together the sugar, cornstarch, and salt.

This prevents clumping when you add the milk.

2. Add the Milk and Yolks

Gradually whisk in the milk, then the egg yolks. Make sure everything is fully combined and smooth.

Grandma’s Tip: Strain the egg yolks if you want extra silky pudding.

3. Heat Gently and Stir Constantly

Place the saucepan over medium heat. Cook the mixture, stirring constantly, until it thickens and starts to bubble — about 8–10 minutes.

Once bubbles appear, cook for 1 more minute while continuing to stir. The pudding should coat the back of a spoon.

4. Remove from Heat and Add Butter & Vanilla

Turn off the heat. Stir in the butter and vanilla extract until smooth and fully melted.

Butter gives the pudding that classic creamy sheen and richness.

5. Strain (Optional) and Cool

For extra smoothness, pour the pudding through a fine-mesh sieve into a bowl.

Cover with plastic wrap pressed directly onto the surface to prevent a skin from forming.

Chill for at least 2 hours before serving — or enjoy it warm if you’re like grandma.

How to Serve Vanilla Pudding

Homemade vanilla pudding is incredibly versatile. Try it:

  • As is, with a sprinkle of cinnamon or nutmeg
  • Topped with berries or banana slices
  • Layered with crushed cookies or cake in a trifle
  • With whipped cream and chocolate shavings
  • As a filling for pies, donuts, or tarts

Grandma sometimes served it in vintage teacups with a biscuit on the side.

Make-Ahead and Storage Tips

  • Store pudding in an airtight container in the fridge for up to 4 days
  • Press plastic wrap directly on the surface to prevent skin
  • Stir before serving to smooth it out
  • Do not freeze — texture will suffer after thawing

Flavor Variations

Once you master the vanilla base, the possibilities are endless:

  • Chocolate Pudding: Add ½ cup cocoa powder or 100g melted dark chocolate
  • Banana Pudding: Layer with fresh banana slices and vanilla wafers
  • Coconut Pudding: Replace 1 cup of milk with coconut milk and add shredded coconut
  • Coffee Pudding: Stir in 1 tsp instant espresso powder with the milk
  • Lemon Pudding: Replace vanilla with lemon zest and a few tablespoons of lemon juice

Tips for Perfect Pudding Every Time

  • Use whole milk for best creaminess
  • Don’t stop stirring once it starts to heat up — this avoids lumps
  • Add eggs gradually to avoid scrambling
  • Cool slowly to avoid watery pudding
  • Strain after cooking for a gourmet finish

Final Thoughts: A Bowl Full of Comfort

Grandma’s vanilla pudding wasn’t just dessert. It was a sweet reward after a long day, a soothing treat for upset stomachs, and a creamy reminder that the best things in life are often the simplest.

With just a few ingredients and a little patience, you can recreate that same sense of home, warmth, and nostalgia in every spoonful.

Grandma’s Apple Pie Recipe: A Classic Dessert with a Golden, Flaky Crust

When the smell of cinnamon, baked apples, and buttery crust filled the house, you knew one thing for sure — grandma was making apple pie. A symbol of tradition, love, and Sunday dinners, her apple pie wasn’t just dessert. It was home in every bite.

In this guide, we’ll walk you through how to make grandma’s classic apple pie from scratch — including a flaky homemade crust, a rich spiced filling, and all the little secrets that make it unforgettable.

Why Apple Pie Is the Ultimate Classic

Few desserts stand the test of time like apple pie. It’s:

  • Made with simple, seasonal ingredients
  • Bursting with warm spices and soft apples
  • Perfect for holidays, celebrations, or anytime baking
  • A crowd-pleaser that feels both rustic and elegant
  • Comforting in every single forkful

Let’s get started with the ingredients.

Ingredients for Grandma’s Apple Pie

For the Crust (Double Crust):

  • 2 ½ cups all-purpose flour
  • 1 teaspoon salt
  • 1 tablespoon sugar (optional)
  • 1 cup cold unsalted butter (cut into cubes)
  • 6–8 tablespoons ice water

For the Apple Filling:

  • 6–7 medium apples (Granny Smith, Honeycrisp, or a mix), peeled and sliced
  • ¾ cup granulated sugar
  • ¼ cup brown sugar
  • 2 tablespoons all-purpose flour (for thickening)
  • 1 teaspoon ground cinnamon
  • ¼ teaspoon ground nutmeg
  • 1 tablespoon lemon juice
  • 1 teaspoon vanilla extract
  • Optional: pinch of ground cloves or ginger

For the Top:

  • 1 egg + 1 tablespoon milk (for egg wash)
  • Coarse sugar for sprinkling (optional)

Step-by-Step Instructions

1. Make the Pie Dough

In a large bowl, whisk together flour, salt, and sugar.

Cut in the cold butter using a pastry cutter or your fingers until the mixture resembles coarse crumbs.

Add ice water one tablespoon at a time, mixing gently until dough holds together when pinched. Don’t overwork it.

Divide into two discs, wrap in plastic, and refrigerate for at least 1 hour.

Grandma’s Tip: Cold dough = flaky crust.

2. Prepare the Apple Filling

While the dough chills, combine sliced apples, sugars, flour, cinnamon, nutmeg, lemon juice, and vanilla in a large bowl.

Toss to coat and let sit for 20 minutes — this helps release juices and deepen the flavor.

3. Roll Out the Crust

Preheat oven to 200°C (400°F).

Roll out one dough disc on a floured surface into a 12-inch circle. Fit into a 9-inch pie pan. Trim excess dough but leave a bit hanging over the edge.

Roll out the second disc for the top crust (or cut into strips for a lattice).

4. Assemble the Pie

Pour the apple filling into the pie crust, including the juices. Dot the top with small cubes of butter (optional).

Top with second crust or lattice. Seal the edges and crimp. Cut small slits in the top if using a full crust.

Brush with egg wash and sprinkle with coarse sugar if desired.

5. Bake the Pie

Place pie on a baking sheet to catch drips.

Bake at 200°C (400°F) for 20 minutes, then reduce heat to 175°C (350°F) and bake for 35–40 more minutes, or until crust is golden and filling is bubbling.

If the edges brown too quickly, cover with foil or a pie shield.

6. Cool Before Slicing

Let the pie cool for at least 2 hours to allow the filling to set. Serve warm or at room temperature.

Serving Suggestions

Grandma’s apple pie pairs beautifully with:

  • A scoop of vanilla ice cream
  • A dollop of fresh whipped cream
  • A drizzle of caramel sauce
  • A slice of sharp cheddar cheese (a regional favorite!)

Storage Tips

  • Store leftover pie covered at room temperature for 1 day, or in the fridge for up to 4 days
  • Reheat slices in the oven at 150°C (300°F) for 10–15 minutes for best texture
  • Freeze unbaked pie for up to 3 months — bake straight from frozen, adding 20–30 extra minutes

Grandma’s Tips for the Best Apple Pie

  • Mix apple varieties for flavor and texture
  • Use a glass or ceramic pie dish for even baking
  • Let the filling sit before baking to release juices
  • Add lemon juice for brightness and to prevent browning
  • Chill your dough before rolling and again before baking

Final Thoughts: A Slice of Pure Nostalgia

Grandma’s apple pie wasn’t just dessert — it was the dessert. Served on holidays, after big family dinners, or sometimes “just because,” it had a way of making everything feel right.

With its buttery crust, tender spiced apples, and timeless simplicity, this recipe captures what made her pies so special: honest ingredients, careful hands, and love in every layer.