Grandma’s Cornbread: Moist, Golden, and Made from Scratch

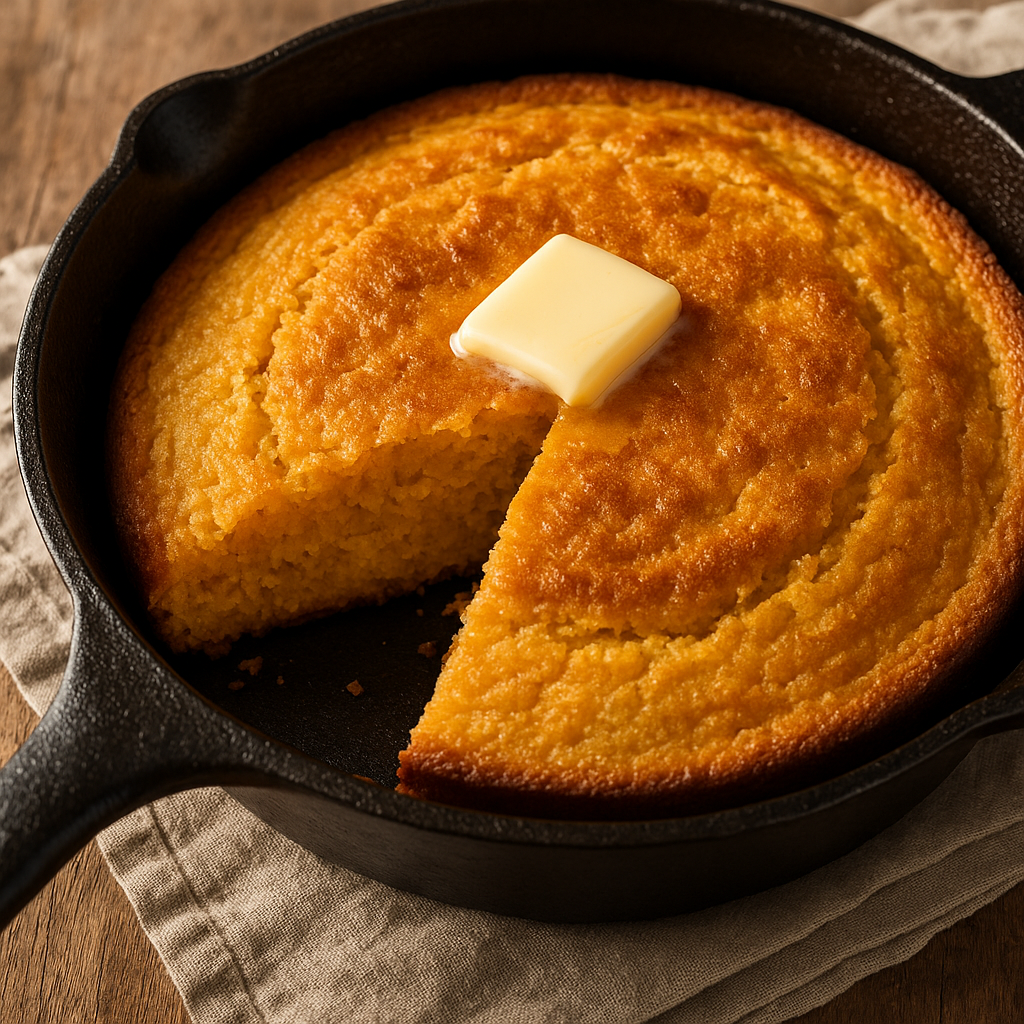
Whether served alongside a bowl of chili, a Southern-style dinner, or simply enjoyed with honey and butter, cornbread has always held a special place in grandma’s kitchen. Baked in a cast iron skillet, with a tender crumb and golden crust, it was the kind of simple recipe that felt like home.

In this article, you’ll learn how to make classic cornbread from scratch — moist, flavorful, and incredibly easy to prepare.

Why You’ll Love Grandma’s Cornbread

  • Moist and fluffy interior with a crispy edge
  • Balanced sweetness — not too sugary
  • Easy one-bowl recipe
  • Bakes perfectly in a skillet or baking dish
  • Ready in under 30 minutes

Ingredients for Homemade Cornbread

Serves 8.

  • 1 cup yellow cornmeal
  • 1 cup all-purpose flour
  • 1 tablespoon baking powder
  • ½ teaspoon baking soda
  • ½ teaspoon salt
  • 2 tablespoons sugar (optional or to taste)
  • 2 large eggs
  • 1 cup buttermilk
  • ½ cup milk
  • ⅓ cup melted butter or oil
  • Optional: 1 cup corn kernels, shredded cheese, or jalapeños

Step-by-Step Instructions

1. Preheat the Oven

Preheat to 200°C (400°F).

Place a cast iron skillet or baking dish in the oven to heat while you prepare the batter.

2. Mix the Dry Ingredients

In a large bowl, whisk together cornmeal, flour, baking powder, baking soda, salt, and sugar.

3. Mix the Wet Ingredients

In a separate bowl or measuring cup, whisk together eggs, buttermilk, milk, and melted butter or oil.

4. Combine the Batter

Pour the wet mixture into the dry ingredients.

Stir gently until just combined — don’t overmix.

Fold in any add-ins (corn, cheese, etc.) if using.

5. Pour and Bake

Remove the hot skillet from the oven and grease it with butter or oil.

Pour in the batter and smooth the top.

Bake for 20–25 minutes, or until golden brown and a toothpick comes out clean.

Let cool for 5–10 minutes before slicing.

Serving Suggestions

  • With butter and honey or jam
  • Crumbled into soups, stews, or chili
  • Alongside fried chicken, ribs, or collard greens
  • Used for stuffing/dressing during holidays
  • Topped with a spoonful of maple syrup

Grandma’s tip: Always bake in a preheated cast iron skillet for the crispiest crust.

Storage and Reheating

Store:

  • Cover and store at room temperature for up to 2 days
  • Refrigerate for up to 5 days

Reheat:

  • Wrap slices in foil and warm in the oven at 160°C (325°F)
  • Or microwave individual slices for 15–30 seconds

Freeze:

  • Freeze slices or whole bread, tightly wrapped, for up to 2 months
  • Thaw at room temp and reheat before serving

Variations to Try

  • Sweet Cornbread: Add more sugar or a tablespoon of honey to the batter
  • Savory Cornbread: Add shredded cheddar, bacon, or green onions
  • Spicy Cornbread: Mix in diced jalapeños or chili powder
  • Corn Muffins: Bake in muffin tins for 15–18 minutes
  • Gluten-Free: Use a gluten-free flour blend in place of all-purpose

Common Mistakes to Avoid

  • Dry texture? Don’t overbake — remove as soon as the toothpick is clean
  • Bitter taste? Check that baking soda/powder is fresh and properly measured
  • Dense cornbread? Mix batter gently and don’t pack the flour
  • Crumbly? Let it rest before cutting and don’t skip the egg or fat

Grandma’s Cornbread Secrets

  • Use buttermilk — it adds tang and helps with texture
  • Bake in a cast iron skillet for even browning and crispy edges
  • Let the batter rest for 5–10 minutes before baking
  • Use coarse cornmeal for a rustic texture, or fine for smoother results
  • Slice with a serrated knife once slightly cooled for clean edges

Final Thoughts: A Golden Tradition

Grandma’s cornbread was never fancy — but it was always perfect. With each bite, it carried the warmth of the oven, the simplicity of real ingredients, and the comfort of home.

Now, you can carry that same tradition forward, sharing it with your own family and creating new memories, one golden slice at a time.

Grandma’s Beef Stew: Hearty, Slow-Cooked, and Full of Flavor

There’s nothing like a bowl of homemade beef stew to warm you up on a chilly evening. With tender chunks of beef, soft root vegetables, and a rich, savory broth, grandma’s stew was the kind of meal that made you feel nourished and comforted from the inside out.

In this article, you’ll learn how to make a classic, old-fashioned beef stew, slow-cooked to perfection and bursting with flavor. We’ll walk through every step, offer expert tips, and share variations that make it your own — all while staying true to the heart of grandma’s kitchen.


Why Beef Stew Is a Timeless Comfort Food

  • Slow-cooked until the beef is melt-in-your-mouth tender
  • Made with simple, wholesome ingredients
  • Packed with vegetables, herbs, and rich broth
  • Even better the next day
  • Feeds a crowd and freezes well

Ingredients for Traditional Beef Stew

This recipe makes about 6 servings.

Meat and Vegetables:

  • 2 lbs (900g) beef chuck roast, cut into 1.5-inch cubes
  • 3 tablespoons vegetable oil (for browning)
  • 1 large onion, chopped
  • 3 garlic cloves, minced
  • 4 carrots, peeled and sliced into thick rounds
  • 3 celery stalks, chopped
  • 3 medium potatoes, peeled and cut into chunks
  • 2 tablespoons tomato paste
  • 1 tablespoon Worcestershire sauce
  • ½ cup red wine (optional, but recommended)
  • 4 cups beef broth
  • 2 bay leaves
  • 1 teaspoon dried thyme
  • Salt and freshly ground black pepper to taste
  • 2 tablespoons flour (optional, for thickening)

Step-by-Step Instructions

1. Brown the Beef

Heat 1–2 tablespoons of oil in a large Dutch oven over medium-high heat.

Season the beef with salt and pepper. Brown it in batches to avoid overcrowding, turning until well browned on all sides (about 6–8 minutes per batch). Set browned beef aside.

Tip: Don’t skip this step! Browning adds layers of flavor.


2. Sauté the Aromatics

Lower the heat to medium and add another tablespoon of oil if needed.

Sauté the chopped onion for 4–5 minutes until translucent, then add garlic and tomato paste. Stir for 1 minute until fragrant.


3. Deglaze the Pot

Pour in the red wine (or ½ cup broth if not using wine), scraping up the browned bits from the bottom of the pot with a wooden spoon.

Let it simmer for 2–3 minutes until slightly reduced.


4. Add the Broth and Seasoning

Return the browned beef to the pot. Add the Worcestershire sauce, thyme, bay leaves, and beef broth.

Bring to a simmer, cover, and reduce heat to low. Let it cook for 1.5 to 2 hours, or until the beef is very tender.


5. Add the Vegetables

After the initial simmering time, stir in the carrots, celery, and potatoes.

Cover again and simmer for another 30–40 minutes, or until vegetables are tender.


6. Optional Thickening

If you like a thicker stew, mix 2 tablespoons of flour with 2 tablespoons of water in a small bowl, then stir it into the stew during the last 15 minutes of cooking.

Alternatively, mash some of the potatoes directly into the stew to naturally thicken it.


7. Taste and Adjust

Remove bay leaves. Taste the stew and adjust salt, pepper, or thyme as needed.

Let it sit uncovered for 5–10 minutes to cool slightly and thicken more.


Serving Suggestions

  • With crusty bread or warm dinner rolls
  • Over a bed of buttered egg noodles or mashed potatoes
  • With a side of green beans or steamed greens
  • Topped with fresh parsley for color and freshness
  • Alongside a simple garden salad and a glass of red wine

Grandma’s tip: Always serve stew in warm bowls — it stays hot longer and feels more comforting.


Storage and Reheating

Store:

  • Refrigerate in an airtight container for up to 4 days

Reheat:

  • Stovetop: Warm over low heat, adding a splash of broth if needed
  • Microwave: Heat individual portions in 1-minute intervals, stirring between

Freeze:

  • Let stew cool completely. Freeze in freezer-safe containers for up to 3 months
  • Thaw in refrigerator overnight before reheating

Variations to Try

1. Irish-Inspired Stew

Replace red wine with Guinness or stout beer, and use parsnips and turnips for a deeper flavor.

2. Herbed Stew

Add a sprig of fresh rosemary or a spoonful of chopped fresh herbs just before serving.

3. Spicy Stew

Add red pepper flakes or chopped chili for a subtle kick.

4. Mushroom Stew

Include sautéed mushrooms for earthiness and texture.

5. Slow Cooker Version

Brown the beef first, then transfer everything to a slow cooker and cook on low for 6–8 hours or high for 4–5 hours.


Tips for the Best Stew Every Time

  • Choose the right cut of beef: Chuck roast or stew beef works best — it gets tender with slow cooking.
  • Don’t rush it: Long, slow simmering makes the meat melt in your mouth.
  • Layer your seasoning: Add herbs early and adjust salt and pepper near the end.
  • Let it rest: Give your stew 10 minutes to cool before serving. The flavors meld and it thickens naturally.
  • Make it ahead: Beef stew tastes even better the next day.

Final Thoughts: A Bowl Full of Heart

Grandma’s beef stew was more than food — it was a ritual, a comfort, and a connection to tradition. Whether you’re sharing it with family, making it for a cozy night in, or freezing some for later, this stew brings warmth to both body and soul.

Now it’s your turn to recreate that timeless comfort — in your kitchen, for your people, and maybe even for the next generation.

Grandma’s Homemade Mac and Cheese: Creamy, Cheesy, and Baked to Perfection

No boxed mix ever came close to grandma’s baked mac and cheese. Rich, golden, and packed with gooey cheese, it was always the most requested side dish at family dinners — and often the first to disappear from the table.

This article will show you how to make classic baked macaroni and cheese, the old-fashioned way: comforting, creamy, and full of real, melted cheese.

Why This Mac and Cheese Is a Family Favorite

  • Made with real cheese and a creamy béchamel sauce
  • Topped with a buttery golden crust
  • Easily customizable with mix-ins or spices
  • Perfect for holidays, potlucks, or weeknight dinners
  • Comfort food at its absolute best

Ingredients for Grandma’s Mac and Cheese

Serves 6–8 people.

For the Pasta:

  • 1 lb (450g) elbow macaroni or small shells
  • Salt for pasta water

For the Cheese Sauce:

  • 4 tablespoons butter
  • 4 tablespoons all-purpose flour
  • 3 cups milk (whole milk preferred)
  • 2 cups shredded sharp cheddar cheese
  • 1 cup shredded mozzarella (or another melty cheese)
  • ½ teaspoon salt
  • ¼ teaspoon black pepper
  • Optional: pinch of paprika or dry mustard

For the Topping:

  • ½ cup breadcrumbs (panko or regular)
  • 1 tablespoon melted butter
  • Optional: more shredded cheese on top

Step-by-Step Instructions

1. Cook the Pasta

Boil the macaroni in salted water until just al dente (about 1 minute less than package directions).

Drain and set aside.

2. Make the Roux

In a large saucepan, melt the butter over medium heat.

Add the flour and stir constantly for about 2 minutes until lightly golden.

3. Add the Milk

Slowly whisk in the milk to avoid lumps.

Cook, stirring constantly, until the sauce thickens — about 5–7 minutes.

4. Add the Cheese

Remove from heat and stir in the shredded cheddar and mozzarella.

Season with salt, pepper, and optional paprika or mustard powder.

Taste and adjust seasoning as needed.

5. Combine Pasta and Sauce

Mix the drained pasta into the cheese sauce until fully coated.

Transfer to a greased 9×13-inch baking dish.

6. Add the Topping

Mix breadcrumbs with melted butter and sprinkle over the top.

You can also add a little more shredded cheese for extra crispiness.

7. Bake

Bake at 180°C (350°F) for 25–30 minutes, or until bubbly and golden on top.

Let rest for 5–10 minutes before serving.

Serving Ideas

  • Serve as a main dish with salad or roasted vegetables
  • As a side for fried chicken, barbecue, or meatloaf
  • Add bacon bits, caramelized onions, or jalapeños for extra flavor
  • Use as a base for mac and cheese bowls with toppings like pulled pork or veggies

Storage and Reheating

Store:

  • Refrigerate in an airtight container for up to 4 days

Reheat:

  • Oven: Cover with foil and bake at 160°C (325°F) until hot
  • Microwave: Heat individual portions with a splash of milk

Freeze:

  • Freeze after baking. Wrap tightly and freeze for up to 2 months
  • Thaw overnight in the fridge and reheat thoroughly

Tasty Variations

  • Three-Cheese Mac: Add Gruyère, Monterey Jack, or Parmesan
  • Spicy Mac: Add cayenne, hot sauce, or pepper jack
  • Veggie Mac: Stir in cooked spinach, peas, or roasted cauliflower
  • Southern-Style: Add beaten egg to the sauce before baking for a firmer texture
  • Gluten-Free: Use GF pasta and flour

Grandma’s Tips for the Creamiest Mac and Cheese

  • Use freshly shredded cheese — it melts better than pre-shredded
  • Don’t overcook the pasta before baking
  • For extra creaminess, use a splash of cream or add more cheese to the sauce
  • Let the mac and cheese rest after baking so it sets up perfectly
  • Always taste the sauce before baking — adjust seasoning early!

Final Thoughts: The Ultimate Comfort Classic

Whether served on a holiday table or a rainy Tuesday night, grandma’s mac and cheese was always a dish that brought smiles and second helpings. With its gooey interior and golden, cheesy crust, it’s a recipe that deserves a permanent place in your kitchen — and in your heart.