Grandma’s Chicken and Dumplings: A Creamy Bowl of Pure Comfort

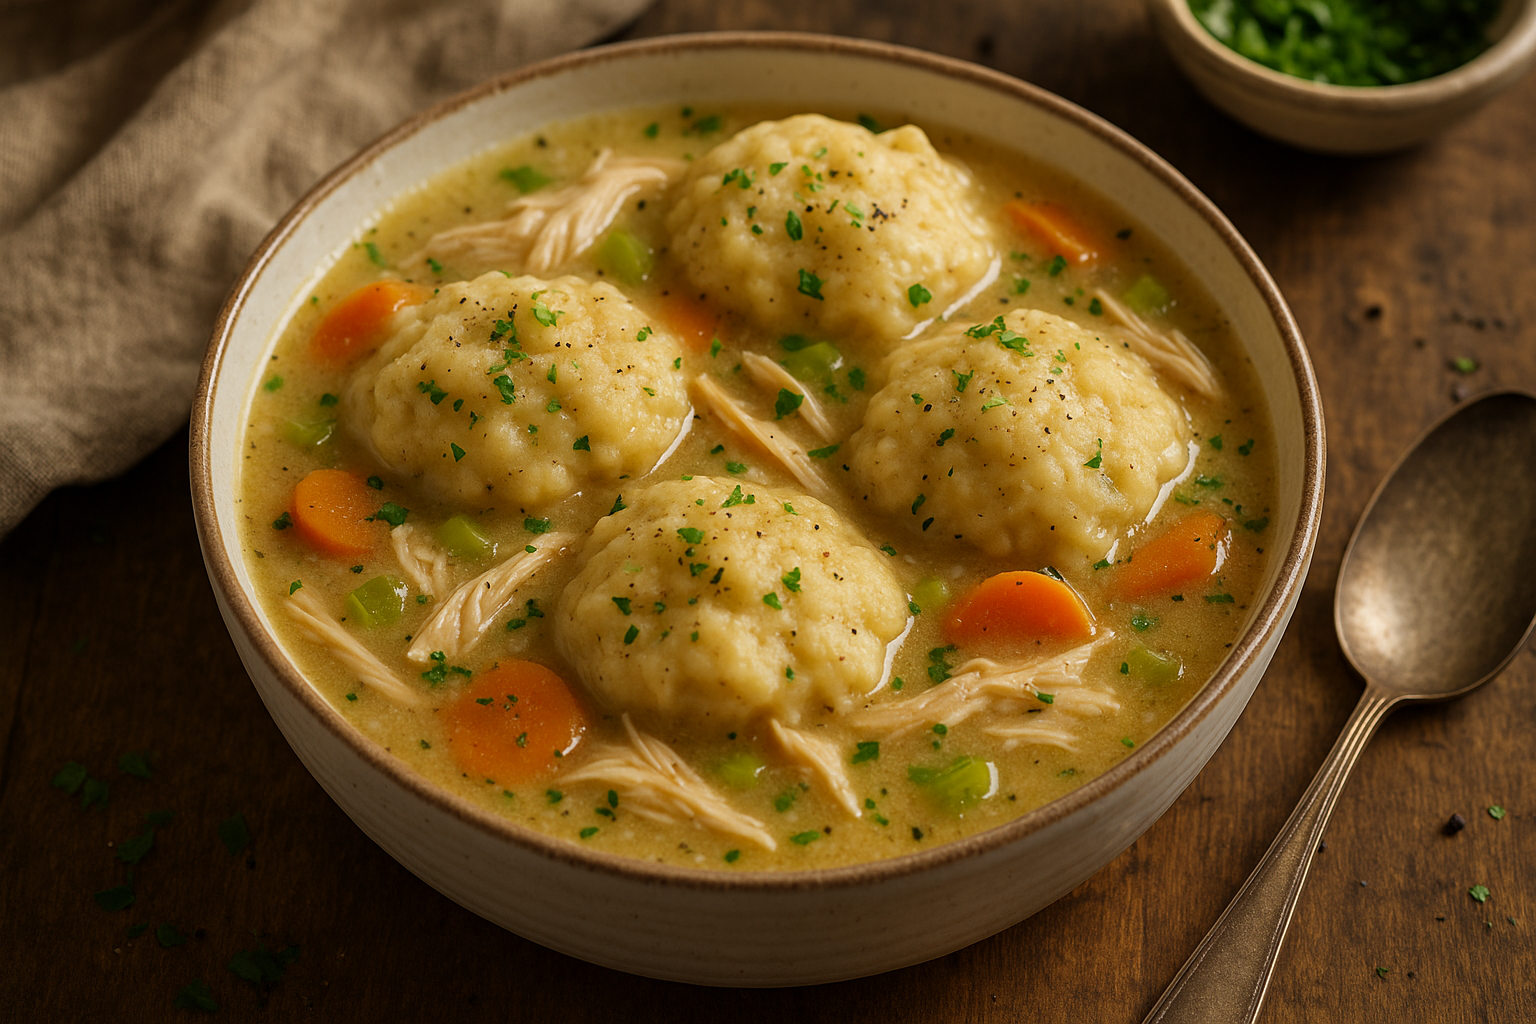
There’s no dish that says “comfort” quite like a steaming bowl of chicken and dumplings. With tender chicken, soft vegetables, a creamy broth, and fluffy dumplings floating on top, this was one of grandma’s most-loved recipes — especially on cold days or when someone needed a little extra love.

In this guide, we’ll teach you how to make homemade chicken and dumplings from scratch, just like grandma did: rich, hearty, and packed with soul.


Why This Dish Is So Special

  • A one-pot meal perfect for family dinners
  • Features tender shredded chicken and fluffy dumplings
  • The broth is creamy, flavorful, and soul-soothing
  • Made with basic ingredients and lots of love
  • A true comfort food classic for all seasons

Ingredients for Grandma’s Chicken and Dumplings

This recipe serves 6–8 people.

For the Stew:

  • 2 tablespoons butter or oil
  • 1 onion, chopped
  • 2 garlic cloves, minced
  • 3 carrots, sliced
  • 2 celery stalks, chopped
  • 4 cups chicken broth
  • 2 cups cooked shredded chicken (rotisserie or homemade)
  • 1 cup milk or half-and-half
  • 2 tablespoons all-purpose flour
  • 1 teaspoon dried thyme or poultry seasoning
  • Salt and black pepper to taste
  • Optional: 1 bay leaf or chopped parsley

For the Dumplings:

  • 1 cup all-purpose flour
  • 2 teaspoons baking powder
  • ½ teaspoon salt
  • 2 tablespoons butter, melted
  • ½ cup whole milk (plus more if needed)

Step-by-Step Instructions

1. Cook the Base

In a large pot or Dutch oven, melt the butter over medium heat.

Add the onion, garlic, carrots, and celery. Cook for about 5–6 minutes, until soft.

Sprinkle in the flour and stir for 1–2 minutes to coat the vegetables.

Slowly whisk in the chicken broth and bring to a gentle simmer.


2. Add Chicken and Seasonings

Stir in the shredded chicken, milk, thyme, salt, pepper, and bay leaf (if using).

Let the stew simmer uncovered for 10–15 minutes until it thickens slightly.


3. Make the Dumplings

In a bowl, whisk together the flour, baking powder, and salt.

Add the melted butter and milk, stirring just until combined — don’t overmix.

The dough should be thick but spoonable.


4. Add the Dumplings

Drop spoonfuls of dumpling dough (about a tablespoon each) on top of the simmering stew.

Cover with a lid and let cook on low heat for 15 minutes — do not lift the lid during this time.

The dumplings will puff up and steam until fluffy.


5. Serve Hot

Remove the bay leaf, if used. Taste and adjust seasoning.

Serve warm in deep bowls, topped with fresh parsley or a pat of butter if desired.


Tips for Success

  • Use rotisserie chicken for ease, or boil your own with aromatics
  • Don’t uncover the pot while dumplings cook — steam is key!
  • Add peas or corn for extra texture and color
  • If stew gets too thick, add a splash of milk or broth to loosen
  • For richer flavor, stir in a bit of cream at the end

Variations You’ll Love

  • Creamy Herb Dumplings: Add chopped chives or parsley to the dumpling mix
  • Cheesy Dumplings: Mix in shredded cheddar or parmesan
  • Spicy Twist: Add crushed red pepper or hot sauce to the stew base
  • Veggie Boost: Stir in spinach or kale at the end
  • Gluten-Free Option: Use a gluten-free flour blend for both stew and dumplings

Storage and Reheating

Store:

  • Refrigerate leftovers in an airtight container for up to 4 days

Reheat:

  • Gently on the stovetop with a splash of broth or milk
  • Microwave in short bursts, covered with a damp paper towel

Freeze:

  • Best to freeze the stew base without dumplings, then add fresh dumplings when reheating

Final Thoughts: A Bowl Full of Love

Grandma’s chicken and dumplings weren’t just warm and hearty — they were healing, the kind of food that made you feel cared for with every bite. From the fluffy dumplings to the creamy, savory stew, this dish brings comfort straight to the heart.

Now it’s your turn to bring that kind of care and comfort to your kitchen — one spoonful at a time.

Grandma’s Apple Crisp: Warm, Spiced, and Topped with Buttery Crumble

Few things say “home” like a warm dish of apple crisp coming out of the oven. With tender spiced apples, a crispy oat topping, and that unmistakable aroma of cinnamon and butter, grandma’s apple crisp was a dessert you never had to wait for a special occasion to enjoy — just a few ripe apples and a little love.

In this guide, you’ll learn how to make the perfect apple crisp, just like grandma did — rustic, simple, and absolutely satisfying.


Why Apple Crisp Is a Timeless Favorite

  • Easier and faster than apple pie — no crust needed
  • Made with simple pantry ingredients
  • Perfect for using seasonal apples
  • Best served warm with vanilla ice cream or whipped cream
  • A true comfort dessert that feeds the soul

Ingredients for Grandma’s Apple Crisp

This recipe serves 6–8 people.

For the Filling:

  • 6 medium apples (Granny Smith, Honeycrisp, or a mix), peeled and sliced
  • 2 tablespoons granulated sugar
  • 2 tablespoons brown sugar
  • 1 tablespoon all-purpose flour
  • 1 teaspoon ground cinnamon
  • ¼ teaspoon ground nutmeg
  • 1 teaspoon lemon juice

For the Topping:

  • ¾ cup rolled oats
  • ¾ cup all-purpose flour
  • ½ cup brown sugar
  • ½ cup unsalted butter, cold and cubed
  • ¼ teaspoon salt
  • Optional: ½ teaspoon cinnamon or chopped nuts for added texture

Step-by-Step Instructions

1. Preheat the Oven

Set your oven to 175°C (350°F) and lightly butter a 9×9-inch baking dish or similar.


2. Prepare the Apple Filling

In a large mixing bowl, toss the sliced apples with sugar, brown sugar, flour, cinnamon, nutmeg, and lemon juice.

Pour the apple mixture into the prepared baking dish and spread evenly.


3. Make the Crisp Topping

In another bowl, mix oats, flour, brown sugar, salt, and cinnamon.

Cut in the cold butter using a pastry cutter or your fingertips until the mixture resembles coarse crumbs.

Sprinkle the topping evenly over the apples.


4. Bake

Bake for 40–45 minutes, or until the topping is golden brown and the apples are tender and bubbling.

Let cool for at least 10–15 minutes before serving — this allows the filling to set slightly.


Serving Suggestions

  • Warm with a scoop of vanilla ice cream
  • Drizzled with caramel sauce
  • Served cold for breakfast with a dollop of Greek yogurt
  • With whipped cream and a sprinkle of cinnamon

Grandma’s Favorite: A warm bowl of apple crisp with milk poured over the top — old-fashioned and delicious!


Storage and Reheating Tips

Store:

  • Cover and refrigerate for up to 4 days

Reheat:

  • Oven: Warm at 160°C (325°F) for 10–15 minutes
  • Microwave: Heat individual portions in short intervals

Freeze:

  • Freeze after baking (cooled) for up to 3 months
  • Thaw in the fridge overnight and reheat before serving

Delicious Variations

  • Apple-Pear Crisp: Replace half the apples with ripe pears
  • Maple Apple Crisp: Add 2 tablespoons of maple syrup to the filling
  • Berry Apple Crisp: Mix in fresh or frozen berries with the apples
  • Coconut-Oat Topping: Add shredded coconut to the topping for extra texture
  • Gluten-Free Version: Use gluten-free flour and oats

Grandma’s Tips for the Perfect Apple Crisp

  • Use tart apples like Granny Smith for balance
  • Slice apples evenly so they cook at the same rate
  • Don’t skip the lemon juice — it brightens the flavor
  • Use real butter for the richest, crunchiest topping
  • Let it rest before serving — this helps the juices settle

Final Thoughts: A Rustic Treat with Heart

Grandma’s apple crisp wasn’t fancy — and that’s exactly what made it so special. No need for perfection, just ripe fruit, cozy spices, and a golden, buttery topping that brought everyone back for seconds.

Now it’s your turn to carry on that tradition with a dessert that’s as comforting as it is delicious.