Grandma’s Buttermilk Pancakes: Fluffy, Golden, and Made from Scratch

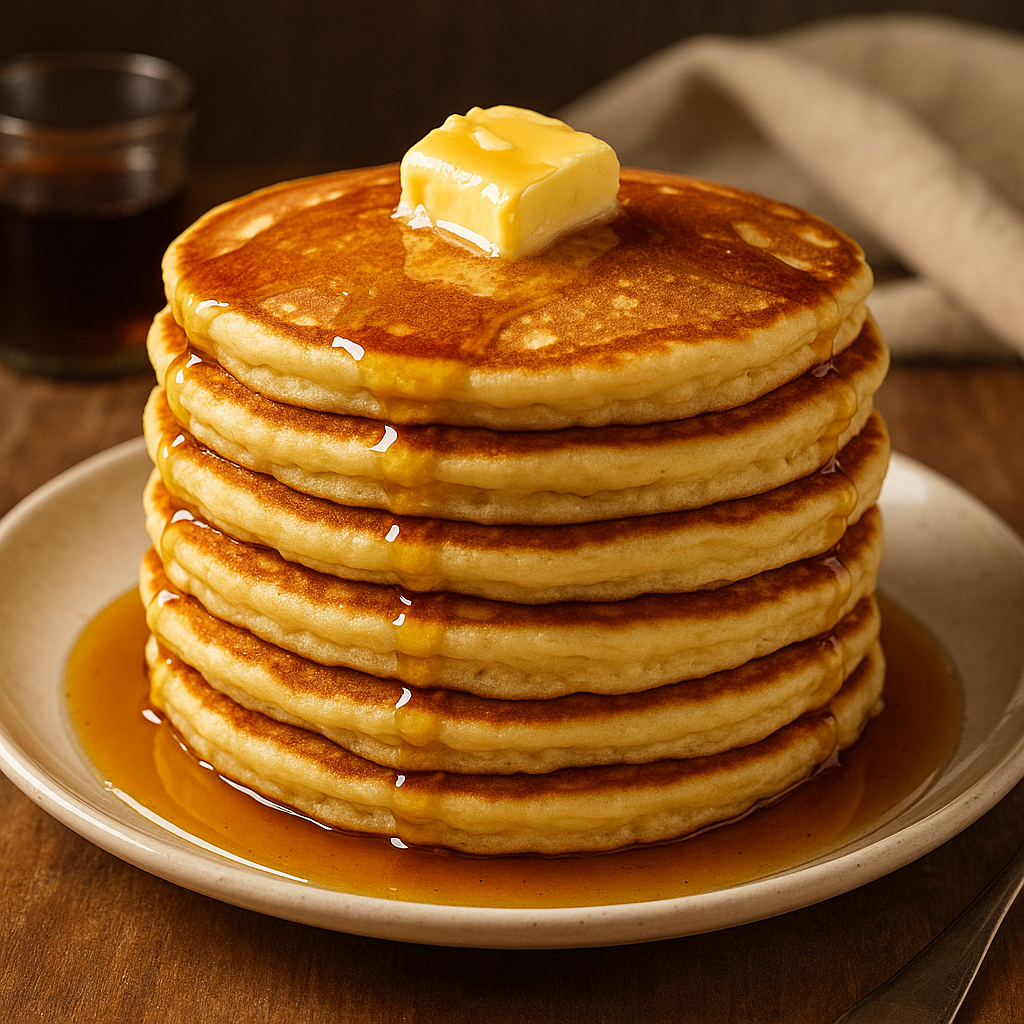
In grandma’s kitchen, pancakes weren’t just for Saturday mornings — they were a celebration of slow breakfasts, warm syrup, and second helpings. Made from scratch with real buttermilk, her pancakes were perfectly fluffy inside, lightly crisped outside, and stacked high with love.

In this guide, you’ll learn how to recreate grandma’s legendary buttermilk pancakes — from ingredients and tips to flipping techniques and delicious topping ideas.

Why Buttermilk Pancakes Are Extra Special

Buttermilk isn’t just a fancy ingredient — it’s the key to pancakes that are:

  • Incredibly fluffy and tender
  • Slightly tangy for balance
  • Golden brown with a delicate crust
  • Perfect with sweet or savory toppings

Grandma never used boxed mixes — and after this, neither will you.

Ingredients for Classic Buttermilk Pancakes

This recipe makes 10–12 medium pancakes (serves 3–4).

Dry Ingredients:

  • 2 cups all-purpose flour
  • 2 tablespoons granulated sugar
  • 2 teaspoons baking powder
  • 1 teaspoon baking soda
  • ½ teaspoon salt

Wet Ingredients:

  • 2 cups buttermilk (or substitute below)
  • 2 large eggs
  • ¼ cup melted butter (plus more for cooking)
  • 1 teaspoon vanilla extract (optional)

Buttermilk Substitute (if needed):

  • 2 cups milk + 2 tablespoons lemon juice or white vinegar
  • Let sit for 5–10 minutes to curdle before using

Step-by-Step Instructions

1. Mix the Dry Ingredients

In a large mixing bowl, whisk together the flour, sugar, baking powder, baking soda, and salt.

2. Combine Wet Ingredients

In a separate bowl, beat the eggs lightly. Add buttermilk, melted butter, and vanilla. Mix well.

3. Combine Wet and Dry

Pour the wet mixture into the dry ingredients. Stir gently until just combined — a few small lumps are fine. Do not overmix, or your pancakes will be tough.

Grandma’s Tip: Let the batter rest for 5–10 minutes while you heat the pan. This makes the pancakes even fluffier.

4. Heat and Grease the Pan

Heat a large nonstick skillet or griddle over medium heat. Lightly grease with butter or oil.

The surface is ready when a drop of water sizzles and dances on it.

5. Cook the Pancakes

Pour ¼ cup of batter for each pancake onto the hot skillet.

Cook for 2–3 minutes, until bubbles form on the surface and the edges look set. Flip and cook another 1–2 minutes, until golden brown and cooked through.

Adjust heat as needed to avoid burning.

6. Serve Warm

Transfer pancakes to a plate and keep warm. Serve immediately with your favorite toppings.

Topping Ideas Grandma Would Approve

  • Classic butter and maple syrup
  • Fresh berries and whipped cream
  • Sliced bananas and chopped nuts
  • Jam or fruit preserves
  • Peanut butter and honey
  • Powdered sugar and lemon juice
  • Or grandma’s favorite: apple compote with cinnamon

Tips for Perfect Pancakes Every Time

  • Use fresh baking powder/soda — old leavening won’t rise
  • Don’t overmix — it’s okay if the batter is slightly lumpy
  • Let the batter rest — helps gluten relax and bubbles form
  • Wipe skillet between batches to prevent burnt butter flavor
  • Flip only once — flipping multiple times deflates the pancakes

How to Keep Pancakes Warm

Place cooked pancakes on a baking sheet in a 95°C (200°F) oven while you finish cooking the batch. Cover loosely with foil to prevent drying out.

Make-Ahead and Storage Tips

Refrigerate:

  • Store leftovers in an airtight container for up to 3 days.

Freeze:

  • Let pancakes cool completely, then stack with parchment between and freeze in a zip-top bag for up to 2 months.

Reheat:

  • Toast or microwave for a quick breakfast
  • Or warm in the oven at 150°C (300°F) until heated through

Variations to Try

  • Blueberry Pancakes: Add fresh or frozen blueberries to the batter
  • Chocolate Chip Pancakes: Stir in mini chocolate chips
  • Savory Herb Pancakes: Add grated cheese and chives
  • Cinnamon Swirl Pancakes: Drizzle cinnamon-sugar mixture on top while cooking
  • Pumpkin Pancakes: Add ½ cup pumpkin puree + pumpkin spice blend

Final Thoughts: A Stack of Happiness

There’s something magical about a stack of warm pancakes, made from scratch just like grandma used to do. They’re simple, comforting, and perfect for any day that needs a little extra joy.

Whether it’s Sunday morning with the whole family or a quiet breakfast for one, these fluffy buttermilk pancakes are a reminder that some of life’s best moments are cooked in a skillet.

Grandma’s Homemade Tomato Sauce: A Slow-Simmered Classic Full of Tradition

In grandma’s kitchen, tomato sauce wasn’t just something that came from a jar — it was an all-day process, filled with rich aromas, bubbling pots, and the kind of care that only tradition can teach. This sauce was the base for Sunday dinners, lasagnas, meatballs, and impromptu spaghetti nights.

In this guide, you’ll learn how to make homemade tomato sauce from scratch, just like grandma did — slowly simmered, deeply flavorful, and built from simple, whole ingredients.

Why Homemade Tomato Sauce Is Worth It

While store-bought sauces are convenient, grandma’s version wins every time — here’s why:

  • Made from real tomatoes, not concentrate
  • Free of preservatives, sugar, and fillers
  • Slow-simmered for deep flavor
  • Easily customizable with herbs and spices
  • Can be made in large batches and frozen

Ingredients for Grandma’s Tomato Sauce

This recipe yields about 6 cups of sauce, enough for 2–3 meals.

Basic Ingredients:

  • 2 tablespoons olive oil
  • 1 medium onion, finely chopped
  • 4 cloves garlic, minced
  • 2 cans (28 oz or 800g each) whole peeled tomatoes OR 10–12 fresh ripe tomatoes (peeled and chopped)
  • 2 tablespoons tomato paste (for richness)
  • 1 teaspoon salt
  • ½ teaspoon black pepper
  • 1 teaspoon sugar (optional, to balance acidity)
  • 1 teaspoon dried oregano
  • ½ teaspoon dried basil
  • 1 bay leaf
  • Optional: ½ teaspoon red pepper flakes

Finish with:

  • 1 tablespoon butter (for creaminess)
  • Handful of chopped fresh basil or parsley
  • Grated Parmesan cheese (optional)

Step-by-Step Instructions

1. Sauté the Aromatics

In a large pot, heat the olive oil over medium heat.

Add the chopped onion and cook until translucent — about 5 minutes. Stir in the garlic and cook for another 1–2 minutes, just until fragrant (don’t let it burn).

2. Add Tomatoes

If using canned tomatoes, crush them by hand or blend slightly for smoother texture. If using fresh tomatoes, peel and chop them.

Add tomatoes and their juice to the pot along with the tomato paste. Stir to combine.

3. Add Seasonings

Stir in salt, pepper, sugar (if using), oregano, basil, bay leaf, and red pepper flakes if you want a little heat.

Bring the sauce to a simmer.

4. Simmer Low and Slow

Lower the heat and simmer uncovered for 45 minutes to 1½ hours, stirring occasionally. The longer it cooks, the deeper the flavor.

If it gets too thick, add a splash of water or broth. If too thin, let it simmer uncovered to reduce.

5. Blend (Optional)

For a smooth sauce, blend with an immersion blender directly in the pot, or use a regular blender in batches (be careful with hot liquids). For a rustic, chunky sauce, skip this step.

6. Finish and Adjust

Remove bay leaf. Stir in a tablespoon of butter to add shine and richness. Taste and adjust salt, herbs, or sugar.

Stir in fresh basil or parsley at the end for a burst of freshness.

Grandma’s Tomato Sauce Tips

  • Use ripe, in-season tomatoes if making from fresh — Roma or San Marzano are ideal
  • Cook long and slow to break down acidity and bring out sweetness
  • Use butter at the end — it mellows sharpness and adds silkiness
  • Don’t skip the onion and garlic — they build the flavor foundation
  • Freeze in portions for easy future meals

How to Use Grandma’s Tomato Sauce

This sauce is versatile and goes far beyond pasta. Use it for:

  • Spaghetti or linguine with fresh herbs and cheese
  • Lasagna or baked ziti
  • Pizza sauce (just reduce slightly more)
  • Meatballs or sausage in sauce
  • Eggplant Parmesan
  • Shakshuka or poached eggs in tomato sauce
  • Stuffed peppers or zucchini

Storage and Freezing

Refrigerate:

  • Store in airtight containers for up to 5–7 days.

Freeze:

  • Freeze in freezer bags or containers for up to 3 months.
  • Use ice cube trays to freeze in small portions.

Reheat:

  • Thaw in the fridge or heat directly from frozen on the stove.
  • Stir well and re-season if needed.

Variations You Can Try

  • Add red wine: Splash in ¼ cup red wine during simmering for depth
  • Meaty version: Brown ground beef or sausage with the onions
  • Creamy version: Stir in a splash of cream or dollop of ricotta at the end
  • Roasted flavor: Use fire-roasted tomatoes or roast your own beforehand
  • Fresh garden version: Add chopped zucchini, mushrooms, or bell peppers

Final Thoughts: A Sauce That Feeds the Soul

Grandma’s tomato sauce wasn’t just a recipe — it was the heart of the meal, the reason everyone gathered around the table. It was made without shortcuts, always in big batches, and always with the hope that someone would come back for seconds.

Whether you’re making spaghetti for two or lasagna for a crowd, this slow-simmered sauce is your base for building beautiful meals and beautiful memories.