Grandma’s Chicken and Dumplings: A Hearty, Homemade Classic from the Heart

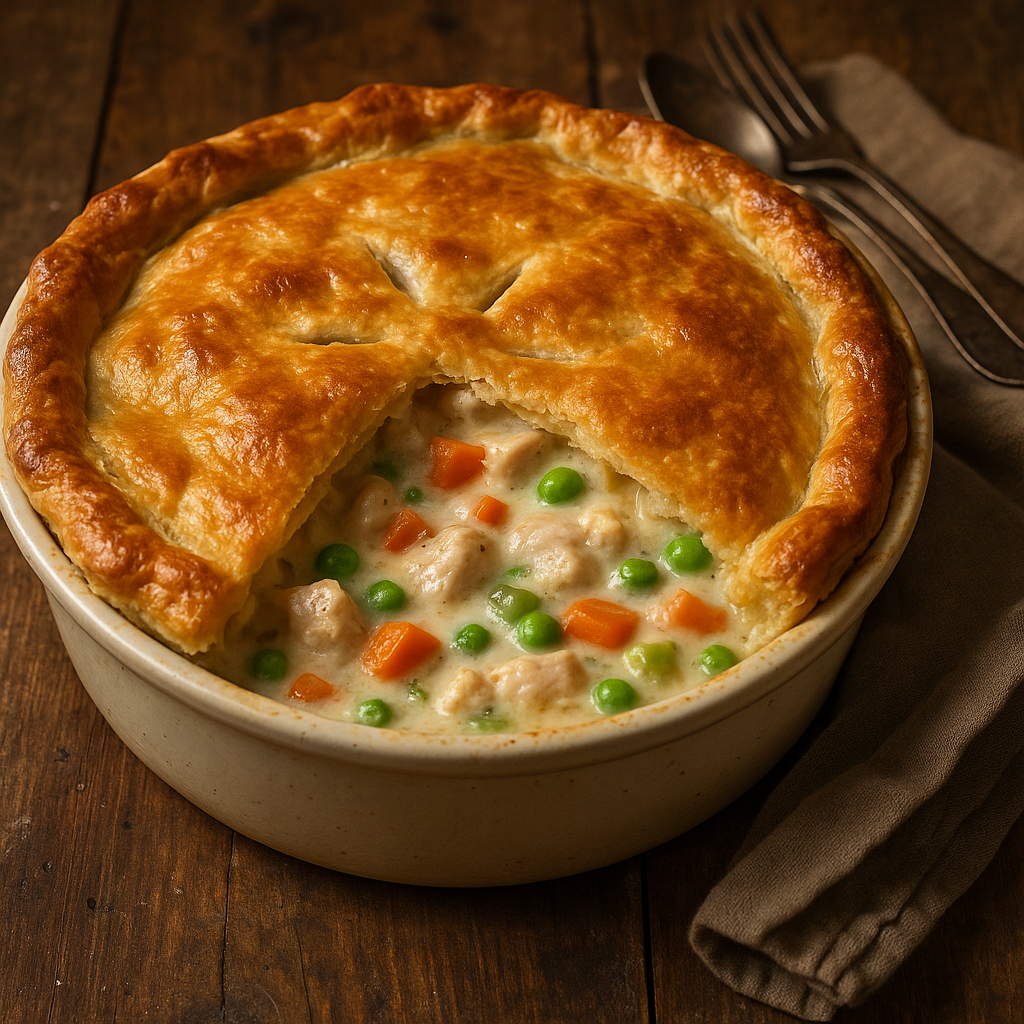
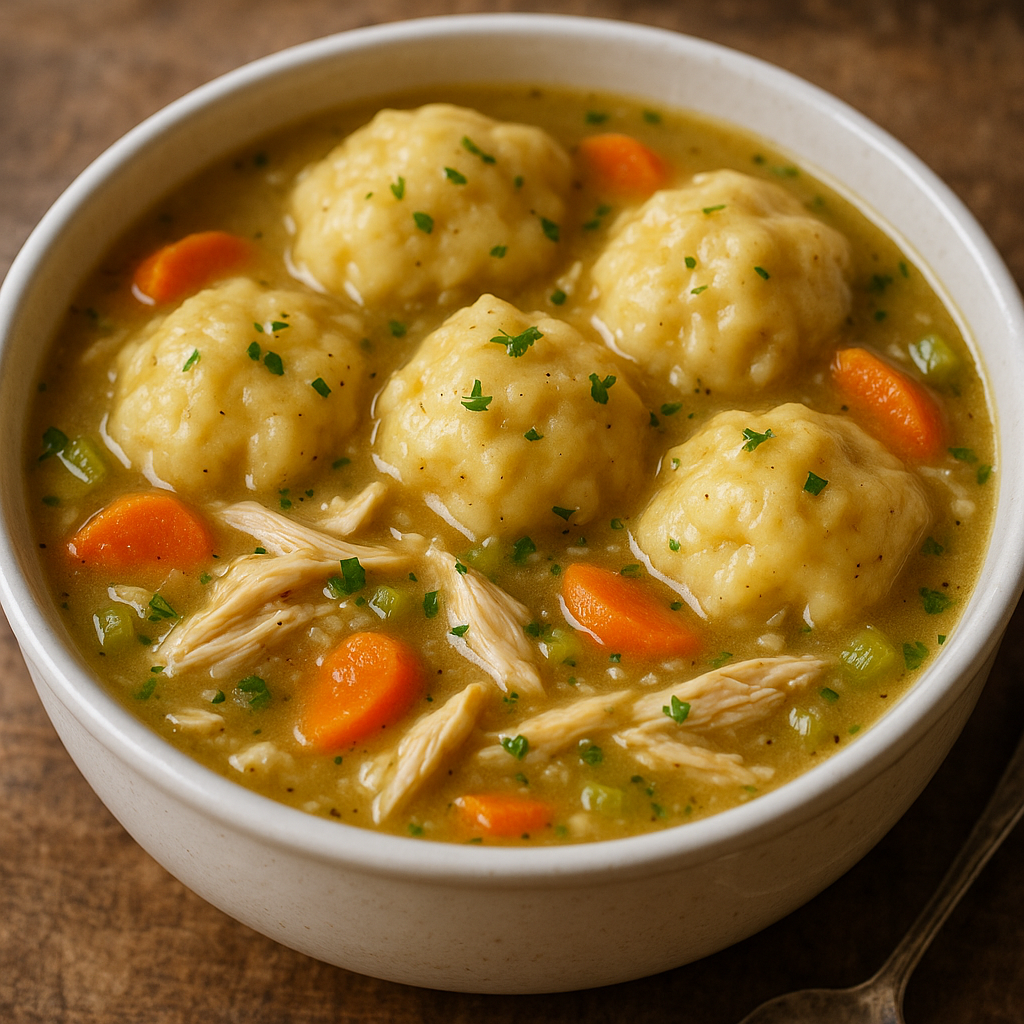
There are few dishes as comforting, nostalgic, and satisfying as chicken and dumplings. In grandma’s kitchen, this wasn’t just a recipe — it was medicine for the soul. Whether someone was sick, sad, or just hungry, a warm bowl of her chicken and dumplings had the power to make everything feel better.

In this guide, you’ll learn to make this classic one-pot comfort dish, just like grandma did: from scratch, slow-simmered, and full of love.

What Is Chicken and Dumplings?

It’s a traditional dish consisting of tender shredded chicken, flavorful broth, and soft, pillowy dumplings that cook right in the pot.

It’s like a cross between a soup and a stew, with the dumplings soaking up the flavor while keeping the dish thick and satisfying.

Ingredients for Grandma’s Chicken and Dumplings

For the Soup Base:

  • 1 tablespoon olive oil or butter
  • 1 medium onion, diced
  • 2 carrots, diced
  • 2 celery stalks, diced
  • 3 cloves garlic, minced
  • 6 cups chicken broth (preferably homemade or low-sodium)
  • 2–3 cups cooked, shredded chicken (from a whole chicken or rotisserie)
  • 1 teaspoon salt (adjust to taste)
  • ½ teaspoon black pepper
  • ½ teaspoon dried thyme
  • Optional: ½ teaspoon turmeric (for color and warmth)

For the Dumplings:

  • 2 cups all-purpose flour
  • 1 tablespoon baking powder
  • ½ teaspoon salt
  • 1 cup milk
  • 4 tablespoons unsalted butter, melted
  • Optional: chopped parsley or chives in the dough

Step-by-Step Instructions

1. Sauté the Vegetables

Heat oil or butter in a large pot over medium heat. Add the onion, carrots, and celery, and cook until softened (about 5–7 minutes). Stir in the garlic and cook another 1–2 minutes.

2. Add Broth and Seasonings

Pour in the chicken broth. Add salt, pepper, thyme, and turmeric if using. Bring to a gentle boil, then reduce to a simmer.

3. Add the Chicken

Stir in the cooked shredded chicken and let the mixture simmer gently while you prepare the dumplings.

Grandma’s Tip: Use a mix of white and dark meat for richer flavor.

4. Make the Dumplings

In a bowl, whisk together flour, baking powder, and salt. In a separate bowl, mix milk and melted butter. Add wet to dry ingredients and stir until just combined — don’t overmix.

The dough should be thick and sticky. Let it sit for a few minutes.

5. Drop the Dumplings

Bring the soup to a gentle simmer (not a rolling boil). Drop tablespoon-sized scoops of the dough into the simmering broth using a spoon or small scoop.

Cover the pot with a lid and cook on low heat for 15–18 minutes, without lifting the lid during the first 10 minutes. The dumplings will puff up and steam through.

Resist peeking! Keeping the lid closed ensures the dumplings cook evenly.

6. Check for Doneness

Insert a toothpick into one of the dumplings — it should come out clean. If still doughy, cook uncovered for a few more minutes.

Taste the broth and adjust seasoning if needed.

7. Serve Hot

Ladle into bowls with dumplings and lots of broth. Sprinkle with fresh herbs if desired and serve immediately.

Tips for the Best Chicken and Dumplings

  • Don’t overmix the dough — this makes the dumplings tough
  • Keep the lid closed during cooking
  • Use good broth — it’s the flavor base of the dish
  • Add cream or a splash of milk to the broth for a richer stew-style version
  • Use leftover roast chicken or simmer a whole chicken from scratch for depth

Optional Additions Grandma Sometimes Used

  • A splash of heavy cream or evaporated milk for creamy broth
  • A handful of frozen peas or corn added in the last 5 minutes
  • Fresh or dried herbs like dill, rosemary, or parsley
  • A pinch of nutmeg or a spoonful of grainy mustard for depth

Storage and Reheating

Store:

  • Refrigerate in airtight containers for up to 4 days
  • Dumplings will soak up broth — add extra broth or water before reheating

Reheat:

  • Gently reheat on the stove over low heat with added liquid
  • Microwave individual portions on medium power to avoid drying out dumplings

Freeze:

  • Best to freeze the broth and chicken separately and make fresh dumplings when serving
  • Dumplings tend to become mushy when frozen and thawed

Why This Dish Endures

This dish isn’t flashy or trendy. It doesn’t rely on exotic spices or complicated techniques. What makes it special is its honest simplicity and warmth — a true reflection of grandma’s cooking philosophy.

Chicken and dumplings remind us of being cared for. It’s comfort in a bowl, best served when someone needs a little extra love.

Final Thoughts: More Than Just a Meal

Grandma’s chicken and dumplings isn’t just food. It’s family tradition, quiet healing, and full bellies gathered around the table. Whether you’re new to cooking or recreating a beloved memory, this dish is one to keep close.

Grandma’s Apple Pie Recipe: A Classic Dessert with a Golden, Flaky Crust

When the smell of cinnamon, baked apples, and buttery crust filled the house, you knew one thing for sure — grandma was making apple pie. A symbol of tradition, love, and Sunday dinners, her apple pie wasn’t just dessert. It was home in every bite.

In this guide, we’ll walk you through how to make grandma’s classic apple pie from scratch — including a flaky homemade crust, a rich spiced filling, and all the little secrets that make it unforgettable.

Why Apple Pie Is the Ultimate Classic

Few desserts stand the test of time like apple pie. It’s:

  • Made with simple, seasonal ingredients
  • Bursting with warm spices and soft apples
  • Perfect for holidays, celebrations, or anytime baking
  • A crowd-pleaser that feels both rustic and elegant
  • Comforting in every single forkful

Let’s get started with the ingredients.

Ingredients for Grandma’s Apple Pie

For the Crust (Double Crust):

  • 2 ½ cups all-purpose flour
  • 1 teaspoon salt
  • 1 tablespoon sugar (optional)
  • 1 cup cold unsalted butter (cut into cubes)
  • 6–8 tablespoons ice water

For the Apple Filling:

  • 6–7 medium apples (Granny Smith, Honeycrisp, or a mix), peeled and sliced
  • ¾ cup granulated sugar
  • ¼ cup brown sugar
  • 2 tablespoons all-purpose flour (for thickening)
  • 1 teaspoon ground cinnamon
  • ¼ teaspoon ground nutmeg
  • 1 tablespoon lemon juice
  • 1 teaspoon vanilla extract
  • Optional: pinch of ground cloves or ginger

For the Top:

  • 1 egg + 1 tablespoon milk (for egg wash)
  • Coarse sugar for sprinkling (optional)

Step-by-Step Instructions

1. Make the Pie Dough

In a large bowl, whisk together flour, salt, and sugar.

Cut in the cold butter using a pastry cutter or your fingers until the mixture resembles coarse crumbs.

Add ice water one tablespoon at a time, mixing gently until dough holds together when pinched. Don’t overwork it.

Divide into two discs, wrap in plastic, and refrigerate for at least 1 hour.

Grandma’s Tip: Cold dough = flaky crust.

2. Prepare the Apple Filling

While the dough chills, combine sliced apples, sugars, flour, cinnamon, nutmeg, lemon juice, and vanilla in a large bowl.

Toss to coat and let sit for 20 minutes — this helps release juices and deepen the flavor.

3. Roll Out the Crust

Preheat oven to 200°C (400°F).

Roll out one dough disc on a floured surface into a 12-inch circle. Fit into a 9-inch pie pan. Trim excess dough but leave a bit hanging over the edge.

Roll out the second disc for the top crust (or cut into strips for a lattice).

4. Assemble the Pie

Pour the apple filling into the pie crust, including the juices. Dot the top with small cubes of butter (optional).

Top with second crust or lattice. Seal the edges and crimp. Cut small slits in the top if using a full crust.

Brush with egg wash and sprinkle with coarse sugar if desired.

5. Bake the Pie

Place pie on a baking sheet to catch drips.

Bake at 200°C (400°F) for 20 minutes, then reduce heat to 175°C (350°F) and bake for 35–40 more minutes, or until crust is golden and filling is bubbling.

If the edges brown too quickly, cover with foil or a pie shield.

6. Cool Before Slicing

Let the pie cool for at least 2 hours to allow the filling to set. Serve warm or at room temperature.

Serving Suggestions

Grandma’s apple pie pairs beautifully with:

  • A scoop of vanilla ice cream
  • A dollop of fresh whipped cream
  • A drizzle of caramel sauce
  • A slice of sharp cheddar cheese (a regional favorite!)

Storage Tips

  • Store leftover pie covered at room temperature for 1 day, or in the fridge for up to 4 days
  • Reheat slices in the oven at 150°C (300°F) for 10–15 minutes for best texture
  • Freeze unbaked pie for up to 3 months — bake straight from frozen, adding 20–30 extra minutes

Grandma’s Tips for the Best Apple Pie

  • Mix apple varieties for flavor and texture
  • Use a glass or ceramic pie dish for even baking
  • Let the filling sit before baking to release juices
  • Add lemon juice for brightness and to prevent browning
  • Chill your dough before rolling and again before baking

Final Thoughts: A Slice of Pure Nostalgia

Grandma’s apple pie wasn’t just dessert — it was the dessert. Served on holidays, after big family dinners, or sometimes “just because,” it had a way of making everything feel right.

With its buttery crust, tender spiced apples, and timeless simplicity, this recipe captures what made her pies so special: honest ingredients, careful hands, and love in every layer.

Grandma’s Buttermilk Pancakes: Fluffy, Golden, and Made from Scratch

In grandma’s kitchen, pancakes weren’t just for Saturday mornings — they were a celebration of slow breakfasts, warm syrup, and second helpings. Made from scratch with real buttermilk, her pancakes were perfectly fluffy inside, lightly crisped outside, and stacked high with love.

In this guide, you’ll learn how to recreate grandma’s legendary buttermilk pancakes — from ingredients and tips to flipping techniques and delicious topping ideas.

Why Buttermilk Pancakes Are Extra Special

Buttermilk isn’t just a fancy ingredient — it’s the key to pancakes that are:

  • Incredibly fluffy and tender
  • Slightly tangy for balance
  • Golden brown with a delicate crust
  • Perfect with sweet or savory toppings

Grandma never used boxed mixes — and after this, neither will you.

Ingredients for Classic Buttermilk Pancakes

This recipe makes 10–12 medium pancakes (serves 3–4).

Dry Ingredients:

  • 2 cups all-purpose flour
  • 2 tablespoons granulated sugar
  • 2 teaspoons baking powder
  • 1 teaspoon baking soda
  • ½ teaspoon salt

Wet Ingredients:

  • 2 cups buttermilk (or substitute below)
  • 2 large eggs
  • ¼ cup melted butter (plus more for cooking)
  • 1 teaspoon vanilla extract (optional)

Buttermilk Substitute (if needed):

  • 2 cups milk + 2 tablespoons lemon juice or white vinegar
  • Let sit for 5–10 minutes to curdle before using

Step-by-Step Instructions

1. Mix the Dry Ingredients

In a large mixing bowl, whisk together the flour, sugar, baking powder, baking soda, and salt.

2. Combine Wet Ingredients

In a separate bowl, beat the eggs lightly. Add buttermilk, melted butter, and vanilla. Mix well.

3. Combine Wet and Dry

Pour the wet mixture into the dry ingredients. Stir gently until just combined — a few small lumps are fine. Do not overmix, or your pancakes will be tough.

Grandma’s Tip: Let the batter rest for 5–10 minutes while you heat the pan. This makes the pancakes even fluffier.

4. Heat and Grease the Pan

Heat a large nonstick skillet or griddle over medium heat. Lightly grease with butter or oil.

The surface is ready when a drop of water sizzles and dances on it.

5. Cook the Pancakes

Pour ¼ cup of batter for each pancake onto the hot skillet.

Cook for 2–3 minutes, until bubbles form on the surface and the edges look set. Flip and cook another 1–2 minutes, until golden brown and cooked through.

Adjust heat as needed to avoid burning.

6. Serve Warm

Transfer pancakes to a plate and keep warm. Serve immediately with your favorite toppings.

Topping Ideas Grandma Would Approve

  • Classic butter and maple syrup
  • Fresh berries and whipped cream
  • Sliced bananas and chopped nuts
  • Jam or fruit preserves
  • Peanut butter and honey
  • Powdered sugar and lemon juice
  • Or grandma’s favorite: apple compote with cinnamon

Tips for Perfect Pancakes Every Time

  • Use fresh baking powder/soda — old leavening won’t rise
  • Don’t overmix — it’s okay if the batter is slightly lumpy
  • Let the batter rest — helps gluten relax and bubbles form
  • Wipe skillet between batches to prevent burnt butter flavor
  • Flip only once — flipping multiple times deflates the pancakes

How to Keep Pancakes Warm

Place cooked pancakes on a baking sheet in a 95°C (200°F) oven while you finish cooking the batch. Cover loosely with foil to prevent drying out.

Make-Ahead and Storage Tips

Refrigerate:

  • Store leftovers in an airtight container for up to 3 days.

Freeze:

  • Let pancakes cool completely, then stack with parchment between and freeze in a zip-top bag for up to 2 months.

Reheat:

  • Toast or microwave for a quick breakfast
  • Or warm in the oven at 150°C (300°F) until heated through

Variations to Try

  • Blueberry Pancakes: Add fresh or frozen blueberries to the batter
  • Chocolate Chip Pancakes: Stir in mini chocolate chips
  • Savory Herb Pancakes: Add grated cheese and chives
  • Cinnamon Swirl Pancakes: Drizzle cinnamon-sugar mixture on top while cooking
  • Pumpkin Pancakes: Add ½ cup pumpkin puree + pumpkin spice blend

Final Thoughts: A Stack of Happiness

There’s something magical about a stack of warm pancakes, made from scratch just like grandma used to do. They’re simple, comforting, and perfect for any day that needs a little extra joy.

Whether it’s Sunday morning with the whole family or a quiet breakfast for one, these fluffy buttermilk pancakes are a reminder that some of life’s best moments are cooked in a skillet.

Grandma’s Old-Fashioned Meatloaf: Moist, Flavorful, and Full of Love

Back in the day, meatloaf wasn’t just a weeknight meal — it was a centerpiece. In grandma’s kitchen, this hearty classic was made with simple pantry ingredients, baked to perfection, and served with sides like mashed potatoes, green beans, or buttered corn. It was the kind of meal that brought everyone to the table — and kept them there for seconds.

In this article, we’ll share the step-by-step recipe for grandma’s old-fashioned meatloaf, including all the tips she used to keep it moist, flavorful, and unforgettable.

Why Grandma’s Meatloaf Stands the Test of Time

While modern versions experiment with bacon-wrapped crusts or exotic spices, grandma’s meatloaf has stayed a favorite because it’s:

  • Easy to make with simple ingredients
  • Perfectly moist — never dry or bland
  • Packed with rich, savory flavor
  • Great for leftovers and sandwiches
  • A symbol of traditional, home-cooked comfort food

Let’s recreate the magic.

Ingredients for Classic Meatloaf

This recipe serves 4 to 6 people.

For the Meatloaf:

  • 1 ½ pounds ground beef (80/20 preferred for flavor)
  • 1 small onion, finely chopped
  • 2 garlic cloves, minced
  • ¾ cup breadcrumbs (plain or Italian)
  • ½ cup milk
  • 2 large eggs
  • 2 tablespoons ketchup
  • 1 tablespoon Worcestershire sauce
  • 1 teaspoon salt
  • ½ teaspoon black pepper
  • 1 teaspoon dried thyme or parsley (optional)

For the Glaze:

  • ½ cup ketchup
  • 2 tablespoons brown sugar
  • 1 tablespoon yellow mustard or Dijon

Optional Add-ins: chopped green bell pepper, grated carrot, shredded cheese, or a pinch of smoked paprika for added depth.

Step-by-Step Instructions

1. Preheat the Oven

Set your oven to 175°C (350°F). Line a baking sheet with parchment paper or lightly grease a loaf pan.

2. Soak the Breadcrumbs

In a small bowl, combine the breadcrumbs and milk. Let sit for 5 minutes so the crumbs absorb the liquid — this keeps the meatloaf moist.

3. Mix the Meatloaf

In a large bowl, combine ground beef, chopped onion, garlic, soaked breadcrumbs, eggs, ketchup, Worcestershire sauce, salt, pepper, and herbs.

Mix gently with your hands or a spoon just until combined. Don’t overmix, or the meatloaf may turn out tough.

4. Shape and Place

Form the mixture into a loaf shape and place on the prepared baking sheet, or gently press into a loaf pan.

Grandma’s Tip: Free-form loaves (on a baking sheet) allow for better caramelization and more crust!

5. Add the Glaze

Mix together the ketchup, brown sugar, and mustard. Spread half the glaze on top of the meatloaf.

Reserve the rest for basting later or serving on the side.

6. Bake Until Done

Bake uncovered for 55–65 minutes, or until the internal temperature reaches 70°C (160°F).

Halfway through baking, spread the remaining glaze on top for extra flavor.

7. Let Rest Before Slicing

Remove from the oven and let the meatloaf rest for 10–15 minutes before slicing. This helps the juices redistribute and keeps each slice moist.

Serving Suggestions

Grandma often served her meatloaf with:

  • Mashed potatoes and gravy
  • Steamed green beans or glazed carrots
  • Buttered corn or baked sweet potatoes
  • A side of homemade rolls or biscuits

And of course — a generous drizzle of that sweet-savory glaze.

Tips for a Better Meatloaf

  • Use meat with some fat (80/20 ground beef) — lean meat can be dry
  • Don’t skip the soaking — breadcrumbs + milk = moist texture
  • Let it rest after baking — this step is essential
  • Use fresh aromatics — onion and garlic add essential flavor
  • Bake on a sheet for more crust, or in a loaf pan for a moist interior

Leftovers That Don’t Go to Waste

One of the best things about meatloaf is how delicious the leftovers are. Try:

  • Meatloaf sandwiches on toasted bread with lettuce and mayo
  • Crumbled into pasta sauces or stuffed into bell peppers
  • Fried meatloaf patties for breakfast
  • Served cold with mustard or pickles for a snack

Variations You Can Try

  • Turkey meatloaf: Use ground turkey and add extra moisture (like grated zucchini)
  • Cheesy center: Add a layer of shredded cheese inside the loaf
  • Bacon-wrapped: Wrap in bacon before baking for a smoky twist
  • Spicy version: Add hot sauce, jalapeños, or smoked paprika to the mix
  • Vegetable-loaded: Mix in grated carrots, mushrooms, or spinach

Final Thoughts: A Slice of Comfort

Grandma’s meatloaf isn’t just a meal — it’s a tradition. It’s the smell that filled the house on Sundays, the crispy ends that everyone fought over, and the warmth of a full plate and a full heart.

When you make this meatloaf, you’re not just cooking — you’re carrying on a legacy of love, care, and good food made simply and well.

Grandma’s Homemade Tomato Sauce: A Slow-Simmered Classic Full of Tradition

In grandma’s kitchen, tomato sauce wasn’t just something that came from a jar — it was an all-day process, filled with rich aromas, bubbling pots, and the kind of care that only tradition can teach. This sauce was the base for Sunday dinners, lasagnas, meatballs, and impromptu spaghetti nights.

In this guide, you’ll learn how to make homemade tomato sauce from scratch, just like grandma did — slowly simmered, deeply flavorful, and built from simple, whole ingredients.

Why Homemade Tomato Sauce Is Worth It

While store-bought sauces are convenient, grandma’s version wins every time — here’s why:

  • Made from real tomatoes, not concentrate
  • Free of preservatives, sugar, and fillers
  • Slow-simmered for deep flavor
  • Easily customizable with herbs and spices
  • Can be made in large batches and frozen

Ingredients for Grandma’s Tomato Sauce

This recipe yields about 6 cups of sauce, enough for 2–3 meals.

Basic Ingredients:

  • 2 tablespoons olive oil
  • 1 medium onion, finely chopped
  • 4 cloves garlic, minced
  • 2 cans (28 oz or 800g each) whole peeled tomatoes OR 10–12 fresh ripe tomatoes (peeled and chopped)
  • 2 tablespoons tomato paste (for richness)
  • 1 teaspoon salt
  • ½ teaspoon black pepper
  • 1 teaspoon sugar (optional, to balance acidity)
  • 1 teaspoon dried oregano
  • ½ teaspoon dried basil
  • 1 bay leaf
  • Optional: ½ teaspoon red pepper flakes

Finish with:

  • 1 tablespoon butter (for creaminess)
  • Handful of chopped fresh basil or parsley
  • Grated Parmesan cheese (optional)

Step-by-Step Instructions

1. Sauté the Aromatics

In a large pot, heat the olive oil over medium heat.

Add the chopped onion and cook until translucent — about 5 minutes. Stir in the garlic and cook for another 1–2 minutes, just until fragrant (don’t let it burn).

2. Add Tomatoes

If using canned tomatoes, crush them by hand or blend slightly for smoother texture. If using fresh tomatoes, peel and chop them.

Add tomatoes and their juice to the pot along with the tomato paste. Stir to combine.

3. Add Seasonings

Stir in salt, pepper, sugar (if using), oregano, basil, bay leaf, and red pepper flakes if you want a little heat.

Bring the sauce to a simmer.

4. Simmer Low and Slow

Lower the heat and simmer uncovered for 45 minutes to 1½ hours, stirring occasionally. The longer it cooks, the deeper the flavor.

If it gets too thick, add a splash of water or broth. If too thin, let it simmer uncovered to reduce.

5. Blend (Optional)

For a smooth sauce, blend with an immersion blender directly in the pot, or use a regular blender in batches (be careful with hot liquids). For a rustic, chunky sauce, skip this step.

6. Finish and Adjust

Remove bay leaf. Stir in a tablespoon of butter to add shine and richness. Taste and adjust salt, herbs, or sugar.

Stir in fresh basil or parsley at the end for a burst of freshness.

Grandma’s Tomato Sauce Tips

  • Use ripe, in-season tomatoes if making from fresh — Roma or San Marzano are ideal
  • Cook long and slow to break down acidity and bring out sweetness
  • Use butter at the end — it mellows sharpness and adds silkiness
  • Don’t skip the onion and garlic — they build the flavor foundation
  • Freeze in portions for easy future meals

How to Use Grandma’s Tomato Sauce

This sauce is versatile and goes far beyond pasta. Use it for:

  • Spaghetti or linguine with fresh herbs and cheese
  • Lasagna or baked ziti
  • Pizza sauce (just reduce slightly more)
  • Meatballs or sausage in sauce
  • Eggplant Parmesan
  • Shakshuka or poached eggs in tomato sauce
  • Stuffed peppers or zucchini

Storage and Freezing

Refrigerate:

  • Store in airtight containers for up to 5–7 days.

Freeze:

  • Freeze in freezer bags or containers for up to 3 months.
  • Use ice cube trays to freeze in small portions.

Reheat:

  • Thaw in the fridge or heat directly from frozen on the stove.
  • Stir well and re-season if needed.

Variations You Can Try

  • Add red wine: Splash in ¼ cup red wine during simmering for depth
  • Meaty version: Brown ground beef or sausage with the onions
  • Creamy version: Stir in a splash of cream or dollop of ricotta at the end
  • Roasted flavor: Use fire-roasted tomatoes or roast your own beforehand
  • Fresh garden version: Add chopped zucchini, mushrooms, or bell peppers

Final Thoughts: A Sauce That Feeds the Soul

Grandma’s tomato sauce wasn’t just a recipe — it was the heart of the meal, the reason everyone gathered around the table. It was made without shortcuts, always in big batches, and always with the hope that someone would come back for seconds.

Whether you’re making spaghetti for two or lasagna for a crowd, this slow-simmered sauce is your base for building beautiful meals and beautiful memories.

How to Make Grandma’s Classic Banana Bread: Moist, Sweet, and Full of Flavor

When your bananas start turning brown, it’s not a mistake — it’s an opportunity. And no one understood that better than grandma. Instead of wasting them, she transformed overripe bananas into the most delicious, moist, and fragrant banana bread you could imagine.

In this guide, you’ll learn how to make banana bread the old-fashioned way, just like grandma used to — simple ingredients, no fancy gadgets, and a loaf so rich and comforting it barely lasted a day on the counter.

Why Banana Bread Is a Timeless Favorite

Banana bread is one of the ultimate comfort bakes. Here’s why:

  • Uses up ripe bananas instead of throwing them out
  • Comes together with basic pantry ingredients
  • Moist, tender, and full of sweet banana flavor
  • Delicious warm, cold, toasted — with or without toppings
  • Perfect for breakfast, snacks, or even dessert

Let’s dig into grandma’s secrets for the best banana bread you’ll ever taste.

Ingredients for Grandma’s Banana Bread

This recipe makes one 9×5 inch loaf — about 8–10 slices.

  • 3 very ripe bananas, mashed
  • 2 large eggs
  • ½ cup unsalted butter, melted and cooled
  • ¾ cup granulated sugar (adjust to taste)
  • 1 ½ cups all-purpose flour
  • 1 teaspoon baking soda
  • ½ teaspoon salt
  • 1 teaspoon vanilla extract
  • ½ teaspoon ground cinnamon (optional)
  • ½ cup chopped walnuts or pecans (optional)
  • ¼ cup milk or sour cream (optional, for extra moisture)

Step-by-Step Instructions

1. Preheat the Oven and Prep the Pan

Preheat your oven to 175°C (350°F).

Grease and flour a 9×5-inch loaf pan, or line it with parchment paper for easy removal.

2. Mash the Bananas

In a large bowl, mash the bananas until mostly smooth (a few chunks are okay — they add texture).

Add the melted butter and stir to combine.

3. Add Wet Ingredients

Mix in the sugar, eggs, vanilla, and milk or sour cream if using. Stir until smooth and well incorporated.

4. Mix the Dry Ingredients

In a separate bowl, whisk together flour, baking soda, salt, and cinnamon.

Gradually add the dry ingredients to the banana mixture, stirring gently just until no flour remains.

Grandma’s Tip: Don’t overmix — overworking the batter can lead to dense bread.

5. Fold in Nuts (Optional)

If using chopped nuts, gently fold them into the batter at the end.

6. Pour and Bake

Pour the batter into your prepared loaf pan and smooth the top with a spatula.

Bake for 50–60 minutes, or until a toothpick inserted into the center comes out clean.

7. Cool and Slice

Let the banana bread cool in the pan for 10–15 minutes, then transfer to a wire rack to cool completely.

Slice and serve warm, room temperature, or toasted with butter.

Banana Bread Variations Grandma Loved

Want to mix it up? Here are some fun and delicious twists:

  • Chocolate Chip Banana Bread: Add ½ cup chocolate chips
  • Peanut Butter Swirl: Swirl 2 tbsp peanut butter into the top before baking
  • Coconut Banana Bread: Add ¼ cup shredded coconut to the batter
  • Maple-Walnut: Replace sugar with maple syrup and fold in walnuts
  • Tropical: Add pineapple chunks and coconut for a fruity twist

Serving Suggestions

Banana bread is perfect on its own, but it also pairs wonderfully with:

  • Coffee or hot tea
  • A drizzle of honey or maple syrup
  • A spread of butter, cream cheese, or nut butter
  • Yogurt and fruit for a hearty breakfast

Warm it slightly before serving for that fresh-out-of-the-oven flavor.

How to Store and Reheat

Storing:

  • Wrap in foil or plastic wrap and keep at room temperature for up to 3 days.
  • Refrigerate for up to 1 week (though it may dry slightly).

Freezing:

  • Wrap tightly in plastic, then foil, and freeze for up to 3 months.
  • Slice before freezing for easy grab-and-go pieces.

Reheating:

  • Toast slices in a toaster or warm briefly in the microwave.
  • For oven reheating, wrap in foil and bake at 150°C (300°F) for 10–15 minutes.

Grandma’s Banana Bread Tips

  • Use overripe bananas with lots of brown spots — they’re sweeter and softer
  • Let melted butter cool slightly so it doesn’t cook the eggs
  • Don’t skip the salt — it enhances the banana flavor
  • Add a banana on top (sliced in half) for a beautiful presentation
  • Test with a toothpick — underbaking is better than overbaking

Final Thoughts: A Slice of Sweet Nostalgia

Grandma’s banana bread wasn’t just dessert — it was a memory, a comfort, and a family tradition. It filled the house with warmth, made everyone gather in the kitchen, and somehow tasted even better the next day (if there was any left).

Whether you’re baking it for your kids, your neighbors, or just for yourself, this classic recipe brings the sweetness of the past into the present.

Now let’s bring this beloved treat to life with a warm, ultra-realistic image of a golden, moist banana bread loaf — freshly sliced and ready to enjoy.

Grandma’s Traditional Chicken Pot Pie: A Golden Crust Full of Homemade Comfort

One bite of a freshly baked chicken pot pie and you’re instantly transported to grandma’s kitchen — where the windows fogged up from the oven heat and the smell of buttery crust and savory filling filled the air. This classic comfort food is more than just a meal — it’s a memory.

In this article, we’ll show you how to make grandma’s traditional chicken pot pie with a flaky, golden crust and a rich, creamy filling loaded with chicken and vegetables. It’s the ultimate recipe for cozy nights, special gatherings, or any day that needs a touch of warmth.

What Makes Grandma’s Pot Pie So Special?

Grandma didn’t rely on shortcuts. She used simple, fresh ingredients and gave them time to develop flavor. Her pot pie was:

  • Made with homemade crust or buttery puff pastry
  • Filled with real roasted or boiled chicken
  • Packed with vegetables from her garden
  • Seasoned with love and slow-cooked attention

Let’s recreate that magic.

Ingredients for Grandma’s Chicken Pot Pie

This recipe makes one 9-inch pie, serving 6 generous portions.

For the Filling:

  • 2 tablespoons butter
  • 1 small onion, diced
  • 2 cloves garlic, minced
  • 2 medium carrots, peeled and diced
  • 2 celery stalks, diced
  • 1⁄4 cup all-purpose flour
  • 2 cups chicken broth
  • 1 cup milk (whole or 2%)
  • 2 cups cooked chicken, shredded or diced
  • 1 cup frozen peas
  • ½ teaspoon dried thyme
  • Salt and black pepper to taste
  • Optional: 1 small potato, diced and pre-cooked

For the Crust:

  • 1 sheet of puff pastry (store-bought or homemade)
  • Or: double crust pastry for top and bottom
  • 1 egg (beaten with 1 tbsp milk, for egg wash)

Note: If you prefer a bottom crust, use a standard pie crust and par-bake it before adding filling.

Step-by-Step Instructions

1. Preheat Oven

Preheat your oven to 200°C (400°F). If using a bottom crust, line your pie dish and blind bake for 10 minutes with pie weights. Set aside.

2. Cook the Filling Base

In a large saucepan, melt butter over medium heat. Add the onions, garlic, carrots, and celery. Sauté until the vegetables are softened, about 5–7 minutes.

3. Make the Creamy Sauce

Sprinkle the flour over the veggies and stir to coat. Cook for 1–2 minutes to eliminate the raw flour taste.

Gradually whisk in the chicken broth and milk. Keep stirring until the mixture thickens to a creamy consistency — about 5 minutes.

4. Add Chicken and Peas

Stir in the shredded chicken, peas, thyme, salt, and pepper. Taste and adjust seasoning as needed. Let the filling simmer for another 3–5 minutes, then remove from heat.

Grandma’s Tip: Let the filling cool slightly before assembling to avoid a soggy crust.

5. Assemble the Pie

Spoon the cooled filling into the pie dish. Top with puff pastry or your prepared crust. Trim and crimp the edges.

Use a sharp knife to cut small slits in the top to allow steam to escape.

Brush with the egg wash for a shiny, golden finish.

6. Bake to Perfection

Place the pie on a baking tray (to catch any drips) and bake for 30–35 minutes, or until the crust is golden brown and the filling is bubbling.

Let it rest for at least 10 minutes before slicing — this helps the filling set.

Variations to Try

Want to make it your own? Grandma would approve. Try these:

  • Turkey Pot Pie: Great for holiday leftovers
  • Vegetarian Version: Use mushrooms, lentils, or white beans instead of chicken
  • Cheesy Filling: Stir in shredded cheddar or Parmesan
  • Herbed Crust: Mix fresh herbs into the dough for an aromatic twist
  • Mini Pot Pies: Use ramekins for individual servings — perfect for meal prep

How to Serve Chicken Pot Pie

This dish is hearty enough to stand alone, but pairs beautifully with:

  • A green salad with vinaigrette
  • Steamed green beans or broccoli
  • A glass of iced tea or white wine
  • Or just a cozy blanket and a fork on the couch!

Storing and Reheating Tips

To Store:

  • Cover leftover pie tightly with foil or transfer to an airtight container.
  • Refrigerate for up to 4 days.

To Reheat:

  • Oven: Cover loosely with foil and bake at 175°C (350°F) for 15–20 minutes.
  • Microwave: Use medium power to prevent the crust from getting rubbery.

To Freeze:

  • Freeze unbaked pot pie (assembled but not egg-washed) for up to 3 months.
  • Bake from frozen at 190°C (375°F) for about 1 hour, covering loosely with foil for the first half.

Grandma’s Secrets to the Best Pot Pie

  • Homemade broth = deeper flavor
  • Use leftover roast chicken for tenderness
  • Chill your dough before topping for better flakiness
  • Never skip the egg wash — it makes the crust shine
  • Let it rest before cutting — patience pays off!

Final Thoughts: A Crust Full of Memories

Chicken pot pie is more than a recipe — it’s a piece of heritage. It’s what grandma made when guests came over, when the weather turned cold, or when someone needed cheering up.

With every bite of tender chicken, buttery crust, and creamy filling, you’re not just tasting food — you’re tasting home, care, and generations of tradition.

Grandma’s Secret to the Perfect Rice Pudding: Creamy, Sweet, and Timeless

If you ever walked into grandma’s kitchen and caught the scent of vanilla, cinnamon, and warm milk, chances are she was making her famous rice pudding. Silky, sweet, and subtly spiced, this humble dessert has been passed down through generations — not just as a treat, but as a taste of comfort and tradition.

In this guide, you’ll learn how to make perfect, creamy rice pudding from scratch — the same way grandma did it: slow-cooked, simple, and made with love.

Why Rice Pudding Is a Classic Comfort Dessert

Rice pudding is one of those dishes that transcends trends. Here’s why it’s been loved for so long:

  • Uses basic pantry ingredients
  • Naturally gluten-free
  • Can be served warm or chilled
  • Customizable with fruits, spices, and toppings
  • Satisfies your sweet tooth without being too heavy

Most importantly, it brings back memories of slow, cozy evenings and warm kitchen tables.

Ingredients for Classic Rice Pudding

This recipe makes 4–6 servings.

Basic Ingredients:

  • 1 cup uncooked white rice (short- or medium-grain preferred)
  • 4 cups whole milk (or half milk, half cream for richer texture)
  • ½ cup granulated sugar
  • 1 cinnamon stick (or ½ tsp ground cinnamon)
  • 1 teaspoon vanilla extract
  • Pinch of salt
  • 1 egg (optional, for a thicker custard-style pudding)
  • 2 tablespoons butter (optional, for richness)

Optional Add-ins:

  • Raisins or chopped dried fruits
  • Lemon or orange zest
  • Ground nutmeg
  • Coconut milk for a tropical version
  • Sweetened condensed milk instead of sugar

Step-by-Step Instructions

1. Rinse the Rice

Rinse the rice under cold water until the water runs clear. This removes excess starch and prevents stickiness.

2. Cook the Rice (If Using Raw)

In a medium saucepan, bring 2 cups of water to a boil. Add the rice and a pinch of salt. Reduce the heat, cover, and simmer until the rice is just cooked, about 10–15 minutes. Drain if necessary.

Shortcut: You can use leftover cooked rice — just skip to the next step and reduce the total cooking time.

3. Simmer with Milk and Cinnamon

Add the milk, sugar, and cinnamon stick to the cooked rice. Stir gently and bring to a low simmer over medium heat.

Cook uncovered, stirring frequently, for 30–40 minutes, or until the mixture thickens and becomes creamy.

Stirring often prevents the milk from scalding and helps break down the rice for that silky texture.

4. Add the Egg (Optional)

For a custard-style pudding:

  • In a small bowl, beat one egg.
  • Slowly add a few tablespoons of hot rice pudding to the egg, whisking to temper it.
  • Then slowly stir the egg mixture back into the pot.
  • Continue to cook for 3–5 more minutes, stirring constantly.

5. Finish with Vanilla and Butter

Remove the pudding from heat. Discard the cinnamon stick.

Stir in the vanilla extract and butter (if using) for extra creaminess.

Let it rest for 5–10 minutes before serving. It will continue to thicken as it cools.

How to Serve Rice Pudding

You can enjoy this dish in many ways, just like grandma did:

  • Warm, straight from the pot — the ultimate comfort
  • Chilled, with a sprinkle of cinnamon on top
  • With fresh berries or banana slices
  • Topped with toasted nuts or coconut flakes
  • Drizzled with honey or caramel sauce

Grandma often sprinkled cinnamon sugar on top and served it in teacups for a charming touch.

Storage Tips

  • Refrigerate in an airtight container for up to 4 days.
  • Add a splash of milk before reheating to restore creaminess.
  • Best served warm or cold — not frozen, as texture may change.

Common Mistakes and How to Avoid Them

  • Boiling the milk too hard: Simmer gently to avoid curdling
  • Not stirring enough: Frequent stirring gives you that creamy texture
  • Using long-grain rice: It won’t break down as nicely
  • Adding sugar too late: Add early so it dissolves and thickens the mixture
  • Overcooking: Stop cooking when the pudding is still slightly loose — it will thicken as it cools

Make It Your Own: Creative Variations

Looking to experiment? Try these twists:

  • Chocolate rice pudding: Add cocoa powder and dark chocolate chunks
  • Coconut-lime version: Use coconut milk and add lime zest
  • Spiced chai version: Add cardamom, clove, and ginger
  • Maple and pecan: Stir in maple syrup and top with toasted nuts
  • Tropical twist: Use pineapple, mango, or passionfruit puree as topping

Final Thoughts: A Spoonful of Nostalgia

There’s a reason rice pudding has stood the test of time. It’s simple, soulful, and endlessly adaptable — a dessert that can be dressed up or kept plain, and always delivers warmth.

Grandma knew that the best recipes didn’t come from cookbooks. They came from memory, repetition, and a touch of love in every stir. Now, with this guide, you can bring that same warmth to your own table — one creamy spoonful at a time.

Grandma’s Biscuit Secrets: How to Make the Fluffiest, Buttery Biscuits from Scratch

Few smells rival the aroma of freshly baked biscuits wafting from the kitchen on a Sunday morning. Whether served with jam, gravy, or just a pat of butter, grandma’s biscuits were always light, flaky, and full of love. They weren’t made from a tube or box — they were hand-mixed, rolled with care, and baked to golden perfection.

In this article, we’ll uncover the secrets grandma used to make her legendary homemade biscuits — from ingredients and techniques to storage and serving suggestions.

Why Grandma’s Biscuits Were Always Better

Biscuits may seem simple, but achieving that perfect rise, tender crumb, and golden crust requires just the right technique. Grandma’s biscuits stood out because:

  • She used cold ingredients and handled them gently
  • She didn’t overwork the dough
  • She always baked them close together for a higher rise
  • And most of all — she made them often, with instinct and care

Let’s recreate that timeless comfort in your kitchen.

Ingredients You’ll Need

This recipe makes about 8 to 10 biscuits.

  • 2 cups all-purpose flour
  • 1 tablespoon baking powder
  • ½ teaspoon baking soda
  • 1 teaspoon salt
  • 6 tablespoons cold unsalted butter, cut into cubes
  • ¾ cup cold buttermilk (or substitute below)
  • Extra melted butter for brushing tops

Buttermilk Substitute:

  • ¾ cup milk + 1 tablespoon lemon juice or vinegar
  • Let sit for 5–10 minutes before using

Step-by-Step Instructions

1. Preheat the Oven

Preheat your oven to 220°C (425°F). Line a baking sheet with parchment paper or lightly grease it.

2. Mix the Dry Ingredients

In a large bowl, whisk together flour, baking powder, baking soda, and salt until well combined.

3. Cut in the Butter

Add the cold butter cubes. Use a pastry cutter, fork, or your fingers to blend the butter into the flour until the mixture resembles coarse crumbs with some pea-sized bits.

Grandma’s Tip: Keep everything cold. You can even chill the flour and bowl beforehand!

4. Add the Buttermilk

Make a well in the center and pour in the buttermilk. Stir gently with a spoon or spatula just until the dough comes together — don’t overmix.

The dough will look shaggy and slightly sticky. That’s perfect.

5. Knead Gently

Turn the dough out onto a floured surface. Pat it into a rough rectangle about 1 inch thick.

Fold the dough in half, rotate 90°, and pat it down again. Repeat this folding 3–4 times — this creates the beautiful layers in the finished biscuits.

Final thickness should be about ¾ to 1 inch.

6. Cut the Biscuits

Use a round biscuit cutter (or a drinking glass) to cut biscuits without twisting — twisting seals the edges and prevents rising.

Place the biscuits close together on the baking sheet for soft sides, or spaced apart for crispier edges.

7. Bake

Bake for 12–15 minutes, or until the tops are golden brown.

Remove from the oven and brush immediately with melted butter for extra flavor and softness.

8. Let Cool Slightly and Serve

Cool for a few minutes on a wire rack. Serve warm and enjoy the flaky, buttery goodness!

Serving Ideas: Grandma-Style

These biscuits were the foundation of many meals in grandma’s kitchen:

  • With homemade jam and butter
  • Split and topped with sausage gravy
  • Alongside fried chicken and greens
  • Used for mini sandwiches (ham and cheese, pulled pork)
  • Served with soup or stew

Pro tip: Leftover biscuits also make amazing breakfast sandwiches.

How to Store and Reheat

Storage:

  • Store cooled biscuits in an airtight container at room temperature for up to 2 days.
  • Refrigerate for up to 5 days, though they may dry out slightly.

Reheating:

  • Wrap in foil and warm in a 160°C (325°F) oven for 5–10 minutes.
  • Or microwave for 15 seconds (cover with a damp paper towel).

Freezing:

  • Freeze baked biscuits in freezer bags for up to 2 months.
  • Reheat in the oven straight from frozen for best results.

Tips for Biscuit Success Every Time

  • Don’t overwork the dough — gentle hands make tender biscuits
  • Keep everything cold until baking
  • Use real butter for the best flavor
  • Fold the dough to create layers, not just mix and roll
  • Bake hot and fast to encourage steam and rise

Common Mistakes to Avoid

  • Warm ingredients: causes flat, greasy biscuits
  • Overmixing: leads to tough texture
  • Using old baking powder: biscuits won’t rise
  • Cutting with a dull or twisted edge: compresses the dough

Final Thoughts: A Taste of Home in Every Bite

Grandma’s biscuits weren’t just food — they were tradition. A centerpiece at breakfast, a side at dinner, or a standalone snack, they brought warmth and satisfaction to every occasion.

Learning to make biscuits from scratch connects you to generations past — those who made more with less, and who knew how to transform flour and butter into joy.

Now let’s bring this cozy, flaky comfort food to life with a warm, ultra-realistic image of freshly baked biscuits on a rustic kitchen table.

How to Make Grandma’s Creamy Cornmeal Porridge: A Warm and Comforting Classic

Some dishes don’t need anything fancy to make them special. They don’t require exotic ingredients or modern techniques — just a few pantry staples, a pot, and someone who knows how to stir with love. One of those dishes is grandma’s creamy cornmeal porridge.

Rich, smooth, and subtly sweet, this traditional porridge is more than breakfast — it’s a hug in a bowl. Whether served warm on cold mornings or gently sweetened for an evening treat, this recipe is a timeless comfort food passed down through generations.

In this article, you’ll learn how to prepare creamy cornmeal porridge just like grandma did — with step-by-step instructions, variations, and tips to get that perfect texture every time.

What Is Cornmeal Porridge?

Cornmeal porridge is a smooth and creamy dish made from fine yellow or white cornmeal, simmered slowly in milk or water. Often flavored with cinnamon, nutmeg, vanilla, and sweetened with sugar or condensed milk, it’s a favorite in Caribbean, Southern, and rural kitchens around the world.

Unlike instant cereals, cornmeal porridge takes time — and that’s what makes it so delicious.

Ingredients You’ll Need

This recipe makes 2–3 generous servings.

Basic Ingredients:

  • 1 cup fine cornmeal (yellow or white)
  • 3 cups water
  • 2 cups milk (whole or evaporated preferred)
  • ½ teaspoon salt
  • 1 cinnamon stick (or ½ teaspoon ground cinnamon)
  • ½ teaspoon nutmeg (optional)
  • 1 teaspoon vanilla extract
  • 2–3 tablespoons sugar (or to taste)
  • 2 tablespoons sweetened condensed milk (optional, for richness)

Note: If using coarse cornmeal or polenta, you may need longer cooking time and more liquid.

Step-by-Step Instructions

1. Mix Cornmeal and Cold Water

In a medium bowl, whisk the cornmeal with 2 cups of cold water until smooth and lump-free.

Grandma’s Tip: Never add cornmeal directly to boiling liquid — always start with cold water to prevent clumps.

2. Bring Milk and Spices to a Simmer

In a medium saucepan, combine 1 cup of water, milk, salt, cinnamon stick, and nutmeg. Heat gently over medium heat until it starts to simmer — don’t let it boil.

3. Slowly Add Cornmeal Mixture

Reduce the heat to low. Slowly pour the cornmeal mixture into the simmering milk while stirring constantly with a whisk or wooden spoon.

Keep stirring gently to prevent sticking or lumps. The mixture will begin to thicken after 2–3 minutes.

4. Simmer Until Creamy

Continue to cook over low heat, stirring frequently, for 15–20 minutes, or until the porridge is thick and smooth. Add a little more water or milk if it becomes too thick too quickly.

5. Add Sweeteners and Flavor

Remove the cinnamon stick. Stir in the sugar, vanilla extract, and condensed milk (if using). Taste and adjust the sweetness to your liking.

Optional: For a touch of citrus, add a thin strip of orange peel while simmering.

6. Serve Warm

Serve the porridge warm in bowls. Sprinkle with extra cinnamon or nutmeg on top, and drizzle with more condensed milk or honey for extra indulgence.

Tips for the Perfect Porridge

  • Use fine cornmeal for a smooth texture — coarse varieties will need longer cooking.
  • Stir constantly in the beginning, then frequently as it thickens.
  • Cook on low heat to prevent scorching and allow the flavor to develop.
  • Let it rest for a few minutes before serving to thicken further and cool slightly.
  • Add warm milk before serving if you prefer a looser texture.

Variations Grandma Loved

Want to switch it up? Try these ideas:

  • Spiced version: Add clove, ginger, or allspice for a Caribbean flair.
  • Tropical version: Stir in mashed ripe banana or grated coconut.
  • Savory twist: Skip the sugar and add cheese, black pepper, and butter.
  • Fruit topping: Serve with sliced bananas, raisins, or berry compote.
  • Nutty version: Top with chopped walnuts, pecans, or almonds and honey.

How to Store and Reheat

Storage:

  • Let porridge cool completely.
  • Store in an airtight container in the fridge for up to 3 days.

Reheating:

  • Reheat in a saucepan over low heat, stirring constantly.
  • Add a splash of milk or water to loosen it up.
  • Stir until smooth and warm throughout.

It’s just as delicious the next day — grandma always made extra!

Is Cornmeal Porridge Healthy?

Absolutely! It’s:

  • Gluten-free (if using certified cornmeal)
  • A good source of complex carbohydrates and fiber
  • Easy to digest and naturally filling
  • Packed with calcium and protein when made with milk
  • Customizable for dietary needs (vegan, low-sugar, dairy-free)

Final Thoughts: A Bowl of Simplicity, Made with Love

Cornmeal porridge is a dish that reminds us of simpler times — of quiet mornings, kitchen warmth, and a grandma who knew how to make everything better with a wooden spoon and a gentle smile.

Whether you’re making it for breakfast, dessert, or just a moment of comfort, this recipe brings back that feeling of home. Creamy, soothing, and endlessly customizable, it’s one of those traditions that never goes out of style.