Grandma’s Apple Crisp: Warm, Spiced, and Topped with Buttery Crumble

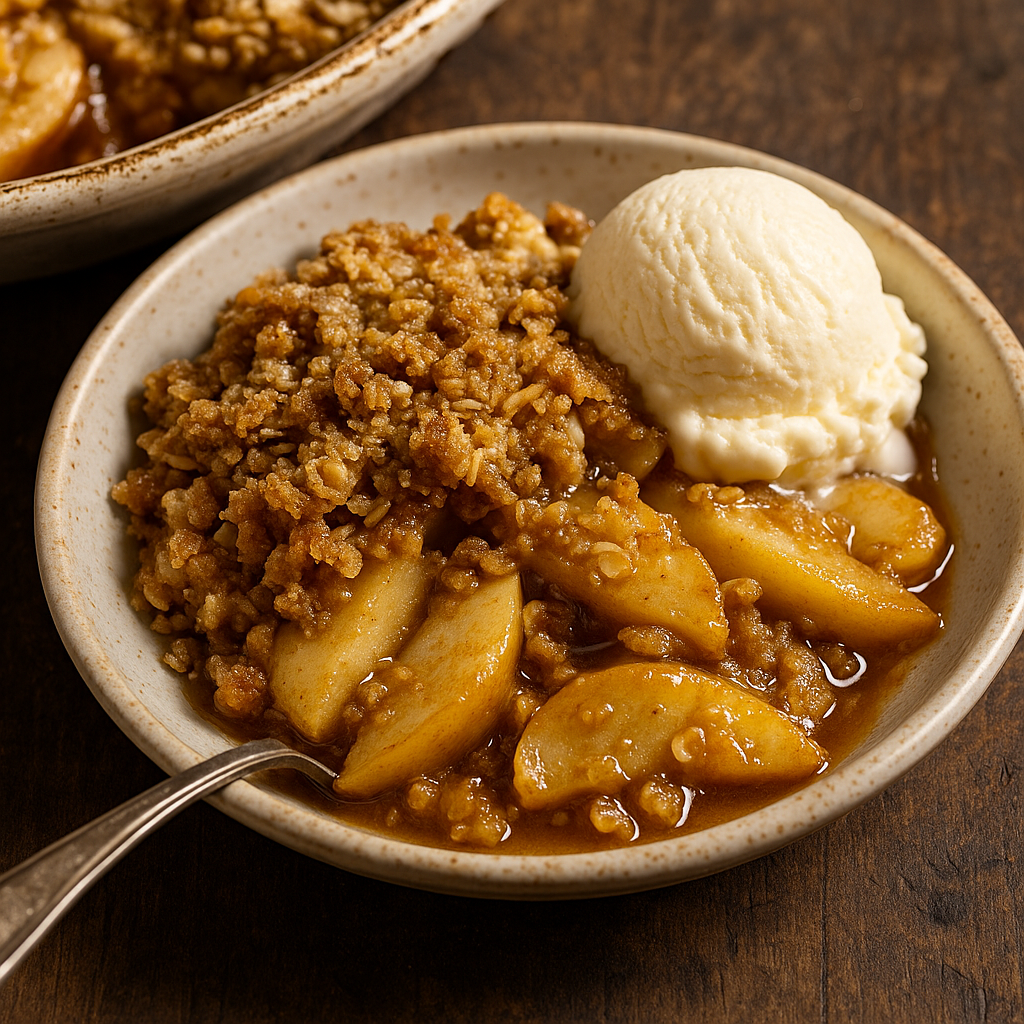
Few things say “home” like a warm dish of apple crisp coming out of the oven. With tender spiced apples, a crispy oat topping, and that unmistakable aroma of cinnamon and butter, grandma’s apple crisp was a dessert you never had to wait for a special occasion to enjoy — just a few ripe apples and a little love.

In this guide, you’ll learn how to make the perfect apple crisp, just like grandma did — rustic, simple, and absolutely satisfying.


Why Apple Crisp Is a Timeless Favorite

  • Easier and faster than apple pie — no crust needed
  • Made with simple pantry ingredients
  • Perfect for using seasonal apples
  • Best served warm with vanilla ice cream or whipped cream
  • A true comfort dessert that feeds the soul

Ingredients for Grandma’s Apple Crisp

This recipe serves 6–8 people.

For the Filling:

  • 6 medium apples (Granny Smith, Honeycrisp, or a mix), peeled and sliced
  • 2 tablespoons granulated sugar
  • 2 tablespoons brown sugar
  • 1 tablespoon all-purpose flour
  • 1 teaspoon ground cinnamon
  • ¼ teaspoon ground nutmeg
  • 1 teaspoon lemon juice

For the Topping:

  • ¾ cup rolled oats
  • ¾ cup all-purpose flour
  • ½ cup brown sugar
  • ½ cup unsalted butter, cold and cubed
  • ¼ teaspoon salt
  • Optional: ½ teaspoon cinnamon or chopped nuts for added texture

Step-by-Step Instructions

1. Preheat the Oven

Set your oven to 175°C (350°F) and lightly butter a 9×9-inch baking dish or similar.


2. Prepare the Apple Filling

In a large mixing bowl, toss the sliced apples with sugar, brown sugar, flour, cinnamon, nutmeg, and lemon juice.

Pour the apple mixture into the prepared baking dish and spread evenly.


3. Make the Crisp Topping

In another bowl, mix oats, flour, brown sugar, salt, and cinnamon.

Cut in the cold butter using a pastry cutter or your fingertips until the mixture resembles coarse crumbs.

Sprinkle the topping evenly over the apples.


4. Bake

Bake for 40–45 minutes, or until the topping is golden brown and the apples are tender and bubbling.

Let cool for at least 10–15 minutes before serving — this allows the filling to set slightly.


Serving Suggestions

  • Warm with a scoop of vanilla ice cream
  • Drizzled with caramel sauce
  • Served cold for breakfast with a dollop of Greek yogurt
  • With whipped cream and a sprinkle of cinnamon

Grandma’s Favorite: A warm bowl of apple crisp with milk poured over the top — old-fashioned and delicious!


Storage and Reheating Tips

Store:

  • Cover and refrigerate for up to 4 days

Reheat:

  • Oven: Warm at 160°C (325°F) for 10–15 minutes
  • Microwave: Heat individual portions in short intervals

Freeze:

  • Freeze after baking (cooled) for up to 3 months
  • Thaw in the fridge overnight and reheat before serving

Delicious Variations

  • Apple-Pear Crisp: Replace half the apples with ripe pears
  • Maple Apple Crisp: Add 2 tablespoons of maple syrup to the filling
  • Berry Apple Crisp: Mix in fresh or frozen berries with the apples
  • Coconut-Oat Topping: Add shredded coconut to the topping for extra texture
  • Gluten-Free Version: Use gluten-free flour and oats

Grandma’s Tips for the Perfect Apple Crisp

  • Use tart apples like Granny Smith for balance
  • Slice apples evenly so they cook at the same rate
  • Don’t skip the lemon juice — it brightens the flavor
  • Use real butter for the richest, crunchiest topping
  • Let it rest before serving — this helps the juices settle

Final Thoughts: A Rustic Treat with Heart

Grandma’s apple crisp wasn’t fancy — and that’s exactly what made it so special. No need for perfection, just ripe fruit, cozy spices, and a golden, buttery topping that brought everyone back for seconds.

Now it’s your turn to carry on that tradition with a dessert that’s as comforting as it is delicious.

Grandma’s Classic Banana Bread: Moist, Sweet, and Made with Ripe Bananas

There’s something magical about the smell of banana bread baking in the oven — especially when it’s grandma’s recipe. Sweet, moist, and perfectly spiced, it was her go-to solution for overripe bananas and a surefire way to bring the family together at the table.

In this article, you’ll learn how to make classic banana bread from scratch, just like grandma did. It’s easy, delicious, and impossible to eat just one slice.


Why Banana Bread Is a Timeless Favorite

  • Uses up overripe bananas that would otherwise go to waste
  • Made with simple pantry staples
  • Incredibly moist and flavorful
  • Perfect as a breakfast, snack, or dessert
  • Easily customizable with nuts, chocolate, or spices

Ingredients for Grandma’s Banana Bread

This recipe makes one 9×5 inch loaf (about 8–10 slices).

  • 3 ripe bananas, mashed
  • ½ cup unsalted butter, melted
  • ¾ cup brown sugar (or use white sugar)
  • 2 large eggs
  • 1 teaspoon vanilla extract
  • 1 ½ cups all-purpose flour
  • 1 teaspoon baking soda
  • ½ teaspoon salt
  • ½ teaspoon cinnamon (optional, but recommended)
  • Optional: ½ cup chopped walnuts, pecans, or chocolate chips

Grandma’s Tip: The riper the bananas, the sweeter and more flavorful your bread will be.


Step-by-Step Instructions

1. Preheat the Oven

Preheat your oven to 175°C (350°F). Grease a 9×5 inch loaf pan or line it with parchment paper.


2. Mash the Bananas

In a large bowl, mash the bananas with a fork until smooth.

Stir in the melted butter and mix until combined.


3. Add the Wet Ingredients

Mix in the brown sugar, eggs, and vanilla extract. Stir until fully blended.


4. Add the Dry Ingredients

In a separate bowl, whisk together the flour, baking soda, salt, and cinnamon.

Gradually add the dry mixture to the banana mixture. Stir just until combined — do not overmix.

Fold in nuts or chocolate chips if using.


5. Bake

Pour the batter into the prepared loaf pan and smooth the top.

Bake for 50–60 minutes, or until a toothpick inserted into the center comes out clean.

If the top browns too quickly, cover loosely with foil during the last 10–15 minutes.


6. Cool and Serve

Let the bread cool in the pan for 10 minutes, then transfer to a wire rack to cool completely.

Slice and serve warm or at room temperature — delicious either way!


How to Store and Freeze Banana Bread

Room Temperature:

  • Wrap in foil or plastic wrap and keep for up to 3 days

Refrigerator:

  • Lasts up to 1 week, but may dry out slightly

Freezer:

  • Wrap tightly in plastic wrap and foil; freeze for up to 3 months
  • To serve, thaw at room temperature or toast slices directly from frozen

Fun Variations

  • Chocolate Banana Bread: Add ¼ cup cocoa powder and chocolate chips
  • Banana Nut Bread: Use chopped walnuts or pecans
  • Spiced Banana Bread: Add ground nutmeg, clove, or cardamom
  • Banana Coconut Bread: Mix in shredded coconut
  • Healthy Twist: Use whole wheat flour and swap butter for coconut oil or Greek yogurt

Grandma’s Secrets for the Best Banana Bread

  • Use extra ripe bananas — black spots are good!
  • Don’t overmix the batter — stir just until no flour streaks remain
  • Let it cool fully before slicing for cleaner cuts
  • Add a few banana slices on top before baking for a beautiful finish
  • Wrap leftovers while still slightly warm to keep moisture inside

Final Thoughts: A Slice of Sweet Nostalgia

Banana bread was more than just a way to use old bananas — it was grandma’s way of turning something ordinary into something unforgettable. With its soft texture, sweet aroma, and comforting flavor, this banana bread recipe brings those memories back in every bite.

Now you can carry on that tradition with your own homemade loaf — and maybe share a slice with someone you love.


Grandma’s Homemade Strawberry Jam: Sweet, Fresh, and Preserved with Love

There’s nothing quite like opening a jar of homemade strawberry jam — especially when it’s made with grandma’s recipe. Bright, fruity, and naturally sweet, her jam was more than a spread — it was a memory, sealed in a jar.

In this guide, you’ll learn how to make classic strawberry jam from scratch, using just a few simple ingredients. No preservatives, no shortcuts — just real fruit, sugar, and love.

Why Make Strawberry Jam at Home?

  • Uses only 3–4 real ingredients
  • Tastes fresher and fruitier than store-bought versions
  • Contains no artificial preservatives or colorings
  • Great for gifting, storing, and enjoying year-round
  • Perfect for toast, pancakes, yogurt, desserts, and more

Ingredients for Homemade Strawberry Jam

This recipe makes about 3 to 4 small jars (roughly 700–800g total).

  • 2 pounds (900g) fresh strawberries, hulled and chopped
  • 2 ½ cups (500g) granulated sugar
  • Juice of 1 lemon
  • Optional: 1 small apple, grated with peel (natural source of pectin)

The apple helps the jam thicken naturally. It’s optional but highly recommended.

How to Make Strawberry Jam: Step-by-Step

1. Prep the Strawberries

Wash the strawberries well, remove the stems, and chop them into small pieces.

Place them in a large pot.

Grandma’s Tip: If you prefer chunky jam, leave the pieces larger. For a smoother texture, mash the fruit before cooking.

2. Combine with Sugar and Lemon

Add the sugar and lemon juice to the pot. If using grated apple, add that as well.

Mix everything together and let it sit for 30 to 60 minutes. This helps the fruit release its juices.

3. Cook the Jam

Place the pot over medium-low heat, stirring occasionally until the sugar is fully dissolved.

Increase the heat to medium and bring the mixture to a gentle boil. Stir frequently to prevent sticking.

Simmer for 25–40 minutes, or until thickened. Skim off any foam that forms.

4. Test the Jam

To test if the jam is ready:

  • Drop a spoonful onto a chilled plate.
  • Wait a few seconds and run your finger through it.
  • If the line stays clear and the jam wrinkles slightly, it’s done.

5. Fill and Seal Jars

Sterilize your jars and lids in boiling water.

Ladle the hot jam into the jars, leaving a small space at the top. Wipe the rims, seal tightly, and turn the jars upside down for 5 minutes.

Let cool completely before storing.

Serving Ideas for Strawberry Jam

  • Spread on warm toast, scones, or biscuits
  • Over pancakes, waffles, or crepes
  • Mixed into Greek yogurt or oatmeal
  • As a filling for cakes, thumbprint cookies, or tarts
  • On a cheese board with brie or cream cheese
  • Or the grandma-approved method: straight from the spoon!

Storage Tips

  • Refrigerator: Keeps for up to 3 weeks after opening
  • Unopened jars: Store in the fridge for up to 3 months
  • Freezer: Freeze cooled jam in containers for up to 6 months

Flavor Variations

Want to customize your jam? Try one of these ideas:

  • Mint Strawberry Jam: Add a few fresh mint leaves while cooking
  • Vanilla Strawberry Jam: Stir in ½ teaspoon of vanilla at the end
  • Strawberry Red Wine Jam: Replace part of the strawberries with red wine for a richer flavor
  • Spicy Strawberry Jam: Add a pinch of chili flakes or chopped fresh chili for heat

Grandma’s Tips for Perfect Jam

  • Use fully ripe strawberries for the best flavor
  • Always add fresh lemon juice — it enhances taste and helps with preservation
  • Don’t rush the simmering — give it time to thicken properly
  • Never double the batch — smaller batches cook more evenly
  • Stir constantly once it starts bubbling to avoid burning

Final Thoughts: A Jar Full of Memories

Grandma’s strawberry jam wasn’t just about fruit and sugar — it was about tradition, family, and the joy of homemade things. With this easy, delicious recipe, you can continue that tradition, one jar at a time.

Whether it’s for breakfast, dessert, or a little moment of sweetness during the day, this jam is the taste of home.

Grandma’s Chicken Pot Pie: A Creamy, Golden-Baked Classic Filled with Love

When it came to comfort food, nothing could beat grandma’s homemade chicken pot pie. With its flaky golden crust, creamy chicken filling, and colorful mix of vegetables, it was more than just dinner — it was a warm, baked hug served fresh from the oven.

This article will guide you through how to make a traditional chicken pot pie from scratch — hearty, homemade, and bursting with flavor, just like grandma’s.

Why This Chicken Pot Pie Is a True Classic

  • Golden, flaky top crust that seals in all the goodness
  • Creamy, savory filling made with real ingredients
  • Tender chunks of chicken and vegetables in every bite
  • Perfect for family dinners, leftovers, or meal prep
  • Brings back warm memories of grandma’s kitchen

Ingredients for Grandma’s Chicken Pot Pie

This recipe fills one 9-inch deep pie dish (or a medium casserole).

For the Crust (Top Only or Double if Desired):

  • 1 ¼ cups all-purpose flour
  • ½ teaspoon salt
  • ½ cup cold unsalted butter, cubed
  • 3–5 tablespoons ice water

Or use store-bought pie crust or puff pastry for a shortcut.

For the Filling:

  • 2 tablespoons unsalted butter
  • 1 small onion, chopped
  • 2 cloves garlic, minced
  • 2 carrots, diced
  • 2 celery stalks, diced
  • ⅓ cup all-purpose flour
  • 2 cups chicken broth
  • ¾ cup whole milk or half-and-half
  • 2–3 cups cooked chicken, shredded or diced
  • ½ cup frozen peas
  • ½ teaspoon dried thyme
  • Salt and pepper to taste

For Finishing:

  • 1 egg, beaten (for egg wash)

Step-by-Step Instructions

1. Prepare the Crust (If Making from Scratch)

Mix flour and salt in a bowl. Cut in cold butter until crumbly.

Add ice water one tablespoon at a time until the dough holds together. Form into a disc, wrap in plastic, and refrigerate for at least 30 minutes.

2. Make the Filling

In a large skillet or saucepan, melt butter over medium heat.

Add onion, garlic, carrots, and celery. Cook until vegetables are soft, about 6–8 minutes.

Stir in flour and cook for 1–2 minutes, stirring constantly, to form a roux.

Gradually whisk in chicken broth and milk. Cook until thickened (5–7 minutes).

Stir in the cooked chicken, peas, thyme, salt, and pepper. Let simmer 2–3 minutes. Remove from heat and let cool slightly.

3. Assemble the Pie

Preheat oven to 200°C (400°F).

Pour the filling into a 9-inch pie dish or baking dish.

Roll out your pie dough to fit over the top. Lay it gently over the filling and trim any excess. Crimp the edges and cut small slits to vent.

Brush with beaten egg for a shiny, golden crust.

4. Bake

Bake for 30–35 minutes, or until the crust is golden and the filling is bubbling.

Let rest for 10–15 minutes before serving — this allows the filling to set.

Serving Suggestions

  • Serve with a simple green salad or roasted vegetables
  • Pair with a glass of iced tea or lemonade
  • Enjoy as is — it’s a complete meal on its own

Tips for the Best Chicken Pot Pie

  • Use leftover roasted chicken or rotisserie chicken to save time
  • Add extra herbs like rosemary or parsley for flavor
  • Let the filling cool slightly before topping with crust — prevents soggy dough
  • Don’t skip the egg wash — it gives that classic golden look
  • For extra comfort, add a splash of cream to the filling

Make-Ahead and Storage

Make Ahead:

  • Prep filling and crust separately up to 1 day ahead
  • Assemble and bake when ready to serve
  • Or assemble and refrigerate (unbaked) for up to 24 hours

Store:

  • Refrigerate leftovers for up to 4 days

Reheat:

  • Bake at 175°C (350°F) until hot and bubbly
  • Microwave individual portions if needed, but crust may lose some crispness

Freeze:

  • Freeze whole assembled, unbaked pot pie. Wrap tightly.
  • Bake from frozen at 190°C (375°F) for 45–55 minutes

Final Thoughts: Dinner, the Way Grandma Did It

Grandma’s chicken pot pie was more than a meal — it was a reminder of everything good: cozy evenings, full plates, and second helpings shared around the table. From the rich, creamy filling to the golden crust, every forkful was filled with love and tradition.

Now it’s your turn to bring that magic into your own kitchen with this timeless, delicious recipe.

Grandma’s Classic Pecan Pie: Sweet, Nutty, and Irresistibly Gooey

No holiday season was ever complete without grandma’s famous pecan pie — golden brown, packed with crunchy pecans, and filled with a sweet, gooey custard that made every bite unforgettable. Served with whipped cream or just as it was, it was always the first dessert to disappear.

In this guide, you’ll learn how to make the ultimate pecan pie from scratch, the way grandma always made it — simple, sweet, and utterly delicious.

What Makes This Pecan Pie Special

  • Crisp, buttery crust
  • Rich, custard-like filling that sets perfectly
  • Loads of toasted pecans in every slice
  • Made with pantry staples — no corn syrup required if you prefer alternatives
  • Perfect for holidays, Sunday dinners, or just a slice of sweet nostalgia

Ingredients for Grandma’s Pecan Pie

This recipe makes one 9-inch pie (serves 8 slices).

For the Crust:

  • 1 ¼ cups all-purpose flour
  • ½ teaspoon salt
  • ½ teaspoon sugar
  • ½ cup cold unsalted butter, cubed
  • 3–5 tablespoons ice water

Or use a store-bought 9-inch pie crust for convenience.

For the Filling:

  • 1 cup light corn syrup (or ¾ cup maple syrup + ¼ cup brown sugar)
  • 1 cup brown sugar (light or dark)
  • 4 tablespoons unsalted butter, melted
  • 3 large eggs
  • 1 teaspoon pure vanilla extract
  • ½ teaspoon salt
  • 2 cups pecan halves (chopped or whole, or a mix)

Step-by-Step Instructions

1. Prepare the Pie Crust

If making from scratch:

  • In a large bowl, mix flour, salt, and sugar. Cut in the cold butter until the mixture resembles coarse crumbs.
  • Add ice water, one tablespoon at a time, until dough just comes together.
  • Form into a disc, wrap, and refrigerate for 30–60 minutes.

Roll out the dough and fit into a 9-inch pie dish. Trim and crimp the edges. Chill again while you prepare the filling.

Grandma’s Tip: Cold crust = flaky crust.

2. Make the Filling

In a large bowl, whisk together corn syrup (or maple + sugar), brown sugar, melted butter, eggs, vanilla, and salt until smooth.

Stir in the pecans.

3. Assemble and Bake

Preheat oven to 175°C (350°F).

Pour the filling into the chilled pie crust. Arrange extra pecan halves on top if desired for decoration.

Place the pie on a baking sheet and bake for 50–60 minutes, or until the center is set and the top is golden and slightly puffed.

If the crust starts browning too fast, cover the edges with foil.

4. Cool Completely

Let the pie cool at room temperature for at least 2–3 hours before slicing. The filling will continue to set as it cools.

Serve at room temp or slightly warmed.

Serving Suggestions

  • A dollop of whipped cream or vanilla ice cream
  • A drizzle of warm caramel sauce
  • Straight from the fridge the next day — even more flavorful!

How to Store Pecan Pie

  • Store covered at room temp for 1–2 days, or refrigerate for up to 5 days
  • Serve cold or bring to room temperature before serving
  • Freeze tightly wrapped for up to 2 months; thaw overnight in the fridge

Variations Grandma Sometimes Made

  • Chocolate Pecan Pie: Add ½ cup chocolate chips to the filling
  • Bourbon Pecan Pie: Add 1–2 tablespoons of bourbon for depth
  • Coconut-Pecan Pie: Add ½ cup shredded sweetened coconut
  • Maple Pecan Pie: Use pure maple syrup for a twist on the classic

Grandma’s Secrets for Perfect Pecan Pie

  • Don’t overbake — center should jiggle slightly when done
  • Toast the pecans beforehand for extra nutty flavor
  • Let it cool completely before slicing, no shortcuts!
  • Use real vanilla extract — the flavor makes a big difference
  • Crack the eggs in a separate bowl to avoid shell bits

Final Thoughts: A Slice of Tradition

Every bite of grandma’s pecan pie tasted like the holidays — buttery crust, caramel-like filling, and that irresistible crunch. It was more than dessert; it was a moment of joy, tradition, and the sweet warmth of home.

Now it’s your turn to pass that flavor and feeling along with this timeless recipe.

Grandma’s Classic Beef Stew: Hearty, Slow-Cooked, and Full of Flavor

When the air turned crisp and the days got shorter, grandma’s house would fill with the rich aroma of beef stew simmering on the stove. Made with love, patience, and simple ingredients, her beef stew was the definition of comfort — tender beef, soft vegetables, and a savory broth that warmed you to the core.

This guide will show you how to make a traditional, slow-cooked beef stew, just like grandma did: hearty, satisfying, and perfect for sharing.

Why Beef Stew Was a Grandma Favorite

  • One-pot meal: Everything simmers together for easy cooking and cleanup
  • Made with simple, affordable ingredients
  • Slow-cooked for hours to develop rich, deep flavor
  • Leftovers taste even better the next day
  • The kind of dish that brings everyone to the table

Ingredients for Grandma’s Beef Stew

This recipe serves 6 people and can be cooked on the stovetop or in a slow cooker.

For the Stew:

  • 2 tablespoons olive oil
  • 2–2½ pounds (900–1100g) beef chuck, cut into 1½-inch cubes
  • Salt and pepper to taste
  • 2 tablespoons all-purpose flour
  • 1 large onion, chopped
  • 3 garlic cloves, minced
  • 3 carrots, sliced
  • 3 celery stalks, sliced
  • 3–4 medium potatoes, peeled and chopped
  • 2 tablespoons tomato paste
  • 4 cups beef broth (low-sodium)
  • 1 cup red wine (or more broth)
  • 2 teaspoons Worcestershire sauce
  • 1 teaspoon dried thyme
  • 1 bay leaf

Optional Additions:

  • 1 cup frozen peas (added at the end)
  • ½ teaspoon paprika or rosemary for extra flavor
  • 1 tablespoon balsamic vinegar for richness

Step-by-Step Instructions

1. Brown the Beef

Pat beef cubes dry with paper towels. Season with salt and pepper, then toss lightly in flour.

In a large pot or Dutch oven, heat the oil over medium-high heat. Brown the beef in batches, turning to sear all sides. Remove and set aside.

Grandma’s Tip: Don’t overcrowd the pan — it’s better to brown in two batches for better flavor.

2. Sauté Aromatics

In the same pot, add onions, carrots, and celery. Cook for 5–6 minutes until softened.

Stir in garlic and tomato paste; cook for another 1–2 minutes.

3. Deglaze and Simmer

Pour in red wine (or broth) and scrape up any brown bits from the bottom — this is pure flavor!

Return the beef to the pot. Add potatoes, broth, Worcestershire, thyme, and bay leaf. Stir to combine.

4. Simmer Low and Slow

Bring the stew to a gentle simmer, cover, and reduce heat to low. Let it cook for 2–2½ hours, stirring occasionally, until the beef is fork-tender.

Remove the lid during the last 30 minutes if you’d like the broth to reduce and thicken slightly.

Or use a slow cooker: After browning the meat, add everything to a slow cooker and cook on LOW for 7–8 hours.

5. Finish and Serve

If using peas, add them in the last 10 minutes of cooking.

Taste and adjust salt, pepper, or acidity (add a splash of vinegar if needed).

Remove bay leaf. Serve hot, with crusty bread or over mashed potatoes if desired.

Serving Suggestions

  • With freshly baked bread or dinner rolls
  • Over a bed of creamy mashed potatoes
  • Alongside a crisp green salad
  • With a glass of red wine or hot tea
  • Grandma’s favorite: with a pat of butter swirled into the bowl

Tips for the Best Beef Stew

  • Use chuck roast, not lean beef — it gets tender and flavorful with long cooking
  • Brown the meat well for maximum flavor
  • Cut veggies evenly so they cook at the same rate
  • Simmer low and slow — this breaks down collagen and deepens taste
  • Add a splash of vinegar or lemon at the end for balance

Storage and Reheating

Store:

  • Refrigerate in airtight containers for up to 4 days

Reheat:

  • On the stove over low heat until warmed through
  • In the microwave in 1-minute intervals, stirring in between

Freeze:

  • Cool completely, then store in freezer-safe containers for up to 3 months
  • Thaw overnight in the fridge before reheating

Final Thoughts: A Bowl of Pure Comfort

Grandma’s beef stew wasn’t just a recipe — it was a ritual. The slow cooking, the fragrant kitchen, the way everyone asked for seconds — it all told a story of home, patience, and warmth.

Now, with this recipe, you can bring that same tradition into your own home — and maybe create new memories around the table.

Grandma’s Oatmeal Raisin Cookies: Soft, Chewy, and Full of Comfort

Before chocolate chip cookies took over the world, grandma’s oatmeal raisin cookies were the treat everyone looked forward to. Warm from the oven, soft in the center, and filled with cinnamon, oats, and plump raisins, these cookies brought a quiet kind of joy — and a whole lot of seconds.

In this guide, we’ll walk you through how to make the perfect homemade oatmeal raisin cookies, just like grandma’s — chewy, comforting, and absolutely delicious.

Why Oatmeal Raisin Cookies Are a Classic

  • Soft and chewy texture that holds up beautifully
  • Sweetness balanced with warm spices and wholesome oats
  • Made with pantry staples — no fancy tools needed
  • Easy to make in big batches for sharing
  • Packed with fiber and just enough sweetness to feel like a “good-for-you” treat

Let’s dive into the recipe.

Ingredients for Grandma’s Oatmeal Raisin Cookies

This recipe yields about 24–30 cookies, depending on size.

  • 1 cup (2 sticks) unsalted butter, softened
  • 1 cup packed brown sugar
  • ½ cup granulated sugar
  • 2 large eggs
  • 1 ½ teaspoons vanilla extract
  • 1 ½ cups all-purpose flour
  • 1 teaspoon baking soda
  • 1 teaspoon ground cinnamon
  • ½ teaspoon salt
  • 3 cups old-fashioned rolled oats
  • 1 cup raisins
  • Optional: ½ cup chopped walnuts or pecans

Tip: Soak the raisins in warm water (or rum) for 10 minutes before using for extra plumpness.

Step-by-Step Instructions

1. Preheat the Oven

Set your oven to 175°C (350°F). Line baking sheets with parchment paper or silicone mats.

2. Cream the Butter and Sugars

In a large bowl, cream together the softened butter, brown sugar, and granulated sugar until light and fluffy (about 2–3 minutes).

3. Add Eggs and Vanilla

Beat in the eggs, one at a time, followed by the vanilla extract. Mix until smooth.

4. Mix the Dry Ingredients

In a separate bowl, whisk together flour, baking soda, cinnamon, and salt.

Gradually add to the wet ingredients and mix until just combined.

5. Add Oats and Raisins

Stir in the oats and raisins (and nuts, if using) by hand with a spatula or wooden spoon. Don’t overmix.

Chill the dough in the fridge for 20–30 minutes (optional but helps with thicker cookies).

6. Scoop and Bake

Drop dough by rounded tablespoons onto the prepared baking sheets, spacing about 2 inches apart.

Bake for 10–12 minutes, or until edges are golden and centers look just set.

Grandma’s Tip: Don’t overbake — they continue to cook as they cool.

7. Cool and Store

Let cookies cool on the sheet for 5 minutes, then transfer to a wire rack.

Store in an airtight container for up to 5 days (if they last that long!).

Variations You’ll Love

  • Chocolate Chip Oatmeal: Swap raisins for chocolate chips
  • Oatmeal Cranberry White Chocolate: Use dried cranberries and white chocolate chips
  • Apple Cinnamon Oatmeal: Add chopped dried apples and extra cinnamon
  • Zucchini Oatmeal: Mix in ½ cup grated zucchini for moisture and fiber
  • Gluten-Free Version: Use 1:1 gluten-free flour blend and certified GF oats

How to Freeze

  • Freeze the Dough: Scoop dough onto a tray, freeze until solid, then transfer to a bag
  • Bake directly from frozen at 175°C (350°F) for 1–2 extra minutes
  • Freeze Baked Cookies: Let cool, then freeze in layers with parchment between

Serving Suggestions

  • With a cold glass of milk (the classic way)
  • Alongside coffee or tea in the afternoon
  • Packed in lunchboxes
  • Crumble over yogurt for breakfast
  • Sandwiched with vanilla ice cream for a homemade ice cream sandwich

Grandma’s Secrets for Perfect Oatmeal Raisin Cookies

  • Use old-fashioned oats, not quick oats — better texture
  • Soak raisins if they’re dry
  • Brown sugar adds chewiness and deeper flavor
  • Don’t overbake — remove them just as the centers set
  • Chill the dough if you like thicker, puffier cookies

Final Thoughts: A Cookie Full of Memories

Grandma’s oatmeal raisin cookies weren’t just a treat — they were part of her love language. Baked with care, shared with smiles, and always made from scratch, they brought warmth to even the simplest moments.

Now you can bake those same feelings into your own kitchen with this timeless, chewy, cinnamon-kissed recipe.

Grandma’s Creamy Mashed Potatoes: Fluffy, Buttery, and Full of Flavor

In grandma’s kitchen, mashed potatoes were never an afterthought. They were a star on the table — smooth, rich, and seasoned to perfection. Whether served with gravy, alongside roast beef, or with a pat of melting butter, her mashed potatoes were the ultimate comfort food side dish.

In this guide, we’ll show you how to make classic creamy mashed potatoes from scratch — the way grandma always did them: simple, hearty, and irresistibly good.

Why These Mashed Potatoes Are So Loved

  • Perfectly fluffy and smooth
  • Rich in butter and creaminess
  • Seasoned just right — not bland, not salty
  • Made with real potatoes, not flakes
  • A versatile base for countless meals

Let’s begin with the basics.

Ingredients for Grandma’s Mashed Potatoes

This recipe serves 4 to 6 people.

  • 2 pounds (900g) Yukon Gold or Russet potatoes, peeled and cut into chunks
  • 4 tablespoons unsalted butter (plus more for topping)
  • ½ to ¾ cup whole milk or cream (warmed)
  • Salt to taste (about 1 ½ teaspoons)
  • Freshly ground black pepper, to taste
  • Optional: garlic, sour cream, cream cheese, or herbs for added flavor

Yukon Gold gives a buttery texture, while Russet makes it fluffy. A mix works beautifully too.

Step-by-Step Instructions

1. Boil the Potatoes

Place the peeled, chopped potatoes in a large pot. Cover with cold, salted water.

Bring to a boil and simmer for 15–20 minutes, or until fork-tender.

Grandma’s Tip: Always start with cold water so the potatoes cook evenly.

2. Drain and Dry

Drain the potatoes and return them to the pot.

Place the pot back on low heat for 1–2 minutes, stirring occasionally — this helps evaporate excess water and makes the mash creamier.

3. Mash the Potatoes

Use a potato masher, ricer, or hand mixer (depending on your desired texture). Mash until smooth.

4. Add Butter and Milk

Stir in butter until fully melted.

Gradually add warm milk (or cream), a little at a time, until you reach your desired consistency — fluffy, smooth, and creamy.

5. Season to Taste

Add salt and pepper to taste. Stir well and taste again.

If desired, stir in extras like garlic, sour cream, or herbs.

6. Serve Warm

Transfer to a serving dish. Top with a pat of butter, chopped parsley, or gravy if desired.

Serve immediately while hot and fresh.

Add-In Variations

Customize your mashed potatoes to suit the meal or occasion:

  • Garlic Mashed Potatoes: Add roasted or sautéed garlic cloves
  • Cheddar & Chive Mash: Stir in sharp cheddar and fresh chives
  • Sour Cream & Onion: Mix in sour cream and caramelized onions
  • Cream Cheese Mash: Add 2–3 tablespoons of cream cheese for extra richness
  • Herb Mash: Fold in fresh thyme, rosemary, or dill

How to Make Ahead and Store

Make-Ahead:

  • Prepare mashed potatoes, then place in a buttered baking dish
  • Cover and refrigerate up to 2 days
  • Reheat in the oven at 175°C (350°F), covered with foil, until warm

Store Leftovers:

  • Refrigerate in an airtight container for up to 4 days

Reheat:

  • Stovetop: Reheat gently with a splash of milk and butter
  • Microwave: Reheat in short bursts, stirring often
  • Oven: Cover with foil and heat until warm through

Grandma’s Tips for the Best Mashed Potatoes

  • Don’t overmix — especially with a mixer, or you’ll get gluey texture
  • Warm the milk and butter before adding
  • Salt the water — this seasons the potatoes from within
  • Choose the right potato — starchy is best for fluffiness
  • Mash while hot — they absorb ingredients better warm

Serving Ideas

These mashed potatoes go beautifully with:

  • Roast chicken or turkey
  • Pot roast or meatloaf
  • Gravy, mushroom sauce, or butter drizzles
  • Grilled veggies or sautéed greens

Or enjoy them with just a spoon — grandma certainly did!

Final Thoughts: A Side Dish with Soul

Grandma’s mashed potatoes weren’t just filler on the plate — they were part of the memory. Passed around the table in a warm bowl, scooped generously with love, and always, always made from scratch.

Now you can keep the tradition alive with this rich, fluffy, and foolproof recipe that’s been loved for generations.

Grandma’s Homemade Cornbread: Moist, Buttery, and Baked to Perfection

In grandma’s kitchen, cornbread was more than a side dish — it was a staple. Served with stews, chili, greens, or just a smear of butter and a drizzle of honey, it was always baked in a hot cast-iron skillet and came out golden, moist, and full of flavor.

This recipe brings back that homemade magic. We’ll show you how to make traditional Southern-style cornbread, just like grandma did — with crispy edges, tender crumb, and simple ingredients from the pantry.

Why Grandma’s Cornbread Is So Loved

There’s something special about homemade cornbread — especially when it’s done the old-fashioned way:

  • No added sugar (or just a touch — grandma-style!)
  • Moist on the inside, golden and crisp on the outside
  • Baked in a cast-iron skillet for perfect texture
  • Versatile enough for both sweet and savory dishes
  • Always made with real cornmeal, butter, and love

Let’s get started!

Ingredients for Grandma’s Cornbread

This recipe serves 6–8 people and bakes in a 9-inch skillet or square pan.

  • 1 cup cornmeal (medium or fine ground)
  • 1 cup all-purpose flour
  • 1 tablespoon baking powder
  • ½ teaspoon baking soda
  • ½ teaspoon salt
  • 1 cup buttermilk (or substitute below)
  • 2 large eggs
  • ½ cup unsalted butter, melted
  • Optional: 1–2 tablespoons sugar (for slightly sweet cornbread)
  • Optional: ½ cup corn kernels, shredded cheese, or chopped jalapeños

Buttermilk Substitute:

  • 1 cup milk + 1 tablespoon vinegar or lemon juice
  • Let sit 5–10 minutes before using

Step-by-Step Instructions

1. Preheat the Oven (and the Skillet)

Preheat oven to 220°C (425°F).

If using a cast-iron skillet, place it in the oven while it preheats. A hot skillet = crispy edges!

2. Mix Dry Ingredients

In a large bowl, whisk together the cornmeal, flour, baking powder, baking soda, salt, and sugar if using.

3. Mix Wet Ingredients

In another bowl, beat the eggs. Add the buttermilk and melted butter. Stir until well combined.

4. Combine Wet and Dry

Add the wet mixture to the dry ingredients. Stir just until combined. Do not overmix — a few lumps are fine.

If adding extras (corn, cheese, herbs), fold them in now.

Grandma’s Tip: A slightly thick batter makes a heartier cornbread.

5. Pour into the Hot Pan

Carefully remove the hot skillet from the oven and grease it with a small amount of butter or oil.

Pour the batter into the skillet — it should sizzle slightly. Spread evenly.

6. Bake

Bake for 20–25 minutes, or until the top is golden brown and a toothpick comes out clean from the center.

Let it cool in the pan for a few minutes before slicing and serving.

How to Serve Cornbread (Grandma-Style)

Cornbread is incredibly versatile. Serve it:

  • With chili or bean stew
  • Alongside fried chicken or BBQ ribs
  • Crumbled into collard greens or soups
  • Toasted with butter and jam
  • As a savory stuffing for poultry
  • With honey or molasses drizzled on top

Variations and Add-Ins

Want to customize your cornbread? Try these ideas:

  • Cheddar Jalapeño Cornbread: Add ½ cup shredded cheese + 1 chopped jalapeño
  • Sweet Cornbread: Increase sugar to ¼ cup
  • Bacon Cornbread: Fold in cooked, crumbled bacon
  • Herbed Cornbread: Add chopped chives, thyme, or rosemary
  • Corn Pudding Cornbread: Mix in creamed corn for extra moisture

How to Store and Reheat

Store:

  • Wrap leftovers in foil or airtight container
  • Keep at room temperature for up to 2 days, or refrigerate for up to 5 days

Freeze:

  • Wrap tightly in plastic and foil, then freeze for up to 2 months
  • Thaw at room temperature or in the oven

Reheat:

  • Oven: Wrap in foil and warm at 160°C (325°F) for 10–15 minutes
  • Microwave: Wrap in a damp paper towel and heat in short bursts

Grandma’s Secrets for the Best Cornbread

  • Preheat your skillet — this gives you that signature crispy crust
  • Use real buttermilk for tang and tenderness
  • Don’t overmix — treat the batter gently
  • Serve warm, straight from the skillet
  • Make extra — it disappears fast!

Final Thoughts: Cornbread with a Legacy

Grandma’s cornbread wasn’t just a side dish — it was part of the story. A warm slice passed around the table, a complement to hearty meals, or a snack all on its own, it brought comfort and connection to every occasion.

Now, with this recipe, you can bake that same golden comfort in your own kitchen — and carry on a timeless tradition.

Grandma’s Homemade Vanilla Pudding: A Silky, Creamy Dessert Straight from the Heart

Before instant pudding mix was a kitchen staple, grandma was already whipping up batches of smooth, homemade vanilla pudding using just a handful of real ingredients. With its silky texture and rich, comforting flavor, it was one of those desserts that felt like a warm hug in a bowl.

In this guide, you’ll learn how to make vanilla pudding from scratch, using the same simple techniques and ingredients grandma used — no packets, no preservatives, just creamy goodness.

Why Homemade Pudding Is Worth It

Store-bought puddings might be fast, but nothing compares to the flavor and texture of the real thing. Here’s why:

  • Uses real milk, eggs, and vanilla
  • Richer, creamier texture than instant mixes
  • Perfect base for other flavors (chocolate, banana, coconut)
  • Great for layering into trifles or topping with fruit
  • Brings back that nostalgic, old-fashioned dessert vibe

Let’s start with the ingredients.

Ingredients for Homemade Vanilla Pudding

This recipe makes about 4–6 servings.

  • 2 ½ cups whole milk
  • ½ cup granulated sugar
  • ¼ cup cornstarch
  • ¼ teaspoon salt
  • 3 large egg yolks
  • 2 tablespoons unsalted butter
  • 1 ½ teaspoons pure vanilla extract

Optional: Add a splash of cream for a richer finish or a pinch of nutmeg for warmth.

Step-by-Step Instructions

1. Mix the Dry Ingredients

In a medium saucepan (off the heat), whisk together the sugar, cornstarch, and salt.

This prevents clumping when you add the milk.

2. Add the Milk and Yolks

Gradually whisk in the milk, then the egg yolks. Make sure everything is fully combined and smooth.

Grandma’s Tip: Strain the egg yolks if you want extra silky pudding.

3. Heat Gently and Stir Constantly

Place the saucepan over medium heat. Cook the mixture, stirring constantly, until it thickens and starts to bubble — about 8–10 minutes.

Once bubbles appear, cook for 1 more minute while continuing to stir. The pudding should coat the back of a spoon.

4. Remove from Heat and Add Butter & Vanilla

Turn off the heat. Stir in the butter and vanilla extract until smooth and fully melted.

Butter gives the pudding that classic creamy sheen and richness.

5. Strain (Optional) and Cool

For extra smoothness, pour the pudding through a fine-mesh sieve into a bowl.

Cover with plastic wrap pressed directly onto the surface to prevent a skin from forming.

Chill for at least 2 hours before serving — or enjoy it warm if you’re like grandma.

How to Serve Vanilla Pudding

Homemade vanilla pudding is incredibly versatile. Try it:

  • As is, with a sprinkle of cinnamon or nutmeg
  • Topped with berries or banana slices
  • Layered with crushed cookies or cake in a trifle
  • With whipped cream and chocolate shavings
  • As a filling for pies, donuts, or tarts

Grandma sometimes served it in vintage teacups with a biscuit on the side.

Make-Ahead and Storage Tips

  • Store pudding in an airtight container in the fridge for up to 4 days
  • Press plastic wrap directly on the surface to prevent skin
  • Stir before serving to smooth it out
  • Do not freeze — texture will suffer after thawing

Flavor Variations

Once you master the vanilla base, the possibilities are endless:

  • Chocolate Pudding: Add ½ cup cocoa powder or 100g melted dark chocolate
  • Banana Pudding: Layer with fresh banana slices and vanilla wafers
  • Coconut Pudding: Replace 1 cup of milk with coconut milk and add shredded coconut
  • Coffee Pudding: Stir in 1 tsp instant espresso powder with the milk
  • Lemon Pudding: Replace vanilla with lemon zest and a few tablespoons of lemon juice

Tips for Perfect Pudding Every Time

  • Use whole milk for best creaminess
  • Don’t stop stirring once it starts to heat up — this avoids lumps
  • Add eggs gradually to avoid scrambling
  • Cool slowly to avoid watery pudding
  • Strain after cooking for a gourmet finish

Final Thoughts: A Bowl Full of Comfort

Grandma’s vanilla pudding wasn’t just dessert. It was a sweet reward after a long day, a soothing treat for upset stomachs, and a creamy reminder that the best things in life are often the simplest.

With just a few ingredients and a little patience, you can recreate that same sense of home, warmth, and nostalgia in every spoonful.