Grandma’s Old-Fashioned Meatloaf: Moist, Flavorful, and Full of Love

Back in the day, meatloaf wasn’t just a weeknight meal — it was a centerpiece. In grandma’s kitchen, this hearty classic was made with simple pantry ingredients, baked to perfection, and served with sides like mashed potatoes, green beans, or buttered corn. It was the kind of meal that brought everyone to the table — and kept them there for seconds.

In this article, we’ll share the step-by-step recipe for grandma’s old-fashioned meatloaf, including all the tips she used to keep it moist, flavorful, and unforgettable.

Why Grandma’s Meatloaf Stands the Test of Time

While modern versions experiment with bacon-wrapped crusts or exotic spices, grandma’s meatloaf has stayed a favorite because it’s:

  • Easy to make with simple ingredients
  • Perfectly moist — never dry or bland
  • Packed with rich, savory flavor
  • Great for leftovers and sandwiches
  • A symbol of traditional, home-cooked comfort food

Let’s recreate the magic.

Ingredients for Classic Meatloaf

This recipe serves 4 to 6 people.

For the Meatloaf:

  • 1 ½ pounds ground beef (80/20 preferred for flavor)
  • 1 small onion, finely chopped
  • 2 garlic cloves, minced
  • ¾ cup breadcrumbs (plain or Italian)
  • ½ cup milk
  • 2 large eggs
  • 2 tablespoons ketchup
  • 1 tablespoon Worcestershire sauce
  • 1 teaspoon salt
  • ½ teaspoon black pepper
  • 1 teaspoon dried thyme or parsley (optional)
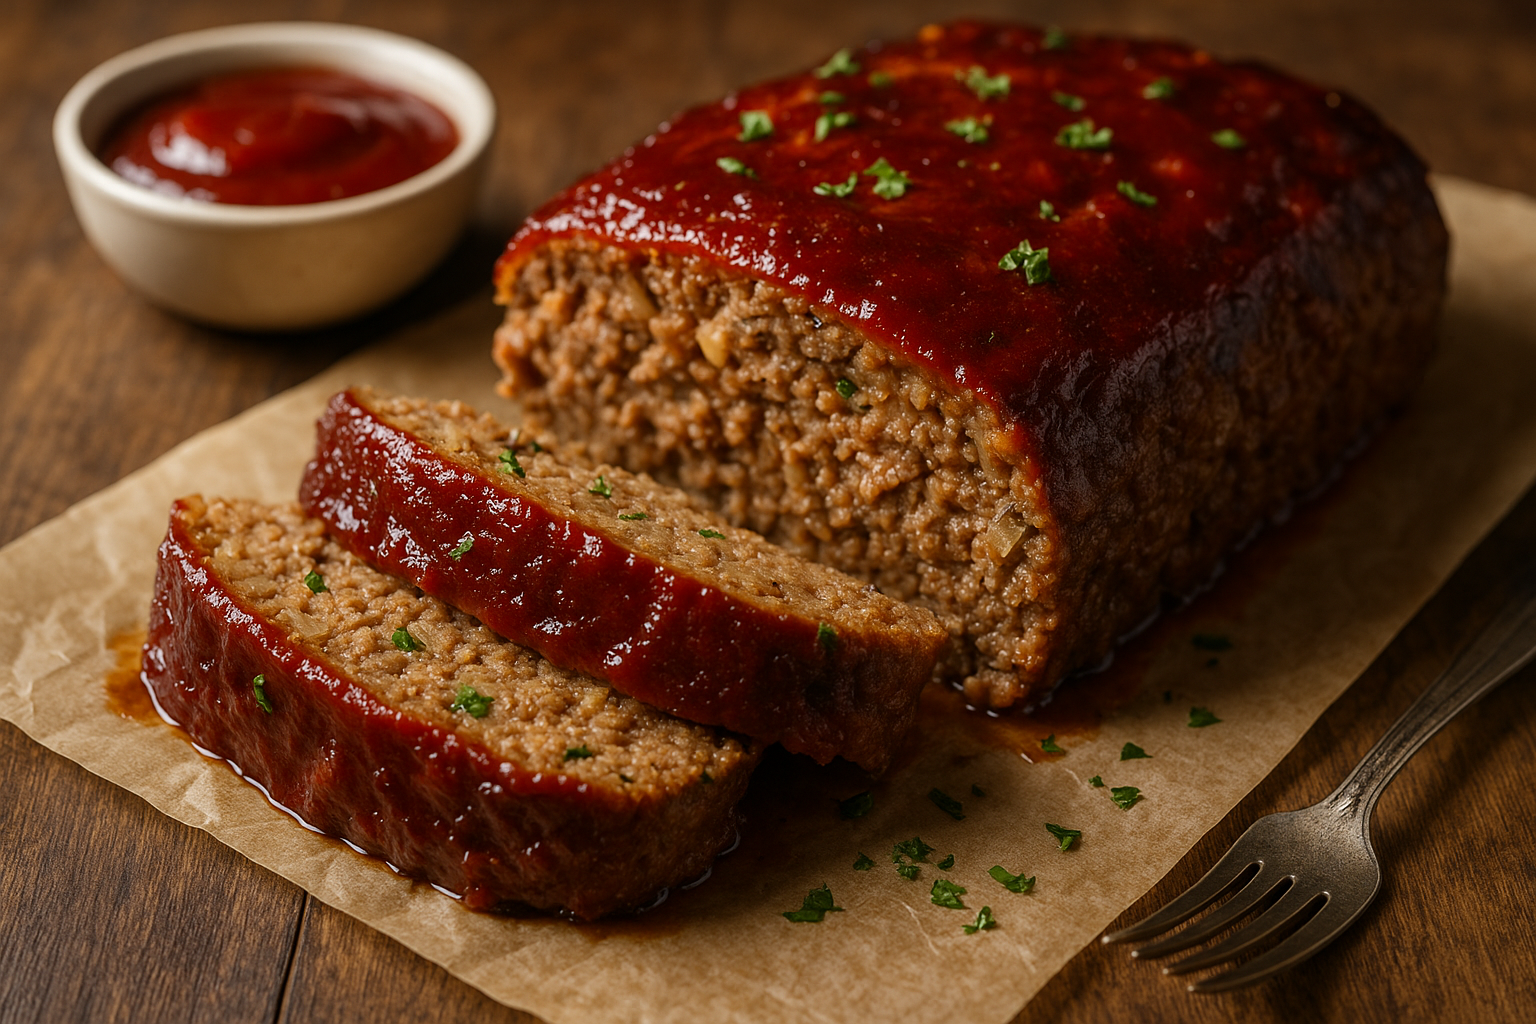
For the Glaze:

  • ½ cup ketchup
  • 2 tablespoons brown sugar
  • 1 tablespoon yellow mustard or Dijon

Optional Add-ins: chopped green bell pepper, grated carrot, shredded cheese, or a pinch of smoked paprika for added depth.

Step-by-Step Instructions

1. Preheat the Oven

Set your oven to 175°C (350°F). Line a baking sheet with parchment paper or lightly grease a loaf pan.

2. Soak the Breadcrumbs

In a small bowl, combine the breadcrumbs and milk. Let sit for 5 minutes so the crumbs absorb the liquid — this keeps the meatloaf moist.

3. Mix the Meatloaf

In a large bowl, combine ground beef, chopped onion, garlic, soaked breadcrumbs, eggs, ketchup, Worcestershire sauce, salt, pepper, and herbs.

Mix gently with your hands or a spoon just until combined. Don’t overmix, or the meatloaf may turn out tough.

4. Shape and Place

Form the mixture into a loaf shape and place on the prepared baking sheet, or gently press into a loaf pan.

Grandma’s Tip: Free-form loaves (on a baking sheet) allow for better caramelization and more crust!

5. Add the Glaze

Mix together the ketchup, brown sugar, and mustard. Spread half the glaze on top of the meatloaf.

Reserve the rest for basting later or serving on the side.

6. Bake Until Done

Bake uncovered for 55–65 minutes, or until the internal temperature reaches 70°C (160°F).

Halfway through baking, spread the remaining glaze on top for extra flavor.

7. Let Rest Before Slicing

Remove from the oven and let the meatloaf rest for 10–15 minutes before slicing. This helps the juices redistribute and keeps each slice moist.

Serving Suggestions

Grandma often served her meatloaf with:

  • Mashed potatoes and gravy
  • Steamed green beans or glazed carrots
  • Buttered corn or baked sweet potatoes
  • A side of homemade rolls or biscuits

And of course — a generous drizzle of that sweet-savory glaze.

Tips for a Better Meatloaf

  • Use meat with some fat (80/20 ground beef) — lean meat can be dry
  • Don’t skip the soaking — breadcrumbs + milk = moist texture
  • Let it rest after baking — this step is essential
  • Use fresh aromatics — onion and garlic add essential flavor
  • Bake on a sheet for more crust, or in a loaf pan for a moist interior

Leftovers That Don’t Go to Waste

One of the best things about meatloaf is how delicious the leftovers are. Try:

  • Meatloaf sandwiches on toasted bread with lettuce and mayo
  • Crumbled into pasta sauces or stuffed into bell peppers
  • Fried meatloaf patties for breakfast
  • Served cold with mustard or pickles for a snack

Variations You Can Try

  • Turkey meatloaf: Use ground turkey and add extra moisture (like grated zucchini)
  • Cheesy center: Add a layer of shredded cheese inside the loaf
  • Bacon-wrapped: Wrap in bacon before baking for a smoky twist
  • Spicy version: Add hot sauce, jalapeños, or smoked paprika to the mix
  • Vegetable-loaded: Mix in grated carrots, mushrooms, or spinach

Final Thoughts: A Slice of Comfort

Grandma’s meatloaf isn’t just a meal — it’s a tradition. It’s the smell that filled the house on Sundays, the crispy ends that everyone fought over, and the warmth of a full plate and a full heart.

When you make this meatloaf, you’re not just cooking — you’re carrying on a legacy of love, care, and good food made simply and well.

Grandma’s Homemade Tomato Sauce: A Slow-Simmered Classic Full of Tradition

In grandma’s kitchen, tomato sauce wasn’t just something that came from a jar — it was an all-day process, filled with rich aromas, bubbling pots, and the kind of care that only tradition can teach. This sauce was the base for Sunday dinners, lasagnas, meatballs, and impromptu spaghetti nights.

In this guide, you’ll learn how to make homemade tomato sauce from scratch, just like grandma did — slowly simmered, deeply flavorful, and built from simple, whole ingredients.

Why Homemade Tomato Sauce Is Worth It

While store-bought sauces are convenient, grandma’s version wins every time — here’s why:

  • Made from real tomatoes, not concentrate
  • Free of preservatives, sugar, and fillers
  • Slow-simmered for deep flavor
  • Easily customizable with herbs and spices
  • Can be made in large batches and frozen

Ingredients for Grandma’s Tomato Sauce

This recipe yields about 6 cups of sauce, enough for 2–3 meals.

Basic Ingredients:

  • 2 tablespoons olive oil
  • 1 medium onion, finely chopped
  • 4 cloves garlic, minced
  • 2 cans (28 oz or 800g each) whole peeled tomatoes OR 10–12 fresh ripe tomatoes (peeled and chopped)
  • 2 tablespoons tomato paste (for richness)
  • 1 teaspoon salt
  • ½ teaspoon black pepper
  • 1 teaspoon sugar (optional, to balance acidity)
  • 1 teaspoon dried oregano
  • ½ teaspoon dried basil
  • 1 bay leaf
  • Optional: ½ teaspoon red pepper flakes

Finish with:

  • 1 tablespoon butter (for creaminess)
  • Handful of chopped fresh basil or parsley
  • Grated Parmesan cheese (optional)

Step-by-Step Instructions

1. Sauté the Aromatics

In a large pot, heat the olive oil over medium heat.

Add the chopped onion and cook until translucent — about 5 minutes. Stir in the garlic and cook for another 1–2 minutes, just until fragrant (don’t let it burn).

2. Add Tomatoes

If using canned tomatoes, crush them by hand or blend slightly for smoother texture. If using fresh tomatoes, peel and chop them.

Add tomatoes and their juice to the pot along with the tomato paste. Stir to combine.

3. Add Seasonings

Stir in salt, pepper, sugar (if using), oregano, basil, bay leaf, and red pepper flakes if you want a little heat.

Bring the sauce to a simmer.

4. Simmer Low and Slow

Lower the heat and simmer uncovered for 45 minutes to 1½ hours, stirring occasionally. The longer it cooks, the deeper the flavor.

If it gets too thick, add a splash of water or broth. If too thin, let it simmer uncovered to reduce.

5. Blend (Optional)

For a smooth sauce, blend with an immersion blender directly in the pot, or use a regular blender in batches (be careful with hot liquids). For a rustic, chunky sauce, skip this step.

6. Finish and Adjust

Remove bay leaf. Stir in a tablespoon of butter to add shine and richness. Taste and adjust salt, herbs, or sugar.

Stir in fresh basil or parsley at the end for a burst of freshness.

Grandma’s Tomato Sauce Tips

  • Use ripe, in-season tomatoes if making from fresh — Roma or San Marzano are ideal
  • Cook long and slow to break down acidity and bring out sweetness
  • Use butter at the end — it mellows sharpness and adds silkiness
  • Don’t skip the onion and garlic — they build the flavor foundation
  • Freeze in portions for easy future meals

How to Use Grandma’s Tomato Sauce

This sauce is versatile and goes far beyond pasta. Use it for:

  • Spaghetti or linguine with fresh herbs and cheese
  • Lasagna or baked ziti
  • Pizza sauce (just reduce slightly more)
  • Meatballs or sausage in sauce
  • Eggplant Parmesan
  • Shakshuka or poached eggs in tomato sauce
  • Stuffed peppers or zucchini

Storage and Freezing

Refrigerate:

  • Store in airtight containers for up to 5–7 days.

Freeze:

  • Freeze in freezer bags or containers for up to 3 months.
  • Use ice cube trays to freeze in small portions.

Reheat:

  • Thaw in the fridge or heat directly from frozen on the stove.
  • Stir well and re-season if needed.

Variations You Can Try

  • Add red wine: Splash in ¼ cup red wine during simmering for depth
  • Meaty version: Brown ground beef or sausage with the onions
  • Creamy version: Stir in a splash of cream or dollop of ricotta at the end
  • Roasted flavor: Use fire-roasted tomatoes or roast your own beforehand
  • Fresh garden version: Add chopped zucchini, mushrooms, or bell peppers

Final Thoughts: A Sauce That Feeds the Soul

Grandma’s tomato sauce wasn’t just a recipe — it was the heart of the meal, the reason everyone gathered around the table. It was made without shortcuts, always in big batches, and always with the hope that someone would come back for seconds.

Whether you’re making spaghetti for two or lasagna for a crowd, this slow-simmered sauce is your base for building beautiful meals and beautiful memories.

How to Make Grandma’s Classic Banana Bread: Moist, Sweet, and Full of Flavor

When your bananas start turning brown, it’s not a mistake — it’s an opportunity. And no one understood that better than grandma. Instead of wasting them, she transformed overripe bananas into the most delicious, moist, and fragrant banana bread you could imagine.

In this guide, you’ll learn how to make banana bread the old-fashioned way, just like grandma used to — simple ingredients, no fancy gadgets, and a loaf so rich and comforting it barely lasted a day on the counter.

Why Banana Bread Is a Timeless Favorite

Banana bread is one of the ultimate comfort bakes. Here’s why:

  • Uses up ripe bananas instead of throwing them out
  • Comes together with basic pantry ingredients
  • Moist, tender, and full of sweet banana flavor
  • Delicious warm, cold, toasted — with or without toppings
  • Perfect for breakfast, snacks, or even dessert

Let’s dig into grandma’s secrets for the best banana bread you’ll ever taste.

Ingredients for Grandma’s Banana Bread

This recipe makes one 9×5 inch loaf — about 8–10 slices.

  • 3 very ripe bananas, mashed
  • 2 large eggs
  • ½ cup unsalted butter, melted and cooled
  • ¾ cup granulated sugar (adjust to taste)
  • 1 ½ cups all-purpose flour
  • 1 teaspoon baking soda
  • ½ teaspoon salt
  • 1 teaspoon vanilla extract
  • ½ teaspoon ground cinnamon (optional)
  • ½ cup chopped walnuts or pecans (optional)
  • ¼ cup milk or sour cream (optional, for extra moisture)

Step-by-Step Instructions

1. Preheat the Oven and Prep the Pan

Preheat your oven to 175°C (350°F).

Grease and flour a 9×5-inch loaf pan, or line it with parchment paper for easy removal.

2. Mash the Bananas

In a large bowl, mash the bananas until mostly smooth (a few chunks are okay — they add texture).

Add the melted butter and stir to combine.

3. Add Wet Ingredients

Mix in the sugar, eggs, vanilla, and milk or sour cream if using. Stir until smooth and well incorporated.

4. Mix the Dry Ingredients

In a separate bowl, whisk together flour, baking soda, salt, and cinnamon.

Gradually add the dry ingredients to the banana mixture, stirring gently just until no flour remains.

Grandma’s Tip: Don’t overmix — overworking the batter can lead to dense bread.

5. Fold in Nuts (Optional)

If using chopped nuts, gently fold them into the batter at the end.

6. Pour and Bake

Pour the batter into your prepared loaf pan and smooth the top with a spatula.

Bake for 50–60 minutes, or until a toothpick inserted into the center comes out clean.

7. Cool and Slice

Let the banana bread cool in the pan for 10–15 minutes, then transfer to a wire rack to cool completely.

Slice and serve warm, room temperature, or toasted with butter.

Banana Bread Variations Grandma Loved

Want to mix it up? Here are some fun and delicious twists:

  • Chocolate Chip Banana Bread: Add ½ cup chocolate chips
  • Peanut Butter Swirl: Swirl 2 tbsp peanut butter into the top before baking
  • Coconut Banana Bread: Add ¼ cup shredded coconut to the batter
  • Maple-Walnut: Replace sugar with maple syrup and fold in walnuts
  • Tropical: Add pineapple chunks and coconut for a fruity twist

Serving Suggestions

Banana bread is perfect on its own, but it also pairs wonderfully with:

  • Coffee or hot tea
  • A drizzle of honey or maple syrup
  • A spread of butter, cream cheese, or nut butter
  • Yogurt and fruit for a hearty breakfast

Warm it slightly before serving for that fresh-out-of-the-oven flavor.

How to Store and Reheat

Storing:

  • Wrap in foil or plastic wrap and keep at room temperature for up to 3 days.
  • Refrigerate for up to 1 week (though it may dry slightly).

Freezing:

  • Wrap tightly in plastic, then foil, and freeze for up to 3 months.
  • Slice before freezing for easy grab-and-go pieces.

Reheating:

  • Toast slices in a toaster or warm briefly in the microwave.
  • For oven reheating, wrap in foil and bake at 150°C (300°F) for 10–15 minutes.

Grandma’s Banana Bread Tips

  • Use overripe bananas with lots of brown spots — they’re sweeter and softer
  • Let melted butter cool slightly so it doesn’t cook the eggs
  • Don’t skip the salt — it enhances the banana flavor
  • Add a banana on top (sliced in half) for a beautiful presentation
  • Test with a toothpick — underbaking is better than overbaking

Final Thoughts: A Slice of Sweet Nostalgia

Grandma’s banana bread wasn’t just dessert — it was a memory, a comfort, and a family tradition. It filled the house with warmth, made everyone gather in the kitchen, and somehow tasted even better the next day (if there was any left).

Whether you’re baking it for your kids, your neighbors, or just for yourself, this classic recipe brings the sweetness of the past into the present.

Now let’s bring this beloved treat to life with a warm, ultra-realistic image of a golden, moist banana bread loaf — freshly sliced and ready to enjoy.

Grandma’s Traditional Chicken Pot Pie: A Golden Crust Full of Homemade Comfort

One bite of a freshly baked chicken pot pie and you’re instantly transported to grandma’s kitchen — where the windows fogged up from the oven heat and the smell of buttery crust and savory filling filled the air. This classic comfort food is more than just a meal — it’s a memory.

In this article, we’ll show you how to make grandma’s traditional chicken pot pie with a flaky, golden crust and a rich, creamy filling loaded with chicken and vegetables. It’s the ultimate recipe for cozy nights, special gatherings, or any day that needs a touch of warmth.

What Makes Grandma’s Pot Pie So Special?

Grandma didn’t rely on shortcuts. She used simple, fresh ingredients and gave them time to develop flavor. Her pot pie was:

  • Made with homemade crust or buttery puff pastry
  • Filled with real roasted or boiled chicken
  • Packed with vegetables from her garden
  • Seasoned with love and slow-cooked attention

Let’s recreate that magic.

Ingredients for Grandma’s Chicken Pot Pie

This recipe makes one 9-inch pie, serving 6 generous portions.

For the Filling:

  • 2 tablespoons butter
  • 1 small onion, diced
  • 2 cloves garlic, minced
  • 2 medium carrots, peeled and diced
  • 2 celery stalks, diced
  • 1⁄4 cup all-purpose flour
  • 2 cups chicken broth
  • 1 cup milk (whole or 2%)
  • 2 cups cooked chicken, shredded or diced
  • 1 cup frozen peas
  • ½ teaspoon dried thyme
  • Salt and black pepper to taste
  • Optional: 1 small potato, diced and pre-cooked

For the Crust:

  • 1 sheet of puff pastry (store-bought or homemade)
  • Or: double crust pastry for top and bottom
  • 1 egg (beaten with 1 tbsp milk, for egg wash)

Note: If you prefer a bottom crust, use a standard pie crust and par-bake it before adding filling.

Step-by-Step Instructions

1. Preheat Oven

Preheat your oven to 200°C (400°F). If using a bottom crust, line your pie dish and blind bake for 10 minutes with pie weights. Set aside.

2. Cook the Filling Base

In a large saucepan, melt butter over medium heat. Add the onions, garlic, carrots, and celery. Sauté until the vegetables are softened, about 5–7 minutes.

3. Make the Creamy Sauce

Sprinkle the flour over the veggies and stir to coat. Cook for 1–2 minutes to eliminate the raw flour taste.

Gradually whisk in the chicken broth and milk. Keep stirring until the mixture thickens to a creamy consistency — about 5 minutes.

4. Add Chicken and Peas

Stir in the shredded chicken, peas, thyme, salt, and pepper. Taste and adjust seasoning as needed. Let the filling simmer for another 3–5 minutes, then remove from heat.

Grandma’s Tip: Let the filling cool slightly before assembling to avoid a soggy crust.

5. Assemble the Pie

Spoon the cooled filling into the pie dish. Top with puff pastry or your prepared crust. Trim and crimp the edges.

Use a sharp knife to cut small slits in the top to allow steam to escape.

Brush with the egg wash for a shiny, golden finish.

6. Bake to Perfection

Place the pie on a baking tray (to catch any drips) and bake for 30–35 minutes, or until the crust is golden brown and the filling is bubbling.

Let it rest for at least 10 minutes before slicing — this helps the filling set.

Variations to Try

Want to make it your own? Grandma would approve. Try these:

  • Turkey Pot Pie: Great for holiday leftovers
  • Vegetarian Version: Use mushrooms, lentils, or white beans instead of chicken
  • Cheesy Filling: Stir in shredded cheddar or Parmesan
  • Herbed Crust: Mix fresh herbs into the dough for an aromatic twist
  • Mini Pot Pies: Use ramekins for individual servings — perfect for meal prep

How to Serve Chicken Pot Pie

This dish is hearty enough to stand alone, but pairs beautifully with:

  • A green salad with vinaigrette
  • Steamed green beans or broccoli
  • A glass of iced tea or white wine
  • Or just a cozy blanket and a fork on the couch!

Storing and Reheating Tips

To Store:

  • Cover leftover pie tightly with foil or transfer to an airtight container.
  • Refrigerate for up to 4 days.

To Reheat:

  • Oven: Cover loosely with foil and bake at 175°C (350°F) for 15–20 minutes.
  • Microwave: Use medium power to prevent the crust from getting rubbery.

To Freeze:

  • Freeze unbaked pot pie (assembled but not egg-washed) for up to 3 months.
  • Bake from frozen at 190°C (375°F) for about 1 hour, covering loosely with foil for the first half.

Grandma’s Secrets to the Best Pot Pie

  • Homemade broth = deeper flavor
  • Use leftover roast chicken for tenderness
  • Chill your dough before topping for better flakiness
  • Never skip the egg wash — it makes the crust shine
  • Let it rest before cutting — patience pays off!

Final Thoughts: A Crust Full of Memories

Chicken pot pie is more than a recipe — it’s a piece of heritage. It’s what grandma made when guests came over, when the weather turned cold, or when someone needed cheering up.

With every bite of tender chicken, buttery crust, and creamy filling, you’re not just tasting food — you’re tasting home, care, and generations of tradition.

Grandma’s Secret to the Perfect Rice Pudding: Creamy, Sweet, and Timeless

If you ever walked into grandma’s kitchen and caught the scent of vanilla, cinnamon, and warm milk, chances are she was making her famous rice pudding. Silky, sweet, and subtly spiced, this humble dessert has been passed down through generations — not just as a treat, but as a taste of comfort and tradition.

In this guide, you’ll learn how to make perfect, creamy rice pudding from scratch — the same way grandma did it: slow-cooked, simple, and made with love.

Why Rice Pudding Is a Classic Comfort Dessert

Rice pudding is one of those dishes that transcends trends. Here’s why it’s been loved for so long:

  • Uses basic pantry ingredients
  • Naturally gluten-free
  • Can be served warm or chilled
  • Customizable with fruits, spices, and toppings
  • Satisfies your sweet tooth without being too heavy

Most importantly, it brings back memories of slow, cozy evenings and warm kitchen tables.

Ingredients for Classic Rice Pudding

This recipe makes 4–6 servings.

Basic Ingredients:

  • 1 cup uncooked white rice (short- or medium-grain preferred)
  • 4 cups whole milk (or half milk, half cream for richer texture)
  • ½ cup granulated sugar
  • 1 cinnamon stick (or ½ tsp ground cinnamon)
  • 1 teaspoon vanilla extract
  • Pinch of salt
  • 1 egg (optional, for a thicker custard-style pudding)
  • 2 tablespoons butter (optional, for richness)

Optional Add-ins:

  • Raisins or chopped dried fruits
  • Lemon or orange zest
  • Ground nutmeg
  • Coconut milk for a tropical version
  • Sweetened condensed milk instead of sugar

Step-by-Step Instructions

1. Rinse the Rice

Rinse the rice under cold water until the water runs clear. This removes excess starch and prevents stickiness.

2. Cook the Rice (If Using Raw)

In a medium saucepan, bring 2 cups of water to a boil. Add the rice and a pinch of salt. Reduce the heat, cover, and simmer until the rice is just cooked, about 10–15 minutes. Drain if necessary.

Shortcut: You can use leftover cooked rice — just skip to the next step and reduce the total cooking time.

3. Simmer with Milk and Cinnamon

Add the milk, sugar, and cinnamon stick to the cooked rice. Stir gently and bring to a low simmer over medium heat.

Cook uncovered, stirring frequently, for 30–40 minutes, or until the mixture thickens and becomes creamy.

Stirring often prevents the milk from scalding and helps break down the rice for that silky texture.

4. Add the Egg (Optional)

For a custard-style pudding:

  • In a small bowl, beat one egg.
  • Slowly add a few tablespoons of hot rice pudding to the egg, whisking to temper it.
  • Then slowly stir the egg mixture back into the pot.
  • Continue to cook for 3–5 more minutes, stirring constantly.

5. Finish with Vanilla and Butter

Remove the pudding from heat. Discard the cinnamon stick.

Stir in the vanilla extract and butter (if using) for extra creaminess.

Let it rest for 5–10 minutes before serving. It will continue to thicken as it cools.

How to Serve Rice Pudding

You can enjoy this dish in many ways, just like grandma did:

  • Warm, straight from the pot — the ultimate comfort
  • Chilled, with a sprinkle of cinnamon on top
  • With fresh berries or banana slices
  • Topped with toasted nuts or coconut flakes
  • Drizzled with honey or caramel sauce

Grandma often sprinkled cinnamon sugar on top and served it in teacups for a charming touch.

Storage Tips

  • Refrigerate in an airtight container for up to 4 days.
  • Add a splash of milk before reheating to restore creaminess.
  • Best served warm or cold — not frozen, as texture may change.

Common Mistakes and How to Avoid Them

  • Boiling the milk too hard: Simmer gently to avoid curdling
  • Not stirring enough: Frequent stirring gives you that creamy texture
  • Using long-grain rice: It won’t break down as nicely
  • Adding sugar too late: Add early so it dissolves and thickens the mixture
  • Overcooking: Stop cooking when the pudding is still slightly loose — it will thicken as it cools

Make It Your Own: Creative Variations

Looking to experiment? Try these twists:

  • Chocolate rice pudding: Add cocoa powder and dark chocolate chunks
  • Coconut-lime version: Use coconut milk and add lime zest
  • Spiced chai version: Add cardamom, clove, and ginger
  • Maple and pecan: Stir in maple syrup and top with toasted nuts
  • Tropical twist: Use pineapple, mango, or passionfruit puree as topping

Final Thoughts: A Spoonful of Nostalgia

There’s a reason rice pudding has stood the test of time. It’s simple, soulful, and endlessly adaptable — a dessert that can be dressed up or kept plain, and always delivers warmth.

Grandma knew that the best recipes didn’t come from cookbooks. They came from memory, repetition, and a touch of love in every stir. Now, with this guide, you can bring that same warmth to your own table — one creamy spoonful at a time.

Grandma’s Biscuit Secrets: How to Make the Fluffiest, Buttery Biscuits from Scratch

Few smells rival the aroma of freshly baked biscuits wafting from the kitchen on a Sunday morning. Whether served with jam, gravy, or just a pat of butter, grandma’s biscuits were always light, flaky, and full of love. They weren’t made from a tube or box — they were hand-mixed, rolled with care, and baked to golden perfection.

In this article, we’ll uncover the secrets grandma used to make her legendary homemade biscuits — from ingredients and techniques to storage and serving suggestions.

Why Grandma’s Biscuits Were Always Better

Biscuits may seem simple, but achieving that perfect rise, tender crumb, and golden crust requires just the right technique. Grandma’s biscuits stood out because:

  • She used cold ingredients and handled them gently
  • She didn’t overwork the dough
  • She always baked them close together for a higher rise
  • And most of all — she made them often, with instinct and care

Let’s recreate that timeless comfort in your kitchen.

Ingredients You’ll Need

This recipe makes about 8 to 10 biscuits.

  • 2 cups all-purpose flour
  • 1 tablespoon baking powder
  • ½ teaspoon baking soda
  • 1 teaspoon salt
  • 6 tablespoons cold unsalted butter, cut into cubes
  • ¾ cup cold buttermilk (or substitute below)
  • Extra melted butter for brushing tops

Buttermilk Substitute:

  • ¾ cup milk + 1 tablespoon lemon juice or vinegar
  • Let sit for 5–10 minutes before using

Step-by-Step Instructions

1. Preheat the Oven

Preheat your oven to 220°C (425°F). Line a baking sheet with parchment paper or lightly grease it.

2. Mix the Dry Ingredients

In a large bowl, whisk together flour, baking powder, baking soda, and salt until well combined.

3. Cut in the Butter

Add the cold butter cubes. Use a pastry cutter, fork, or your fingers to blend the butter into the flour until the mixture resembles coarse crumbs with some pea-sized bits.

Grandma’s Tip: Keep everything cold. You can even chill the flour and bowl beforehand!

4. Add the Buttermilk

Make a well in the center and pour in the buttermilk. Stir gently with a spoon or spatula just until the dough comes together — don’t overmix.

The dough will look shaggy and slightly sticky. That’s perfect.

5. Knead Gently

Turn the dough out onto a floured surface. Pat it into a rough rectangle about 1 inch thick.

Fold the dough in half, rotate 90°, and pat it down again. Repeat this folding 3–4 times — this creates the beautiful layers in the finished biscuits.

Final thickness should be about ¾ to 1 inch.

6. Cut the Biscuits

Use a round biscuit cutter (or a drinking glass) to cut biscuits without twisting — twisting seals the edges and prevents rising.

Place the biscuits close together on the baking sheet for soft sides, or spaced apart for crispier edges.

7. Bake

Bake for 12–15 minutes, or until the tops are golden brown.

Remove from the oven and brush immediately with melted butter for extra flavor and softness.

8. Let Cool Slightly and Serve

Cool for a few minutes on a wire rack. Serve warm and enjoy the flaky, buttery goodness!

Serving Ideas: Grandma-Style

These biscuits were the foundation of many meals in grandma’s kitchen:

  • With homemade jam and butter
  • Split and topped with sausage gravy
  • Alongside fried chicken and greens
  • Used for mini sandwiches (ham and cheese, pulled pork)
  • Served with soup or stew

Pro tip: Leftover biscuits also make amazing breakfast sandwiches.

How to Store and Reheat

Storage:

  • Store cooled biscuits in an airtight container at room temperature for up to 2 days.
  • Refrigerate for up to 5 days, though they may dry out slightly.

Reheating:

  • Wrap in foil and warm in a 160°C (325°F) oven for 5–10 minutes.
  • Or microwave for 15 seconds (cover with a damp paper towel).

Freezing:

  • Freeze baked biscuits in freezer bags for up to 2 months.
  • Reheat in the oven straight from frozen for best results.

Tips for Biscuit Success Every Time

  • Don’t overwork the dough — gentle hands make tender biscuits
  • Keep everything cold until baking
  • Use real butter for the best flavor
  • Fold the dough to create layers, not just mix and roll
  • Bake hot and fast to encourage steam and rise

Common Mistakes to Avoid

  • Warm ingredients: causes flat, greasy biscuits
  • Overmixing: leads to tough texture
  • Using old baking powder: biscuits won’t rise
  • Cutting with a dull or twisted edge: compresses the dough

Final Thoughts: A Taste of Home in Every Bite

Grandma’s biscuits weren’t just food — they were tradition. A centerpiece at breakfast, a side at dinner, or a standalone snack, they brought warmth and satisfaction to every occasion.

Learning to make biscuits from scratch connects you to generations past — those who made more with less, and who knew how to transform flour and butter into joy.

Now let’s bring this cozy, flaky comfort food to life with a warm, ultra-realistic image of freshly baked biscuits on a rustic kitchen table.

How to Make Grandma’s Creamy Cornmeal Porridge: A Warm and Comforting Classic

Some dishes don’t need anything fancy to make them special. They don’t require exotic ingredients or modern techniques — just a few pantry staples, a pot, and someone who knows how to stir with love. One of those dishes is grandma’s creamy cornmeal porridge.

Rich, smooth, and subtly sweet, this traditional porridge is more than breakfast — it’s a hug in a bowl. Whether served warm on cold mornings or gently sweetened for an evening treat, this recipe is a timeless comfort food passed down through generations.

In this article, you’ll learn how to prepare creamy cornmeal porridge just like grandma did — with step-by-step instructions, variations, and tips to get that perfect texture every time.

What Is Cornmeal Porridge?

Cornmeal porridge is a smooth and creamy dish made from fine yellow or white cornmeal, simmered slowly in milk or water. Often flavored with cinnamon, nutmeg, vanilla, and sweetened with sugar or condensed milk, it’s a favorite in Caribbean, Southern, and rural kitchens around the world.

Unlike instant cereals, cornmeal porridge takes time — and that’s what makes it so delicious.

Ingredients You’ll Need

This recipe makes 2–3 generous servings.

Basic Ingredients:

  • 1 cup fine cornmeal (yellow or white)
  • 3 cups water
  • 2 cups milk (whole or evaporated preferred)
  • ½ teaspoon salt
  • 1 cinnamon stick (or ½ teaspoon ground cinnamon)
  • ½ teaspoon nutmeg (optional)
  • 1 teaspoon vanilla extract
  • 2–3 tablespoons sugar (or to taste)
  • 2 tablespoons sweetened condensed milk (optional, for richness)

Note: If using coarse cornmeal or polenta, you may need longer cooking time and more liquid.

Step-by-Step Instructions

1. Mix Cornmeal and Cold Water

In a medium bowl, whisk the cornmeal with 2 cups of cold water until smooth and lump-free.

Grandma’s Tip: Never add cornmeal directly to boiling liquid — always start with cold water to prevent clumps.

2. Bring Milk and Spices to a Simmer

In a medium saucepan, combine 1 cup of water, milk, salt, cinnamon stick, and nutmeg. Heat gently over medium heat until it starts to simmer — don’t let it boil.

3. Slowly Add Cornmeal Mixture

Reduce the heat to low. Slowly pour the cornmeal mixture into the simmering milk while stirring constantly with a whisk or wooden spoon.

Keep stirring gently to prevent sticking or lumps. The mixture will begin to thicken after 2–3 minutes.

4. Simmer Until Creamy

Continue to cook over low heat, stirring frequently, for 15–20 minutes, or until the porridge is thick and smooth. Add a little more water or milk if it becomes too thick too quickly.

5. Add Sweeteners and Flavor

Remove the cinnamon stick. Stir in the sugar, vanilla extract, and condensed milk (if using). Taste and adjust the sweetness to your liking.

Optional: For a touch of citrus, add a thin strip of orange peel while simmering.

6. Serve Warm

Serve the porridge warm in bowls. Sprinkle with extra cinnamon or nutmeg on top, and drizzle with more condensed milk or honey for extra indulgence.

Tips for the Perfect Porridge

  • Use fine cornmeal for a smooth texture — coarse varieties will need longer cooking.
  • Stir constantly in the beginning, then frequently as it thickens.
  • Cook on low heat to prevent scorching and allow the flavor to develop.
  • Let it rest for a few minutes before serving to thicken further and cool slightly.
  • Add warm milk before serving if you prefer a looser texture.

Variations Grandma Loved

Want to switch it up? Try these ideas:

  • Spiced version: Add clove, ginger, or allspice for a Caribbean flair.
  • Tropical version: Stir in mashed ripe banana or grated coconut.
  • Savory twist: Skip the sugar and add cheese, black pepper, and butter.
  • Fruit topping: Serve with sliced bananas, raisins, or berry compote.
  • Nutty version: Top with chopped walnuts, pecans, or almonds and honey.

How to Store and Reheat

Storage:

  • Let porridge cool completely.
  • Store in an airtight container in the fridge for up to 3 days.

Reheating:

  • Reheat in a saucepan over low heat, stirring constantly.
  • Add a splash of milk or water to loosen it up.
  • Stir until smooth and warm throughout.

It’s just as delicious the next day — grandma always made extra!

Is Cornmeal Porridge Healthy?

Absolutely! It’s:

  • Gluten-free (if using certified cornmeal)
  • A good source of complex carbohydrates and fiber
  • Easy to digest and naturally filling
  • Packed with calcium and protein when made with milk
  • Customizable for dietary needs (vegan, low-sugar, dairy-free)

Final Thoughts: A Bowl of Simplicity, Made with Love

Cornmeal porridge is a dish that reminds us of simpler times — of quiet mornings, kitchen warmth, and a grandma who knew how to make everything better with a wooden spoon and a gentle smile.

Whether you’re making it for breakfast, dessert, or just a moment of comfort, this recipe brings back that feeling of home. Creamy, soothing, and endlessly customizable, it’s one of those traditions that never goes out of style.

Grandma’s Classic Banana Bread: Moist, Sweet, and Made with Ripe Bananas

There’s something timeless and healing about a big pot of hot, homemade vegetable soup. No matter the season or occasion, grandma’s classic vegetable soup was always there to comfort — whether you were sick, sad, cold, or just hungry. Full of color, flavor, and simple ingredients, it was her way of saying, “Everything will be alright.”

In this article, you’ll learn how to recreate that old-fashioned vegetable soup that simmered gently on grandma’s stove — loaded with fresh vegetables, tender potatoes, and just the right seasoning.

Why This Soup Is So Special

Unlike fancy modern recipes or pre-packaged mixes, grandma’s vegetable soup was:

  • Flexible — she used whatever was in the fridge or garden
  • Nourishing — packed with real ingredients, vitamins, and fiber
  • Fragrant and slow-cooked — building layers of flavor over time
  • Easy to make in big batches for family dinners or freezing later

Best of all, it made the whole house smell like home.

Ingredients You’ll Need

This recipe serves 6–8 hearty portions.

Base Vegetables:

  • 2 tablespoons olive oil or butter
  • 1 medium onion, chopped
  • 2 garlic cloves, minced
  • 2 celery stalks, diced
  • 3 large carrots, peeled and sliced
  • 2 medium potatoes, cubed
  • 1 zucchini, diced
  • 1 cup green beans, chopped
  • 1 cup corn kernels (fresh or frozen)
  • 1 cup green peas (fresh or frozen)
  • 1 can diced tomatoes (400g / 14oz)

Broth and Seasonings:

  • 6 cups vegetable broth or water
  • 1 bay leaf
  • 1 teaspoon dried thyme
  • Salt and pepper to taste
  • Optional: 1 teaspoon smoked paprika or a pinch of chili flakes for warmth

Add-ins and Variations:

  • 1 cup shredded cabbage or kale
  • 1 can of beans (kidney, white, or chickpeas), drained
  • Small pasta (like elbow or ditalini), cooked separately
  • Fresh parsley or basil for garnish
  • Parmesan rind during cooking for extra flavor (optional)

Step-by-Step Instructions

1. Sauté the Base

Heat the oil or butter in a large pot over medium heat. Add the onions and cook until translucent. Stir in the garlic, celery, and carrots. Sauté for about 5–7 minutes until slightly softened.

2. Add the Broth and Hearty Veggies

Add the potatoes, tomatoes (with juice), bay leaf, thyme, and broth. Bring everything to a gentle boil.

Reduce heat and simmer for 20–25 minutes, or until the potatoes and carrots are nearly tender.

Grandma’s Tip: Keep the lid partially on for a richer broth.

3. Add the Remaining Vegetables

Add the green beans, zucchini, corn, and peas. Simmer for another 10–15 minutes, until all the vegetables are soft but not mushy.

If adding beans, leafy greens, or cooked pasta, stir them in now and cook for just a few minutes more.

4. Taste and Adjust

Season with salt and pepper to taste. Add any optional flavor boosts like paprika or chili flakes. Remove bay leaf before serving.

5. Let It Rest

Remove the soup from heat and let it sit for 5–10 minutes before serving. This allows the flavors to meld and deepen — grandma always insisted on this step.

What Makes This Recipe So Flexible?

One of the best things about grandma’s vegetable soup is how adaptable it is:

  • Out of peas? Add broccoli florets.
  • No potatoes? Try sweet potatoes, turnips, or pasta.
  • No broth? Use water and season generously.
  • No fresh veggies? Frozen works too.

This was a “use what you have” recipe — and it always worked.

How to Serve

Grandma’s vegetable soup was often the main course — simple, hearty, and served with:

  • Crusty bread or toast with butter
  • Homemade cornbread or cheese biscuits
  • White rice or noodles on the side
  • A sprinkle of grated Parmesan or cheddar on top

It’s also great as a starter for larger meals or packed in a thermos for school and work lunches.

How to Store and Reheat

Storage:

  • Let the soup cool completely.
  • Store in an airtight container in the fridge for up to 5 days.
  • Or freeze for up to 3 months — perfect for busy weeks!

Reheating:

  • Reheat gently on the stovetop over medium-low heat.
  • Add a splash of water or broth if it thickens too much in the fridge.
  • Stir often and taste before serving.

Grandma’s Tips for the Best Soup Every Time

  • Layer the flavors by adding vegetables in stages.
  • Don’t skip the garlic and onion — they are the aromatic base.
  • Use fresh herbs at the end for brightness.
  • Taste as you go — add salt gradually and adjust at the end.
  • Let it simmer slowly — never rush a good pot of soup.

The Power of a Pot of Soup

This isn’t just soup. It’s:

  • What you ate after playing outside in the cold
  • What grandma made when someone was sick
  • What filled the house with warmth on Sunday evenings
  • What taught you that simple food can be the most satisfying

A pot of vegetable soup is a pot of care, tradition, and nourishment.

Final Thoughts: A Bowl Full of Memories

Recreating grandma’s vegetable soup isn’t about perfection — it’s about comfort. It’s about taking what you have, adding love, and letting it simmer into something beautiful.

This recipe brings warmth to your kitchen and your heart, one bowl at a time.

Grandma’s Homemade Jam: A Simple Guide to Preserving Fruit the Old-Fashioned Way

Before store-bought jars filled grocery store shelves, jam was something you made at home — slowly, lovingly, and with seasonal fruit picked at just the right moment. Grandma’s homemade jam wasn’t just sweet — it was a labor of love, sealed into a jar and saved for months of joy.

In this complete guide, you’ll learn the traditional way grandma made her delicious jams — no preservatives, no fancy equipment, just fruit, sugar, time, and love.

Why Homemade Jam Is So Special

Homemade jam is more than just a spread. It’s:

  • A way to preserve summer’s fruit through the seasons
  • Richer and more flavorful than store-bought
  • Healthier — no additives, colorants, or artificial thickeners
  • A wonderful gift or memory-maker
  • Surprisingly easy to make with the right steps

The Basics: What You Need to Make Jam

The beauty of jam-making is in its simplicity. Here’s what grandma used:

Ingredients (for about 3 small jars):

  • 4 cups chopped fresh fruit (berries, plums, peaches, or apples)
  • 2 cups granulated sugar (adjust based on fruit sweetness)
  • 2 tablespoons lemon juice (for pectin and balance)
  • Optional: 1 teaspoon vanilla, cinnamon, or herbs for flavor variation

Tools:

  • Large saucepan or jam pot
  • Wooden spoon
  • Ladle
  • Clean glass jars with lids (sterilized)
  • Funnel (optional but helpful)
  • Thermometer (optional for precision)

No pectin needed — grandma’s jam thickened naturally through slow cooking and the natural pectin found in fruit and lemon juice.

Choosing the Right Fruit

You can use nearly any fresh, ripe fruit. Some favorites include:

  • Strawberries: Sweet, bright, and quick-cooking
  • Blueberries: Easy to clean and naturally high in pectin
  • Peaches and apricots: Soft, fragrant, and ideal for smooth jam
  • Apples and pears: Best for firmer, more textured spreads
  • Cherries or plums: Deep flavor and natural tartness

Use very ripe fruit — overripe is fine for jam, as long as it’s not spoiled.

Step-by-Step Instructions: Grandma’s Jam Method

1. Wash, Chop, and Measure

Thoroughly wash your fruit, remove stems/pits/peels as needed, and chop into small pieces. Measure out 4 cups of prepared fruit.

2. Combine Fruit and Sugar

In a large saucepan, add the fruit and sugar together. Stir gently and let it sit for 15–30 minutes. This maceration step draws out the fruit juices.

Add the lemon juice and any optional spices or flavorings.

3. Bring to a Boil

Place the pot over medium-high heat. Stir often as the sugar dissolves and the mixture begins to boil. Once it starts bubbling, lower the heat slightly to maintain a gentle rolling boil.

Skim off any foam that rises to the top with a spoon — this keeps the jam clear.

4. Simmer and Stir

Let the jam simmer uncovered for 30–45 minutes, stirring often. As it cooks down, it will become thicker and more concentrated. The fruit should break down and the liquid should begin to coat the back of a spoon.

5. Check for Doneness

There are a few ways grandma checked if jam was ready:

  • Freezer plate test: Place a small spoonful of jam on a chilled plate. Let it sit for a minute, then push it with your finger — if it wrinkles, it’s done.
  • Thermometer test: Jam sets around 105°C (220°F) at sea level.
  • Wooden spoon test: Lift a spoonful and let it fall — if it drips slowly in a sheet instead of running off, it’s ready.

6. Jar It Up

Carefully ladle the hot jam into sterilized jars, leaving about ¼ inch of headspace. Wipe rims clean, seal with lids, and either:

  • Refrigerate and consume within 1–2 months, or
  • Water-bath can for long-term storage (boil sealed jars for 10 minutes in a large pot of water to preserve shelf life)

Let the jars cool completely before storing.

Grandma’s Favorite Jam Flavors (You Can Try Too!)

  • Strawberry-Vanilla: Add a teaspoon of real vanilla to strawberry jam
  • Peach-Ginger: Fresh grated ginger brings brightness
  • Apple-Cinnamon: Cozy, spiced, and perfect for fall
  • Blueberry-Lemon: A citrus twist makes it pop
  • Cherry-Almond: A splash of almond extract adds depth

How to Store Homemade Jam

  • Keep sealed jars in a cool, dark place — pantry, cupboard, or cellar
  • Once opened, store in the refrigerator and use within 1 month
  • If the jam has any signs of spoilage (mold, strange smell, bubbling), discard it

Tip: Label each jar with the date and fruit used. It keeps your pantry organized and helps you track freshness.

Ways to Enjoy Grandma’s Jam

Jam isn’t just for toast! Try it:

  • On fresh butter biscuits or scones
  • Swirled into yogurt or oatmeal
  • As a filling for cakes or thumbprint cookies
  • Mixed into salad dressings or glazes for meat
  • Layered into parfaits or cheesecake bars

Common Mistakes to Avoid

  • Using low-quality fruit: The better the fruit, the better the jam
  • Undercooking or overcooking: Follow visual cues and do the freezer test
  • Skipping lemon juice: It helps the jam set and adds balance
  • Skipping sterilization: Always clean jars thoroughly to prevent spoilage
  • Rushing the process: Jam takes time — don’t boil too fast or you’ll burn the sugar

Final Thoughts: Sweet Tradition in a Jar

Grandma’s jam wasn’t just a recipe — it was an act of preservation, of both fruit and memory. It turned summer’s bounty into something to be enjoyed during the coldest days. It filled sandwiches, cakes, cookies, and hearts.

When you make your own jam, you’re continuing that legacy — connecting to a tradition of slowness, care, and home.

So grab that pot, pick your fruit, and let’s capture sunshine in a jar — just like grandma used to.

How to Make Grandma’s Apple Cinnamon Cake: A Moist, Fragrant Slice of Home

When the scent of cinnamon and baked apples fills the kitchen, you know something special is in the oven. Few things capture the essence of homemade comfort like grandma’s apple cinnamon cake — soft, buttery, and bursting with warm spice and juicy apple chunks. It’s the kind of cake you remember forever.

Whether it was served on a quiet afternoon or placed proudly at the center of the table during family gatherings, this cake always brought people together. In this guide, we’ll walk you through how to recreate grandma’s beloved recipe — a timeless classic that’s perfect year-round.

Why Apple Cinnamon Cake Is a Timeless Favorite

Apple cinnamon cake isn’t just another dessert — it’s a hug in every slice. It’s:

  • Moist and rich without being too sweet
  • Perfectly spiced and aromatic
  • Easy to make with basic ingredients
  • Ideal for any time of day — breakfast, snack, or dessert

Grandma’s version was especially magical. She didn’t need icing or fancy decorations. Just ripe apples, a pinch of cinnamon, and a whole lot of love.

Ingredients You’ll Need

This recipe makes one 9-inch round or square cake — about 8 generous slices.

For the Batter:

  • 2 cups all-purpose flour
  • 1 tablespoon baking powder
  • ½ teaspoon baking soda
  • ½ teaspoon salt
  • 1 teaspoon ground cinnamon
  • ¼ teaspoon ground nutmeg (optional)
  • ½ cup (1 stick) unsalted butter, softened
  • 1 cup granulated sugar
  • 2 large eggs
  • 1 teaspoon vanilla extract
  • 1 cup sour cream or plain yogurt (for extra moisture)

For the Apples:

  • 2 medium apples, peeled and chopped (use Granny Smith or Fuji for best results)
  • 1 tablespoon lemon juice
  • 1 tablespoon sugar
  • ½ teaspoon ground cinnamon

For the Topping (Optional but Delicious):

  • 2 tablespoons brown sugar
  • 1 teaspoon cinnamon
  • 2 tablespoons chopped walnuts or pecans (optional)

Step-by-Step Instructions

1. Prepare the Apples

Peel and chop the apples into small cubes. Toss with lemon juice, sugar, and cinnamon. Set aside so the apples can soften and absorb the flavor.

Grandma’s Tip: Letting the apples sit for 10–15 minutes brings out their juices and makes the cake even more moist.

2. Preheat the Oven and Prepare the Pan

Preheat your oven to 175°C (350°F). Grease and flour a 9-inch cake pan or line it with parchment paper for easy release.

3. Mix the Dry Ingredients

In a medium bowl, sift together the flour, baking powder, baking soda, salt, cinnamon, and nutmeg. Set aside.

4. Cream the Butter and Sugar

In a large bowl, beat the softened butter and sugar together until light and fluffy — about 2–3 minutes. Add the eggs one at a time, beating well after each.

Stir in the vanilla extract.

5. Add the Sour Cream and Dry Mix

Add the dry ingredients to the butter mixture in three parts, alternating with the sour cream or yogurt. Start and end with the dry ingredients.

Don’t overmix — stir until just combined for a soft, tender crumb.

6. Fold in the Apples

Drain any excess liquid from the apple mixture, then gently fold the apple cubes into the batter with a spatula.

7. Add Topping and Bake

Pour the batter into your prepared pan and smooth the top.

In a small bowl, mix the brown sugar, cinnamon, and nuts (if using). Sprinkle over the batter evenly.

Bake for 40–50 minutes, or until a toothpick inserted into the center comes out clean.

8. Cool and Serve

Let the cake cool in the pan for 15 minutes, then remove and transfer to a wire rack. Serve warm or at room temperature — with or without a dusting of powdered sugar.

How to Serve Apple Cinnamon Cake

This cake is incredibly versatile. Here are some of grandma’s favorite ways to serve it:

  • Warm with a scoop of vanilla ice cream
  • With coffee or tea for a cozy afternoon treat
  • As breakfast with a bit of butter or cream cheese
  • With caramel sauce drizzled on top

Storage Tips

  • Room temperature: Keep covered for up to 3 days.
  • Refrigerator: Up to 5 days, especially in warmer climates.
  • Freezer: Freeze slices wrapped individually for up to 2 months. Thaw at room temperature or gently warm in the oven.

Variations You Can Try

Want to make this cake your own? Try these twists:

  • Add raisins or cranberries with the apples
  • Use brown butter for a richer, nuttier taste
  • Add chopped nuts to the batter for texture
  • Use whole wheat flour for a more rustic finish
  • Replace apples with pears for a seasonal variation

The Magic of Homemade Baking

Baking grandma’s apple cinnamon cake isn’t just about dessert — it’s about reviving tradition. It’s about the smell that brings everyone into the kitchen. The warm slices handed out on little plates. The feeling that something made with care will always taste better.

In a world full of trends, this is one recipe that never goes out of style.

Final Thoughts: A Slice of Love

Whether you’re baking for a holiday, a family gathering, or a simple afternoon at home, grandma’s apple cinnamon cake is the kind of dessert that comforts, nourishes, and delights. Every bite brings you a little closer to her kitchen, her laughter, and her legacy.

Now let’s bring this delicious memory to life with a warm, realistic image of this beautiful apple cinnamon cake!